You don’t have always strip and refinish the wood to restore it to new.
Sometimes a simple clean, prep, and refinish will do the trick. Wood trim that has been up for a while can start to look lusterless and bang-up after a few years.
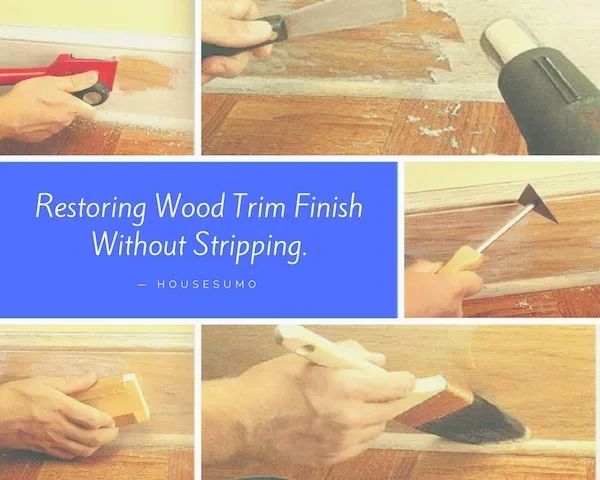
Restoring Wood Trim Finish Without Stripping
Sometimes paint from previous paint jobs will get spattered on the baseboards, and a stray wobble with the cut in brush may have left a bit of paint on the edges.
How do you go about cleaning up and restoring naturally stained and varnished wood trim without stripping?

Read Also:
- How to Produce a Hand Rubbed Satin Wood Finish, for Interior Architectural Wood Finishing
- Wood Filler and Wood Sealers, The Role of Sealers and Fillers in Wood Finishing
- How to Applying Wood Stain with Sprayer, Airless and HVLP Sprayer
- Stain Matching a Professional Painters Method, Matching Wood Stain
- How to Apply Polyurethane, Oil-based Polyurethane Wood Finish
- Painting Over Varnish: How to Paint Over Varnished Wood Trim
Start with Cleaning
You will have some dirt and grime on the doors and casings, and maybe some residues from cleaners used on the wood. As a rule, I like to use a water-based cleaner first.
A water-based cleaner like Krud Kutter will stay wet and open longer than a solvent cleaner, allowing more working time to scour the surface clean.
I would clean the trim a couple of times to be sure a thorough job is done. Spray or wipe it on, scour it with a scouring pad, then wipe it off.
Clean all the trim not just parts of it. Trim that has been up for a while can be grimy and will repel the new varnish if not clean. Clean the trim thoroughly.
(Note: waterbased cleaners may water spot a shellac or lacquer finish –test first before proceeding)
Read: Best Trim Router – Top Choices for Woodworkers
Solvent Cleaning
Follow up the first cleaning with a final solvent cleaning. I prefer to use a “deglosser” which will cut any remaining waxy, greasy residues that might be remaining.
Deglossers are strong. Use solvent resistant rubber gloves and open the windows to provide ventilation during use.
Rags used with deglosser can be spontaneously combustible and should be hung up to dry in a well-ventilated area, outside of the house, and out of reach of children and pets, before disposal.
A solvent deglosser is a better de-waxer than the waterbased Krud Kutter and will ensure that any Pledge or furniture wax is removed.
Scour the deglosser on with a scouring pad, and wipe off with a clean rag.
Remember, that these rags are flammable, and hang them out to dry, don’t clump them together, put them in a metal bucket with a lid cover, until you get a chance to hang them up to dry at the end of the day. See Footnote**
Old Latex Paint Spatters
Most deglossers are strong enough to remove old latex paint spatters and should be used to clean the wood trim from such.
The trim will not look very good with a nice new finish on it – over the top of old paint spatters and goofs.
Remove White Water Spotting
Water left on shellac and lacquer finishes can cause white rings and spots. To remover these rings you need to dissolve the finish where the ring or spot has occurred.
You can use a commercial ring remover or you may be able to remove them with a concentrated scouring with the deglosser.
Be careful not to rub off the stain under the clear finish. If you do damage the stain, you will need to touch it up before the application of a new varnish coat.
Light Scuff Sand
Do a light sanding with 220 grit and/or scour pad scouring to degloss and “re-surface” the old finish.
Be careful and don’t rub through the clear coat or you will remove the old stain too (which will then have to be repaired).
Wipe down the wood with a microfiber tack cloth to remove any dust. Don’t use standard tack cloths that contain potential finish repelling oils.
Stain Touch Ups
There will probably be some worn, chip, and damaged areas that will need to be touched up with stain prior to varnishing.
You may try using a color-matched penetrating stain for this, but you may find that the wood is sealed enough to prevent the stain from “taking” hold. A better choice would be a wiping or gel type of stain.
These stains are good for surface staining of sealed surfaces and will also penetrate raw unsealed wood too.
Old Masters wiping stain is a good one for this type of tough up staining. Match up the closest color to the existing stain and go with that color.
Allow the wiping or get the stain to dry for 24 – 48 hours before varnishing, if you varnish too soon, the varnish will pull off the not-quite-dry stain as you apply the varnish.
Varnishing
Use a user-friendly oil-based varnish. I recommend Zinsser’s Quick 15 (either satin or gloss). Don’t use a waterbased clear coat or a standard oil/polyurethane, they may not adhere to the previous finish.
Use a china bristle brush, which you may want to throw away once you are done, rather than clean out with solvent.
Usually, one coat will do unless the surface is worn badly.
You can use a sponge roller for application on doors or other large areas, but follow the rolling up with a “tipping off” with your brush to smooth out any stipple and air bubbles.
Read Also:
Shading Varnish
If you have a really worn area or two, you may want to blend these areas with a shading varnish.
You can mix a small amount of oil-based stain (like Old Master’s Wiping Stain), with some of the oil-based varnish (Quick 15), and spot over the worn areas with a thin coat of shaded varnish to blend.
Quick 15 will dry quickly (in 15 minutes to an hour), at which time you will apply a full coat of clear, untinted varnish to the whole piece. See Shading Varnishes
Optional: Buff and Wax
You will find that one coat of quick-dry varnish over an already sealed surface will result in a pretty good finish when dry.
There should be little if any dust in the finish and no raised grain to ruin the smooth final coat of varnish.
You can buff out the final finish using wax (see Wood Finishing Wax) after the finish has a chance to harden for a week or so.
** “Hang rags contaminated with solvent or wood preservatives and stain outside or spread them out to dry on a nonflammable surface outside away from your house and other outbuildings. The area must be away from potential ignition sources, children, and pets. When completely dry, the rags can be put in a trash bag and placed in the trash. Store the trash bag outside until trash pickup day”.
** “These procedures are intended for rags contaminated by household use of solvents or wood preservatives and stains only”


 6")

 8")


1 comment
Good article for someone who is doing maybe a small room.
If like me, having to redo an entire house of wood base, 6 panel doors and trim, this would take a year. Most people will clean the wood thoroughly and then put a coat or two of satin or gloss water-based polyurethane.