Introduction
Wood is a timeless material that brings warmth and character to any project. Applying polyurethane is crucial for protecting and enhancing your wood surfaces. Polyurethane acts as a barrier, guarding against wear, moisture, and damage while highlighting the natural beauty of the wood.
In this article, we will focus on how to apply oil-based polyurethane, one of the most popular wood finishes. It offers enhanced durability and a warm amber tone that deepens over time, giving your wood projects a sophisticated and modern look. From start to finish, we’ll provide you with a comprehensive guide to achieve professional results.
Ready to transform your woodworking projects with a flawless finish? Dive into our step-by-step guide and discover techniques that will elevate your craftsmanship.
For additional insights into wood finishing, you might find these resources helpful:
- If you’re also looking to match wood putty for seamless repairs in your woodworking projects, check out this guide on how to match wood putty.
- Are you interested in restoring the finish on your wood trim? This informative article on restoring wood trim finish will provide you with valuable insights.
Understanding Polyurethane and Wood Finishes
Polyurethane is a versatile protective finish that enhances the appearance and durability of wood surfaces. There are two primary types: oil-based and water-based polyurethane, each with unique characteristics.
Oil-Based Polyurethane
Oil-based polyurethane is renowned for its enhanced durability and warm amber tone. This type of finish:
- Provides superior protection against wear and tear, making it ideal for high-traffic areas like floors and tabletops.
- Enhances the natural beauty of wood by imparting a rich, amber hue that deepens over time.
- Requires fewer coats due to its thicker consistency, which can save time in the application process.
This makes oil-based polyurethane a popular choice for projects where both durability and aesthetic enhancement are priorities.
Water-Based Polyurethane
The water-based polyurethane offers a different set of advantages:
- Low odor and quick drying time, which is particularly beneficial for indoor projects.
- Clear finish that preserves the natural color of the wood without adding an amber tint.
- Easier clean-up, as it requires only soap and water, unlike oil-based finishes that need mineral spirits or paint thinner.
Water-based polyurethane is often chosen for projects where maintaining the original wood color is essential or when a faster project turnaround is needed.
Comparison: Oil-Based vs. Water-Based Polyurethane
Understanding the key differences between these two finishes can help you decide which one to use for your project:
| Category | Oil-Based Polyurethane | Water-Based Polyurethane |
|---|---|---|
| Durability | High | Moderate |
| Appearance | Warm amber tone | Clear |
| Drying Time | Slower | Faster |
| Odor | Strong | Low |
| Clean-Up | Requires solvents | Soap and water |
| Number of Coats | Fewer | More |
The choice between oil-based and water-based polyurethane typically depends on your project requirements. For instance, if you’re refinishing hardwood floors in a busy household, oil-based might be the way to go due to its robustness.
On the other hand, if you’re working on cabinetry or indoor furniture where smell and drying time are concerns, a water-based finish could be preferable.
Guidelines for Choosing Based on Project Requirements
Selecting the right type of polyurethane involves considering several factors:
1. Project Location
- High Traffic Areas: Oil-based polyurethane is ideal for areas like floors or kitchen countertops where durability is paramount.
- Indoor Furniture: Water-based polyurethane works well for items like cabinets or desks due to its low odor and quicker drying time.
2. Desired Aesthetic
- Natural Wood Color: If preserving the natural color of the wood is important, opt for water-based polyurethane.
- Warm Finish: Choose oil-based polyurethane to achieve that rich, warm look.
3. Application Conditions
- Ventilation: Ensure good ventilation when using oil-based polyurethane due to its strong fumes.
- Time Constraints: Water-based finishes dry faster, allowing multiple coats to be applied in a shorter timeframe.
Choosing the Right Polyurethane Finish
Selecting the appropriate polyurethane finish is crucial to achieving the desired look and durability for your woodworking project. Each type of sheen available in polyurethane finishes has a unique impact on the final appearance of the wood surface.
Sheen Options
Polyurethane finishes come in several sheen levels, each providing a distinct look:
- Flat/Matte Finish: This sheen offers a natural wood appearance with minimal shine. It conceals imperfections well but might not be as durable as glossier options.
- Satin Finish: Providing a subtle sheen, satin finishes strike a balance between gloss and matte. They conceal dirt and scratches effectively, making them an excellent choice for high-traffic areas.
- Gloss/Semi-Gloss Finish: These finishes offer a reflective surface that highlights the wood grain beautifully. While they provide superior durability, they also tend to show imperfections more readily.
Considerations for Selecting Sheen
When choosing the right sheen for your project, consider the following factors:
1. Style Preference:
- If you prefer a rustic or antique look, a flat/matte finish may be ideal.
- For contemporary or modern aesthetics, satin or semi-gloss finishes often work best.
- High-gloss finishes suit projects where you want a sophisticated and polished appearance.
2. Durability Needs:
- High-traffic furniture pieces like kitchen tables or countertops benefit from gloss or semi-gloss finishes due to their enhanced durability.
- Satin finishes are suitable for general-use furniture where moderate durability is adequate.
- Flat/matte finishes work well on decorative items that do not endure heavy use.
3. Project Requirements:
- Water-based polyurethanes are excellent for indoor projects where low odor and quick drying times are priorities.
- Oil-based polyurethanes should be used on surfaces exposed to heat or moisture due to their superior durability and warm amber tone over time.
Understanding these distinctions ensures you select the most appropriate polyurethane finish for your specific project needs. Proper preparation of your workspace is equally essential in achieving professional results.
For instance, sanding polyurethane between coats helps create a smoother and more even finish, enhancing the overall appeal of your project.
To further improve the quality of your work, it’s important to prepare the wood for recoat effectively. This resource offers valuable guidance on this subject.
Preparing the Workspace and Materials
1. Workspace Preparation
Proper workspace preparation is essential to achieve a flawless polyurethane finish. The right setup can help you avoid common pitfalls such as dust contamination, inadequate ventilation, and accidental damage to surrounding areas.
Ventilation Setup
Ensuring proper ventilation is crucial when working with oil-based polyurethane due to its strong fumes. Here’s how you can set up a ventilated workspace:
- Choose a well-ventilated area: Ideally, work in an outdoor space or a garage with open doors and windows.
- Use fans: Place exhaust fans or create a cross-breeze by positioning fans at opposite ends of the room to ensure continuous airflow.
- Wear protective gear: Equip yourself with a respirator mask specifically designed for solvent fumes to protect your respiratory system.
Protective Covering
Keeping your workspace clean and protected from spills and drips is equally important. Follow these steps for effective protection:
- Cover the floor: Use drop cloths or old sheets to shield the floor from polyurethane drips.
- Protect surrounding surfaces: For indoor projects, cover nearby furniture and walls with plastic sheeting or newspaper.
- Secure coverings: Tape down the edges of the coverings to prevent them from shifting during your work.
2. Sanding Process
Sanding is a critical step in ensuring a smooth and even application of polyurethane. It helps to create a flawless base by removing any imperfections, old finishes, or rough spots on the wood surface.
Why Sanding is Important
Before you begin applying polyurethane, sanding the wood surface is essential for several reasons:
- Creates a Smooth Surface: Sanding eliminates any rough patches and provides a uniform texture for the polyurethane to adhere to.
- Removes Imperfections: It helps get rid of scratches, dents, and previous finishes that may interfere with the new finish.
- Enhances Adhesion: A properly sanded surface ensures better adhesion of the polyurethane, resulting in a longer-lasting finish.
Selecting the Right Sandpaper Grits
Choosing the appropriate sandpaper grit is crucial for achieving the desired smoothness without damaging the wood. Here’s a guide to help you select the right grits:
- Medium Grit (100-grit): Ideal for initial sanding to remove old finishes or rough patches.
- Fine Grit (150-grit): Used for smoothing out the surface after medium grit sanding.
- Extra-Fine Grit (220-grit): Perfect for final sanding before applying polyurethane, ensuring a silky-smooth finish.
Sanding Techniques
Proper sanding techniques are just as important as choosing the right sandpaper. Follow these steps for effective sanding:
- Start with Medium Grit: Begin by using 100-grit sandpaper to remove any old finishes or uneven spots. Always sand in the direction of the wood grain to avoid scratches.
- Progress to Fine Grit: Switch to 150-grit sandpaper to further smooth out the surface. Continue sanding with the grain.
- Finish with Extra-Fine Grit: Use 220-grit sandpaper for your final pass, ensuring an ultra-smooth surface ready for polyurethane application.
Remember:
- Use consistent pressure while sanding to avoid creating dips and uneven areas.
- For large surfaces, consider using an electric sander to save time and effort.
Essential Materials and Tools
To prepare your workspace and achieve professional results, gather these essential materials and tools:
- Sandpaper in various grits (100, 150, 220)
- Electric Sander (optional but recommended for large surfaces)
- Mineral Spirits: To clean and prepare the wood before applying polyurethane
Application tools such as:
- Brush
- Rag
- Aerosol Spray
Ensure your workspace is well-ventilated. Set up proper ventilation using fans or an exhaust system if working indoors. Protect surrounding areas with suitable coverings like drop cloths or plastic sheets.
By carefully selecting your sandpaper grits and employing proper sanding techniques, you’ll create an ideal base for applying polyurethane. This preparation will significantly enhance the quality and durability of your final finish.
3. Surface Cleaning and Conditioning
Creating a pristine surface before applying polyurethane is crucial for achieving a professional finish. A clean and well-conditioned wood surface ensures better adhesion of the polyurethane, which translates to a smoother and more durable finish.
Essential Materials and Tools
To start, gather the following materials:
- Sandpaper: Different grits (100, 150, 220)
- Mineral spirits
- Wood filler
- Stain (optional)
- Brush
- Rag
- Aerosol spray
- Protective covering
Preparing the Surface
- Filling Cracks and Gaps: Inspect the wood for any cracks or gaps. Use a wood filler to fill these imperfections. Apply the filler with a putty knife, ensuring it is level with the surface of the wood. Let it dry completely before moving to the next step. This resource on wood filler application might be helpful.
- Sanding: Sanding is essential for a smooth base. Start with medium-grit sandpaper (100-grit) to remove rough surfaces and old finishes. Follow with fine-grit (150-grit) and then extra-fine (220-grit) sandpaper for a silky-smooth finish. Always sand with the grain of the wood to avoid scratches.
- Stain Application (Optional): If you desire to enhance the color of your wood, apply a stain at this stage. Use a rag or brush to apply the stain evenly across the surface, following the manufacturer’s instructions for drying times. Here’s an informative guide on how to apply gel stain to finished wood that you might find useful. For insights on staining previously stained wood, check out this resource.
- Surface Cleaning with Mineral Spirits: After sanding and staining, clean the surface thoroughly using mineral spirits. Dampen a rag with mineral spirits and wipe down the entire surface to remove any dust or residues left from sanding. This step ensures that no particles will interfere with polyurethane adhesion.
Note: Mineral spirits can emit strong fumes and cause chemical burns, so always wear protective gear such as nitrile gloves, goggles, and a respirator.
Ensuring Proper Ventilation
Proper ventilation is essential when working with polyurethane due to its strong fumes:
- Set up your workspace in an area with good airflow.
- Use an exhaust fan or create a cross-breeze by opening windows on opposite sides of the room.
- If working indoors, consider wearing a professional-grade ventilator mask.
Protective Covering
Before starting any application process:
- Cover surrounding areas with protective materials like drop cloths or plastic sheets.
- This prevents accidental drips or spills from damaging other surfaces.
By taking these steps, you’re ensuring that your workspace is ready for applying polyurethane efficiently and safely. The cleaning and conditioning phase sets the foundation for achieving that sophisticated and modern look you’re aiming for in your woodworking project.
For more detailed guidance on finishing techniques, including polyurethane application and other finishes such as varnish or lacquer, be sure to consult reliable sources or seek advice from experienced woodworkers.
With proper preparation and attention to detail, you’ll be well on your way to achieving a beautiful and durable finish on your woodworking projects.
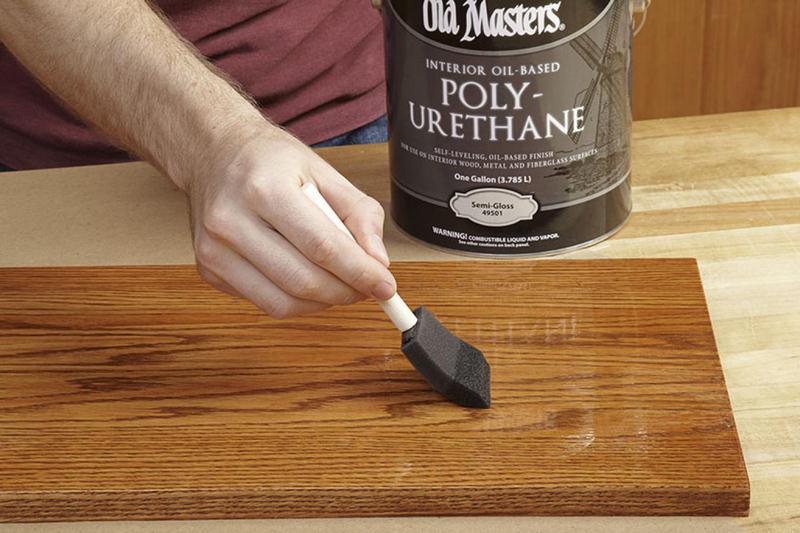
Applying Polyurethane like a Pro
When it comes to applying polyurethane on wood, there are some key steps you can take to ensure a professional-looking finish. In this guide, we’ll walk you through the process from start to finish, covering everything from sealing the wood to sanding between coats.
1. First Coat Application
The first coat of polyurethane is crucial for preparing the wood surface and creating a smooth foundation for subsequent coats. Here’s how you can apply the first coat like a pro:
Seal the Wood:
Before applying the full-strength coat of polyurethane, it’s important to seal the wood with a diluted mixture of mineral spirits and polyurethane. This serves multiple purposes:
- Improves Adhesion: Ensures that the subsequent coats of polyurethane bond effectively to the wood surface.
- Reduces Grain Raising: Minimizes the tendency of the wood grain to swell and become rough, which can happen when applying the first coat directly.
- Speeds Up Drying Time: The addition of mineral spirits helps the mixture dry faster, allowing you to proceed more quickly with additional coats.
To create the perfect sealing mixture, follow these guidelines:
Gather Your Materials:
- Oil-based polyurethane
- Mineral spirits
- A clean mixing container
- Stir stick
Mixing Ratio:
- Combine 2 parts oil-based polyurethane with 1 part mineral spirits. This 2:1 ratio ensures an effective seal without overly thinning the polyurethane.
Stirring Technique:
- Use a stir stick to mix thoroughly. Ensure there are no lumps or bubbles in your mixture.
Application Method:
- Using a high-quality brush, dip into your mixed solution and apply it in long, even strokes following the grain of the wood.
- Cover all areas uniformly but avoid overloading your brush to prevent drips and runs.
Drying Time:
- Allow the sealed coat to dry completely before moving forward. Typically, this drying period will be less than 24 hours thanks to the mineral spirits.
Apply the First Full-Strength Coat:
- Once the sealed coat is dry, it’s time to apply the first full-strength coat of polyurethane. Follow these steps for the best results:
Preparation:
- Stir your polyurethane gently with a stir stick; avoid shaking as this introduces air bubbles.
Application:
- Dip your brush lightly into the polyurethane and tap off any excess against the side of your container.
- Apply with long, even strokes following the grain of the wood.
- Work in manageable sections, overlapping each stroke slightly for an even finish.
Drying Time:
- Allow this coat to dry thoroughly before proceeding to sanding or additional coats. Typically, drying time is about 24 hours but check manufacturer recommendations.
By following these steps, you’ll ensure that your first coat of polyurethane goes on smoothly and sets the stage for a beautiful finish.
2. Coating Process
Applying polyurethane to wood can be done using different techniques tailored to the nature of the wood surface. The method you choose will impact the finish quality and ease of application.
Brush Application
For flat surfaces, a brush is often the go-to tool. Here’s how to achieve a flawless finish:
- Choose the Right Brush: Use a high-quality, natural bristle brush for oil-based polyurethane.
- Dip and Dab: Dip the brush into the polyurethane, covering about one-third of the bristles. Dab off excess on the edge of the container to prevent drips.
- Apply with the Grain: Brush in long, even strokes following the grain of the wood to minimize brush marks.
- Smooth Out Drips: Check for any drips or bubbles and smooth them out gently with your brush.
Rag Application
For contoured or curved surfaces, a rag provides better control and coverage:
- Prepare Your Rag: Fold a lint-free cloth into a palm-sized square.
- Dampen and Apply: Dip one edge of the rag into the polyurethane mixture. Wipe it onto the wood in overlapping strokes, ensuring even coverage.
- Follow the Grain: Always wipe along the grain to maintain consistency.
Aerosol Spray Application
For intricate details or hard-to-reach areas, aerosol spray offers precision:
- Protect Surroundings: Cover nearby areas with protective film or newspapers to prevent overspray.
- Shake Well: Shake the can thoroughly before use to ensure even distribution of polyurethane.
- Short Bursts: Spray in short bursts from about 8-12 inches away, moving consistently to avoid drips and heavy spots.
- Overlap Layers: Overlap each pass by about half to ensure uniform coverage.
3. Drying and Sanding Between Coats
To achieve a flawless finish with polyurethane on wood, it’s important to focus on two key steps: drying and sanding between each coat. These steps are essential for anyone looking to master the art of applying polyurethane.
Tips for Proper Drying Time
Here are some tips to keep in mind when it comes to drying time:
- Be Patient: Allow each coat of polyurethane enough time to dry completely before moving on to the next one. For oil-based polyurethane, this usually means waiting at least 24 hours.
- Consider the Environment: Remember that factors like temperature and humidity can affect how long it takes for the polyurethane to dry. Make sure your workspace is well-ventilated but also free from excessive dust and debris.
- Try the Touch Test: A simple touch test can help you determine if the surface is ready for sanding. The coat should feel dry to the touch and not sticky or tacky.
Step-by-Step Guide for Sanding Between Coats
Here’s a step-by-step guide on how to properly sand between coats of polyurethane:
- Choose the Right Sandpaper: Opt for extra-fine (220-grit) sandpaper when sanding between polyurethane coats. This grit level is perfect for smoothing out any imperfections without removing too much of the finish.
- Master Your Technique: Always sand in the direction of the wood grain to avoid creating scratches on the surface. Keep the sandpaper flat against the wood and apply light, even pressure as you sand.
- Get Rid of Imperfections: Focus on getting rid of any runs, drips, or bubbles that may have appeared during the application process. Use a gentle circular motion if necessary to smooth out these areas.
- Clean Up the Dust: After sanding, make sure to remove all dust particles from the surface. You can use a vacuum with a soft brush attachment or a damp cloth followed by a dry wipe-down to get the job done.
Sealing with Mineral Spirits and Polyurethane Mixture
Before applying additional coats of polyurethane, it’s beneficial to seal the wood with a diluted mixture of mineral spirits and polyurethane. This helps improve adhesion and ensures a more even finish overall.
Here’s what you need to know about this sealing process:
- Mixing Ratio: Combine two parts polyurethane with one part mineral spirits in a clean container.
- Application Method: Use a brush or rag to apply this mixture onto the wood, following the direction of the grain for a smooth and consistent coating.
Applying Thin and Even Coats
When it comes to actually applying the polyurethane onto the wood, there are two main methods you can choose from; brush application or rag application. Both techniques have their advantages, so feel free to use whichever one you’re more comfortable with.
Brush Application:
- Dip your brush into the polyurethane mixture, making sure it’s not overloaded with product.
- Apply the polyurethane onto the wood using long, even strokes that follow the direction of the grain.
Rag Application:
- Fold a clean rag into a small square that fits comfortably in your hand.
- Dip one edge of the rag into the polyurethane mixture, then gently wipe it onto the wood surface.
- Continue this process, overlapping each pass slightly, until you’ve covered the entire area.
Remember, it’s important to apply thin coats of polyurethane to avoid any runs or drips while also ensuring that each layer dries evenly. This technique gives you better control over the final appearance and texture of the finish.
By following these guidelines for drying time and sanding between coats, you’ll be able to achieve superior results when applying polyurethane to wood. Each step builds upon the previous one, leading to a smooth and durable finish that enhances the natural beauty of your woodworking project.
4. Applying the Final Coat and Finishing Touches
To achieve a flawless finish for your woodworking project, it’s important to pay close attention to the final coat application. This last layer serves two purposes: sealing the previous coats and enhancing the wood’s appearance with added protection and shine.
Applying the Final Coat
When you’re ready to apply the final coat of polyurethane, follow these steps:
- Prepare your workspace: Make sure your work area is clean and free from dust or debris.
- Mix the polyurethane: Gently stir the oil-based polyurethane to avoid creating air bubbles.
- Choose the right applicator: For flat surfaces, use a high-quality brush with natural bristles. For curved or detailed areas, opt for a lint-free rag.
- Apply thin and even coats: Dip your brush or rag lightly into the polyurethane and apply it in long, smooth strokes following the direction of the wood grain. Remember to use thin coats to prevent drips and bubbles.
- Avoid excessive brushing: Overworking the polyurethane can lead to streaks and bubbles. Aim for smooth, even coverage without going back over areas multiple times.
Allowing Sufficient Drying Time
After applying each coat of polyurethane, it’s crucial to allow enough time for drying and curing. Here are some tips:
- Check for dryness: Lightly touch a hidden area of the wood to see if it feels dry to the touch. If it’s still tacky or sticky, give it more time to dry.
- Follow manufacturer’s instructions: Different brands or types of polyurethane may have specific drying times, so always refer to the product label for guidance.
- Create optimal drying conditions: Ensure that your workspace is well-ventilated and maintained at a consistent temperature. This will help speed up the drying process and prevent issues like trapped dust or uneven drying.
Light Sanding Between Coats
To achieve a smooth and professional-looking finish, consider doing some light sanding between coats of polyurethane. Here’s how:
- Wait for the previous coat to dry: Before sanding, make sure that the previous coat of polyurethane is completely dry and cured.
- Use fine-grit sandpaper: Choose an extra-fine (220-grit) sandpaper to gently sand the surface of the wood. This will help remove any small imperfections or raised grain.
- Remove sanding dust: After sanding, use a vacuum or a tack cloth to remove any dust particles from the wood surface. This will ensure a clean base for applying the next coat of polyurethane.
Buffing for Added Shine
If you want to take your woodworking project to the next level of polish and smoothness, consider buffing the final coat of polyurethane. Here are two methods you can try:
- Using steel wool: Once the final coat has dried completely, take a piece of 0000 steel wool and lightly buff the surface in circular motions. This gentle abrasion will help create an ultra-smooth finish.
- Applying polishing paste: For an extra boost of shine, apply a small amount of paste wax onto a soft cloth and work it into the wood using circular motions. Continue buffing until you achieve the desired level of sheen.
By following these steps, you can ensure that your woodworking project not only looks sophisticated but also remains well-protected against daily wear and tear.
Conclusion
Applying polyurethane is both an art and a science, important in woodworking finishing techniques and furniture refinishing methods. This protective coating not only enhances the natural beauty of wood but also makes it more durable against damage.
Embarking on your polyurethane application journey gives you the ability to turn ordinary wood projects into impressive works of art. Whether you’re protecting a treasured family piece or giving a new creation a sleek and contemporary appearance, mastering these techniques guarantees professional-looking results.
Your next woodworking project is waiting for you. With this complete guide, confidently enter your workshop and start the transformation. Your woodwork deserves nothing less than a perfect finish!
FAQs (Frequently Asked Questions)
Oil-based polyurethane offers high durability, a warm amber tone, slower drying time, strong odor, solvents for clean-up, and fewer coats. On the other hand, water-based polyurethane provides moderate durability, a clear finish with low odor, fast drying time, easy clean-up with water, and requires more coats for application.
For high-traffic areas, oil-based polyurethane is the ideal choice due to its enhanced durability.
When using oil-based polyurethane, it is crucial to ensure good ventilation in the application area to minimize exposure to strong odors and harmful fumes.
Sanding the wood surface before applying polyurethane is important to achieve a smooth and even finish by removing imperfections and creating a suitable surface for the coating to adhere to.
To prepare the workspace, essential materials include sandpaper of different grits, protective covering for the surrounding area, and proper ventilation setup.
Polyurethane can be applied using brush application for flat surfaces, rag application for contoured or curved surfaces, and aerosol spray application for intricate details or hard-to-reach areas.
