DIY plumbing on a new bathtub is a project that can save you a lot of money as opposed to getting a plumber in arlington to carry out the work, as long as a few principles are observed.
Attention must be paid to sealing against the bathroom wall, as well as piping, drains and overflow connections.
DIY Plumbing a New Bathtub: How to do Plumbing on a New Bathtub
Read Also:
- Top Four DIY Backyard Project Mistakes and Their Solutions
- DIY Chain Link Fence: What Everybody Ought to Know
- Is Your Home Safe From the Dangers of Polybutylene?
- Benefits of Installing a Chilled and Boiling Water Tap
- DIY Project to Install Outdoor Kitchen Cabinets
- DIY Method: How to Clean Leather Furniture
Introduction, DIY Plumbing a New Bathtub
Plumbing in a new bathtub is a relatively straightforward project, provided a few basic rules are observed. These include the use of flexible water pipes to connect the taps to the supply and ensuring all sealing washers are fitted correctly.
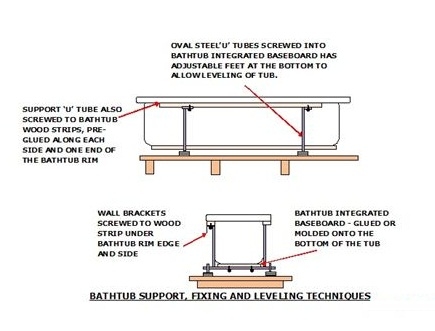
The bathtub is supplied with supporting cradles which must be fitted correctly and adjusted to ensure that the bathtub is level.
This is an article on fitting a bathtub, and in particular how to do plumbing in a new bathtub. We begin with a fitting of a bathtub, and then move on to the plumbing of a new bathtub.
Fitting and Plumbing a New Bathtub
The new bathtub will be supplied complete with the fittings to install it, along with waste drains and an overflow unit, however, the taps will have to be purchased separately, as well as a silicon bathroom sealant and a pair of flexible pipes.
The new bathtub should be fitted in the following sequence:
1. Bathtub Supports and Wall Brackets
- Turn the bathtub upside down and fit the steel ‘U’ supports to the baseboard that is molded to the bottom of the bath.
- Fit the top of the ‘U’ support rod to the plastic brackets in the wood strip underneath the bath rim.
- Turn the bathtub the right way up and fit the wall brackets to the wood strips along one side of the bathtub and the back edge.
2. Taps, Overflow and Drain
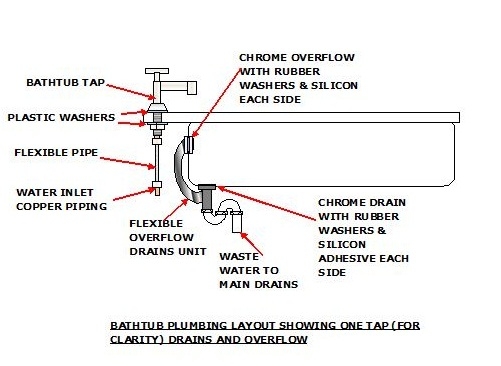
- Remove the lock nut and one washer from the tap stem, and insert the stem through one of the tap-holes in the bathtub rim. Line up the tap and washer, then fit the other washer and locknut from underneath and tighten it while keeping the tap straight. Repeat for the other tap.
- The drain and overflow are now supplied as a combined unit. The overflow pipe is a flexible rubber hose fitted into the drain outlet pipe. Unscrew the overflow pipe from the chrome grill keeping one rubber washer on the grill stem. Push the stem through the overflow hole. Fit the other rubber washer to the overflow pipe connection, squeeze a smear of silicon round each washer and then tighten up the unit. The drain unit is fitted the same way. Remember to smear a little silicone sealant onto the rubber washers.
3. Fitting and Leveling of the Bathtub
- Lift the bathtub into its final position, and using the adjustable feet, level the bath using a spirit level on the rim and tighten the adjuster locknuts.
- Using a sharp pencil, mark the holes through the wall brackets onto the walls.
- Remove the bathtub again, drill and rawl-plug the bracket holes into the walls.
- Replace the bath and screw the brackets to the walls, rechecking the level of the bathtub before fully tightening the screws.
4. Plumbing the Taps
- The copper hot and cold supply pipes are connected to the taps using the flexible pipe connectors. These are supplied with the correct size of compression fittings to fit the taps and the water supply copper pipes.
- Remove the nut and olive from the tap end of the Flexi-pipe, and slip it onto the hot tap copper pipe, reconnect the Flexi-pipe and tighten, using a pair of open-end spanners.
- Connect the other end of the Flexi-pipe to the hot water supply copper pipe, using the same method.
The cold water tap is connected using the same technique.
5. Testing the System for Leaks
- Make sure both taps are shut off, and the drain plug is in the drain.
- Open the hot and cold water valves slowly while checking for leaks, then open fully. Open both taps; checking for leaks from the water pipes and drain.
- Fill the bath to the overflow, ensuring the water is removed and check the overflow system.
Turn off the taps and remove the drain plug, checking for leaks in the drain system.
6. Sealing the Bath Perimeter Edges
- Once all testing is complete, apply silicone around the edges of the bath between the tiles and the bath edges. I have always used clear bathroom silicone, smoothing it off with a soapy finger gives it a good contoured and leak-free finish.
7. Fitting the Front Panel
- Hold the spirit level vertically against the front edge of the bathtub rim and the floor, and mark a short line along the floor in three or four places. Join up these lines using a thick pointed pencil, and screw a piece of 2” x 2” wood to the floor just behind the line.
- Measure the distance from inside the rim to the floor and cut the panel to this size, leaving it a ¼” over length. Trial fit the front panel, slipping the top edge up into the rim, and slotting it between the wood strip and the rim edge, and then push the bottom against the wood batten on the floor. If it does not fit, then cut it again. And if it fits, then drill holes through the bottom of the panel and fix it to the wood batten using woodscrews.
- If there is a large gap between the taps end of the bath and the wall, you may need to fit an end panel. This is carried out in the same manner as the front panel. If there is just a small gap, this can be taken up using a wood spacing unit which is then painted to match the front panel.
Summary
Plumbing and fitting a new bathtub is a worthwhile project for the DIY person.
There are a few points to be taken into consideration before you start your DIY plumbing on a new bathtub, mainly to ensure all gaskets have been inserted and all joints tightened up. This is to ensure that there are no water leaks. Also, the bath should be fully supported and leveled, using the supplied steel frames and adjustable feet.
The use of flexible pipes and tubes has made the plumbing of a new bathtub a lot quicker and easier, eliminating alignment problems in the pipework and drain systems.
A thorough water leak test should be carried out on completion of the plumbing on a new bathtub, then the bath perimeter can be sealed with bathroom silicon, and the front panel fitted to give your DIY project a professional finish.
Steps and Diagrams: DIY Plumbing a New Bathtub
Plumbing Sketches and Bathtub Support
Reference Webs for DIY Plumbing a New Bathtub:
- Dave’s DIY Tips – Fitting a Bath – How to Install a New Bathtub
- Victoria Plumb – How to fit a bath
