• DIY
    • Crafts
      • Outdoors & Garden Projects
    • Decorating
      • Exterior Painting & Decorating
      • Painting & Wallpaper
      • Room by Room
    • Furniture
      • Cabinets
      • Tables
    • Woodworking
  • Home Improvement
    • Real Estate
    • Living
    • Entertaining
    • Home Building & Design
      • Home Interior
      • Home Exterior
    • Home Management
      • Home Organization
    • Remodeling
    • Living Areas
    • Bathroom
    • Kitchen
  • Lawn & Garden
    • Lawn Care
    • Vegetable Gardening
    • Landscaping
      • Irrigating
    • Flowers
    • Trees & Shrubs
  • Categories
    • Home Improvement
    • Lawn & Garden
    • Landscaping
    • Real Estate
Housesumo.com
  • DIY
    • Crafts
      • Outdoors & Garden Projects
    • Decorating
      • Exterior Painting & Decorating
      • Painting & Wallpaper
      • Room by Room
    • Furniture
      • Cabinets
      • Tables
    • Woodworking
  • Home Improvement
    • Real Estate
    • Living
    • Entertaining
    • Home Building & Design
      • Home Interior
      • Home Exterior
    • Home Management
      • Home Organization
    • Remodeling
    • Living Areas
    • Bathroom
    • Kitchen
  • Lawn & Garden
    • Lawn Care
    • Vegetable Gardening
    • Landscaping
      • Irrigating
    • Flowers
    • Trees & Shrubs
  • Categories
    • Home Improvement
    • Lawn & Garden
    • Landscaping
    • Real Estate
featured image - How to Install an Under Sink Plumbing Vent
  • DIY
  • Home Improvement

How to Install an Under Sink Plumbing Vent

  • Perla Irish
  • March 22, 2022
Total
3
Shares
3
0
0
0

If you observe your house’s plumbing system and notice a pipe extending on your roof, this is probably a plumbing vent. These plumbing vents are linked to your fixtures, like your sink or toilet.

These are used to allow the gases from these sewage drains to be expelled, thus regulating the air pressure in your plumbing system.

image - How to Install an Under Sink Plumbing Vent
How to Install an Under Sink Plumbing Vent

Accumulation of gases in your plumbing system, whether sink or toilet, can be harmful if inhaled. Aside from that, these vents help by bringing oxygen to the plumbing system, which quickly degrades waste products.

Now that you know the importance of plumbing vents, you might be curious about how to install one in your home, especially under your sink. Here are the steps to install an under-sink plumbing vent:

1. Accustomize Yourself with The Recent Local Building Codes

Installing a plumbing vent under your sink is relatively easy. But you must familiarize yourself with the local plumbing or building codes because there are restrictions about the type of material and size of the pipes.

These codes might also include the distance between the vent pipes, the sink fixtures, and the placement of the actual vent. Some regulations require you to obtain a permit first or consult professional help for installation.

So, keep in mind that you have to understand the details of the plumbing codes first before beginning your installation.

You can ask for a piece of advice from a local contractor and ask some questions regarding the material and building standards.


Read Also:

  • Five Different Types of Sink Materials That You Should Consider
  • 5 Sink-Related Issues That You Can Prevent Right Now
  • A Homeowner’s Guide to Plumbing Maintenance
  • 10 Warning Signs You Have a Plumbing Problem

2. Plan The Plumbing Layout Under Your Sink

Now that you have considered your local building codes, it’s time to plan the layout.

Planning the arrangement of the drains, the pipe extension, and the plumbing vent will help you quickly assemble it once you have acquired the materials that fit perfectly under your sink.

To achieve accuracy, you should measure the dimensions of your sink before buying the materials. If necessary, it’s good to leave some space for adjustments.

Having a layout will allow you to foresee different size constraints of the pipe. It also determines the number of fixtures you can link into your pipelines.

3. Choose Piping Materials

Once you have formulated a foolproof plumbing layout, you can now choose what type of pipe material best fits your budget and your needs.

It would help if you’d also consider the following factors, such as durability, strength, weight, resistance to corrosion, and the flexibility of the pipe.

Most plumbing vents are available in small sizes with a diameter of less than an inch. If that’s the case, you can use plastic pipes like polyvinyl chloride (PVC) or acrylonitrile butadiene styrene (ABS) pipes.

Both of them are non-toxic and abrasion-resistant. But to compare, here are their key differences:

ABS: easier to install, more rigid, likely to deform if exposed to heat

PVC: slightly challenging to install, flexible and durable

All in all, plastic pipes are known for being inexpensive, having high corrosion resistance, and being lightweight. Aside from that, plastic pipes have a pressure class. The higher the pressure class, the more pressure the pipe can handle.

Aside from plastic pipes, metal pipes, like steel, copper, or cast-iron pipes, are available.

One of the main advantages of metal pipes is that they last longer than their plastic counterparts. It also doesn’t need to be calibrated as often as plastic pipes during installation.

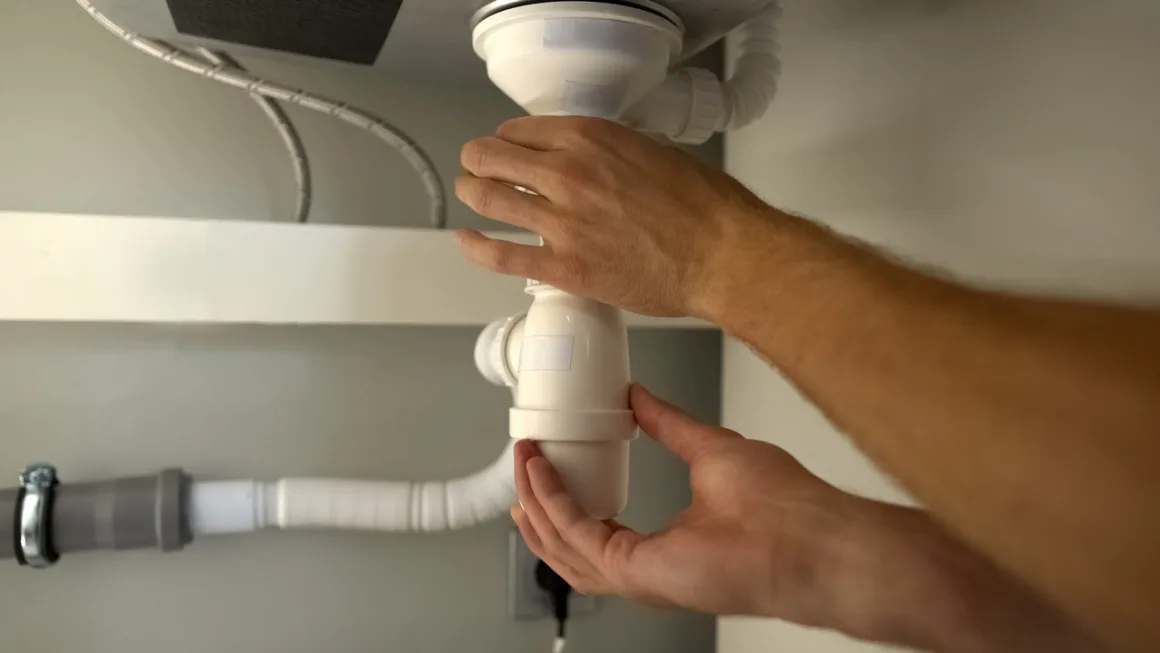
4. Assemble The Parts

image - Assemble The Parts

Now you can take the materials together and begin connecting the joints. This includes the extension pipe, pipe extensions or connectors, and sanitary tee.

Before putting all the pipes together under the sink, prime the ends of the pipes extensions before applying pipe cement glue. If you’re using plastic pipes, make sure there’s a sufficient distance where the waste line drops vertically.

Also, note that the vent pipes should be directed outside the building, usually sticking up through the roof. This will allow the toxic gases or fumes to leave your plumbing system efficiently.

5. Contact Your Local Plumber

If you’re unsure if you did well in your plumbing vent installation under the sink, it would be best to contact your local plumber to help you out, or you could hire them to do the job instead if you’re busy.

Doing this will save you time and spare you from worrying if you’re doing the right procedure and if you’ve complied with the local residence area building codes.

Final Thoughts

Installing a plumbing vent under your sink can prevent poor ventilation in your house that will inevitably expose your family to toxic fumes. Understanding the layout and using the right materials will help your plumbing system last longer.

You must also adhere to the building codes imposed on your local residence. It would be best if you hired a professional plumber to do all the installation for you to ensure code regulations are satisfied and to keep your family safe.

0
0
3
0
Total
3
Shares
Pin it 3
Share 0
Tweet 0
Share 0
Share 0
Related Topics
  • building
  • installation
  • materials
  • pipes
  • plumbing
  • sink
Previous Article
featured image - How to Handle the Invasion of the Giant Asian Joro Spider
  • DIY
  • Home Improvement

How to Handle the Invasion of the Giant Asian Joro Spider

  • Perla Irish
  • March 22, 2022
View Post
Next Article
featured image - Reasons Your Car Key Isn’t Working
  • DIY
  • Home Improvement

Reasons Your Car Key Isn’t Working

  • Perla Irish
  • March 22, 2022
View Post

You May Also Like

Technician checking a refrigerator in a home kitchen in Winter Garden, Florida
View Post
  • Home Improvement

Refrigerator Repair in Winter Garden: A Practical Homeowner’s Guide

  • Perla Irish
  • December 31, 2025
Side-by-side view of common metal finishes showing chrome shine, copper patina, and matte black texture.
View Post
  • Home Improvement
  • Home Interior

How to Choose the Best Metal Plating for Home Fixtures (What Actually Lasts)

  • Perla Irish
  • December 30, 2025
Vintage bathroom with clawfoot tub, subway tiles, and wooden vanity in a timeless, neutral design
View Post
  • Bathroom
  • Home Interior

Vintage Bathroom Décor Ideas That Feel Classic, Not Dated

  • Perla Irish
  • December 29, 2025
Close-up of a pro plasterer applying Venetian plaster with a steel trowel while a homeowner watches in a modern living room
View Post
  • Decorating
  • DIY
  • Home Improvement
  • Home Interior
  • Painting & Wallpaper

Venetian Plaster Technique: Step-by-Step Guide to Luxurious, Marble-Look Walls

  • Perla Irish
  • December 9, 2025
Stamped decorative concrete patio with warm stone pattern, outdoor dining set, lounge chairs, and planting beds in a cosy backyard at golden hour.
View Post
  • DIY
  • Home Exterior
  • Home Improvement
  • Landscaping
  • Lawn & Garden

Reasons to Use Decorative Concrete for Your Patio

  • Perla Irish
  • December 9, 2025
Modern beige bathroom with floating wooden vanity, LED mirror, heated towel rail, built-in shelving and a freestanding tub
View Post
  • Bathroom
  • Decorating
  • DIY
  • Home Improvement
  • Room by Room

Functional Bathroom Décor: Pieces That Look Good and Work Hard

  • Perla Irish
  • December 4, 2025
Couple reviewing kitchen remodel plans on a tablet in a newly renovated soft-modern kitchen with light oak island, quartz countertops, creamy cabinets, and pendant lighting.
View Post
  • DIY
  • Home Improvement
  • Kitchen
  • Remodeling

The Complete 2026 Kitchen Remodeling Guide: New Trends, Updated Costs, Layout Innovations & Smart Design Strategies

  • Perla Irish
  • December 4, 2025
Suburban two-story home with a backyard in-ground pool and patio dining area on a clear summer day
View Post
  • DIY
  • Home Improvement
  • Real Estate

Is a Pool in a Cold Climate a Smart Move When You’re Buying a House?

  • Perla Irish
  • December 3, 2025

Join 13,000 folks!

Get instant access to our weekly newsletter where we share the best! 100% Privacy. No Spam.

  • Disclosure & Affiliate Policy
  • Privacy Policy
  • Terms of Use
  • About
  • Sitemap
  • Contact Us

Input your search keywords and press Enter.