• DIY
    • Crafts
      • Outdoors & Garden Projects
    • Decorating
      • Exterior Painting & Decorating
      • Painting & Wallpaper
      • Room by Room
    • Furniture
      • Cabinets
      • Tables
    • Woodworking
  • Home Improvement
    • Real Estate
    • Living
    • Entertaining
    • Home Building & Design
      • Home Interior
      • Home Exterior
    • Home Management
      • Home Organization
    • Remodeling
    • Living Areas
    • Bathroom
    • Kitchen
  • Lawn & Garden
    • Lawn Care
    • Vegetable Gardening
    • Landscaping
      • Irrigating
    • Flowers
    • Trees & Shrubs
  • Categories
    • Home Improvement
    • Lawn & Garden
    • Landscaping
    • Real Estate
Housesumo.com
  • DIY
    • Crafts
      • Outdoors & Garden Projects
    • Decorating
      • Exterior Painting & Decorating
      • Painting & Wallpaper
      • Room by Room
    • Furniture
      • Cabinets
      • Tables
    • Woodworking
  • Home Improvement
    • Real Estate
    • Living
    • Entertaining
    • Home Building & Design
      • Home Interior
      • Home Exterior
    • Home Management
      • Home Organization
    • Remodeling
    • Living Areas
    • Bathroom
    • Kitchen
  • Lawn & Garden
    • Lawn Care
    • Vegetable Gardening
    • Landscaping
      • Irrigating
    • Flowers
    • Trees & Shrubs
  • Categories
    • Home Improvement
    • Lawn & Garden
    • Landscaping
    • Real Estate
Featured of How to Paint Faux Italian Plaster, Mottled Wall Technique
  • DIY
  • Home Improvement
  • Painting
  • Tips

How to Paint Faux Italian Plaster, Mottled Wall Technique

  • Perla Irish
  • February 19, 2018
Total
64
Shares
64
0
0
0

Faux Italian Plaster, Mottled Wall Technique — The Faux Italian Plaster Technique is a staple decorative finish. This technique is fast, works great with latex paint, and requires no glazing liquid or thinning of the latex paint. This technique does not create an actual texture, which is ideal for future repainting concerns
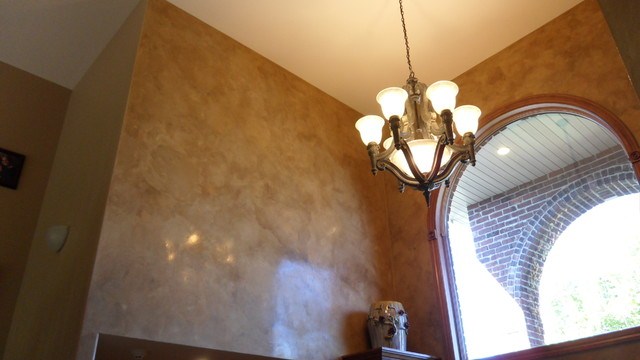
Faux Italian Plaster, Mottled Wall Technique

How to Paint Faux Italian Plaster, Mottled Wall Technique

Unlike Faux Venetian plaster or real Venetian plaster, the Faux Italian Plaster Technique can be done in one layer, using standard latex paint.


Tools & Materials:


Primary Tools Needed:

  • Lamb’s wool roller covers: I prefer to use the four-inch Wall Magic wool-blending rollers manufactured by Wagner Spray Tech Corp. You can use any size lamb’s wool cover, if you’d like (you don’t have to use the Wall Magic covers). Many people find the dual roller-cage and the dual paint-tray convenient for this technique. I use a standard one-gallon (five quart) pail with a one-gallon grid for each color with a standard four-inch roller-frame.
  • Lambswool Pad. Lamb’s wool pads are manufactured for stain application primarily. With this finish, they are used to soften and further blend the paint
  • 1″ or 2″ latex paint brushes You will need one brush for each color. These are used to stipple-blend the paint colors in small areas.
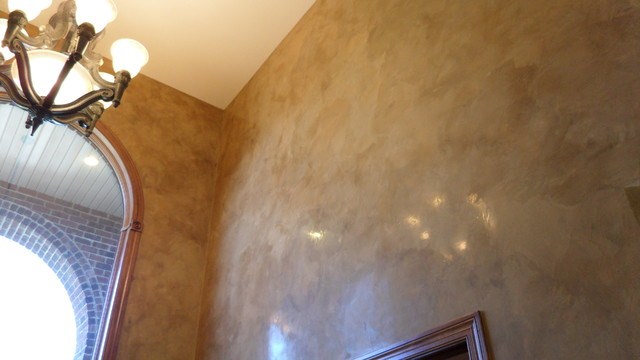
How to Paint Faux Italian Plaster

Base Coat:


Paint

Unless you have a badly damaged surface and you want to hide defects in the underlying substrate, I would use an eggshell or satin latex paint.

Color Selection

The best and most predictable color system to use is a two-color system, which typically consists of one deeper-tone color and one light, pastel color. If you add another color to this mix, you may get a muddy brown color. If you keep it to just two colors (one deeper and one light/pastel or off-white/white), you will get lighter to darker variations of the two colors you picked without creating a third “muddy” color.

Base Coat

Pick a color that goes with the overall look of your sample. Any color-blend mixed from the two colors that you have chosen will work. Use the same sheen for your base coat that you are going to be using for your final finish.

Image below to view color sample.

Color Combinations

Color Combinations

Color Combinations Result


Faux Italian Plaster Technique:


Rolling

You will apply the paint to the wall, working on 4′ X 4′ sections of wall at a time, gradually working your way around the room.

Apply patches of each color to the wall with arching sweeps of the roller, alternating each color. Then begin to blend these colors randomly by rolling over the patches of color with a dry roller, leaving some spots slightly blended and other spots highly blended. Be careful not to over-blend with the roller. More spot-specific blending will be done with the lamb’s wool pad later. Work one 4′ X 4′ section at a time, then move on to the next.

A word about the 4′ x 4′ sections: The edges of these sections should be jagged rather than square. This will give them a randomness that will help hide where each section joins together.

Softening and Blending

After a couple of sections have been blended as described above, use the lamb’s wool pad to do some more specific and refined blending as desired. Soften the work by patting the surface here and there (both randomly and where needed) with the lamb’s wool pad. Take a minute to look over your work, blending the joined sections together as needed to help camouflage the joints between each section. When done well, you will not see any joints from these sections. Again, be careful not to over-blend.
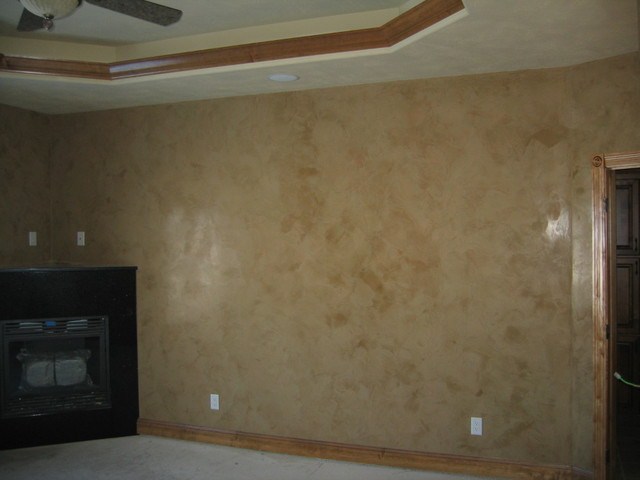
Faux Italian Plaster

Real Life Application Tips:


Inside Corners

Tape off the adjacent wall with either three-inch paper tape or two-inch easy release blue tape. Continue your faux finish right into the corner of the wall, bumping the adjacent wall as necessary. Use a small paint brush to stipple-blend the colors as needed in the inside corner-joint. Use the alternate wall sequencing (this will allow you to tape off the adjacent walls as you go). Tape and treat the ceiling/wall inside corner the same way.

Small Areas

Areas that are too small to get the four-inch roller into need to be stipple-blended with small paint brushes. Apply the paint in random streaks and patches in both colors, then, with a dry brush in a random fashion, blend the patches by stippling the colors together.

You can stipple-blend the louver vents of cold air return vents on the wall in the same way that you would blend small areas. Roller-mottle and blend the face of the vents as you would the rest of the wall.

Must Read:

  • Eliminate Paint Odor: Providing for Adequate Ventilation During and After Painting
  • Painting Over Varnish: How to Paint Over Varnished Wood Trim
  • Easy to Follow Steps to a Finding A Good Plasterer
  • Painting Paneling: How to Paint Over Paneling
  • How to Paint Latex Over Oil Enamel

Use Pails Rather Than Roller Trays

Use one-gallon pails with one-gallon grids to hold your paint. Secure the pails to your ladder by either using paint hooks (ladder hooks) or by setting them on the tray on a step ladder. Using pails allows you to have your paint with you when you are on a ladder.

I have done this technique on 16-foot-high walls where it would be virtually impossible for me to continuously dip my roller into a roller tray on the ground then climb the ladder. However, this method makes the job go a lot faster on eight-foot walls, too.

Remove the Masking Tape as You Go

Don’t wait for the paint to dry before you remove masking tape. Removing the tape while the paint is wet will ensure that you don’t pull the paint off the wall along with the tape.
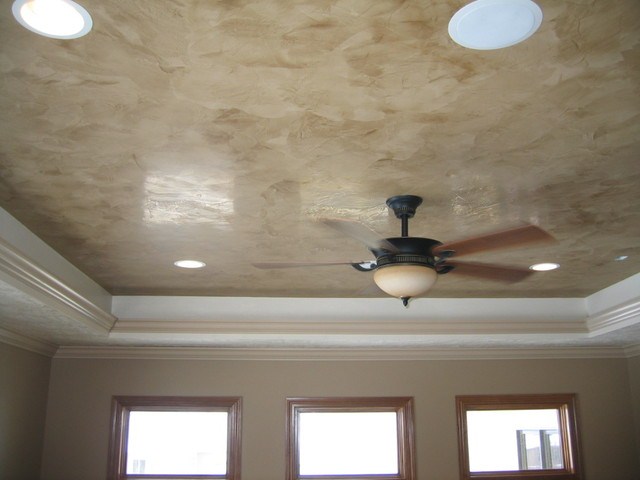

Faux Italian Plaster Decorative Paint Finish
The Faux Italian Plaster Technique is a staple decorative finish
0
0
64
0
Total
64
Shares
Pin it 64
Share 0
Tweet 0
Share 0
Share 0
Perla Irish

Perla Irish, who is more familiarly called Irish, is the Content Manager at Housesumo.com. She loves following trends around home and garden, interior design and digital marketing. Through this blog, Irish wants to share information and help readers solve the problems they are experiencing.

Related Topics
  • diy
  • faux venetian plaster
  • painting
Previous Article
Featured of DIY Chandelier Lamp Shades
  • DIY
  • Home Improvement
  • Home Interior
  • Lighting
  • Remodeling
  • Tips

DIY Chandelier Lamp Shades, Personalize your Chandelier Shades

  • Perla Irish
  • February 18, 2018
View Post
Next Article
Featured of Painting Latex Over Oil: How to Paint Latex Over Oil Enamel
  • DIY
  • Home Improvement
  • Painting
  • Tips

How to Paint Latex Over Oil Enamel

  • Perla Irish
  • February 20, 2018
View Post

You May Also Like

A kitchen with white cabinets, stainless steel appliances, a black countertop, and three black bar stools in a house
View Post
  • DIY
  • Home Building & Design
  • Home Improvement
  • Kitchen
  • Remodeling

How to Open Up the Space Between a Kitchen and Living Room

  • Perla Irish
  • May 21, 2025
Working with a cement mixer in a construction site.
View Post
  • DIY
  • Home Building & Design
  • Home Improvement

How Do I Tell How Many Bags of Concrete I Need for a Project?

  • Perla Irish
  • May 20, 2025
Charming British home with diverse roof tiles—clay, slate, concrete, synthetic—under a cloudy UK sky, showcasing durable and stylish roofing options.
View Post
  • DIY
  • Home Exterior
  • Home Improvement

What Are the Best Roof Tiles for Your UK Home—and When Should You Replace Them?

  • Perla Irish
  • May 17, 2025
A cozy mobile home in a sunny neighborhood with palm trees, hills, and clear blue skies, highlighting affordable modern living.
View Post
  • DIY
  • Finances
  • Home Improvement

How to Qualify for a California Mobile Home Loan in 2025

  • Perla Irish
  • May 8, 2025
Modern interior door with a high-gloss red lacquer finish in a vibrant, eclectic living room during a summer afternoon, colorful artwork on the walls, patterned rug, natural light enhancing the door's bold color, showcasing elegance and durability.
View Post
  • Decorating
  • DIY
  • Home Improvement
  • Painting & Wallpaper

3 of the Best Finishes for Interior Doors

  • Perla Irish
  • April 29, 2025
featured image - Different Types of Roofing and Its Advantages
View Post
  • DIY
  • Home Exterior
  • Home Improvement

Different Types of Roofing and Their Advantages

  • Perla Irish
  • April 25, 2025
Close-up shot of a leaking air conditioning unit indoors, showing water droplets forming on the metallic fins and dripping into a small, stagnant puddle on the dusty concrete floor, highlighting AC maintenance problems in a dimly lit basement.
View Post
  • DIY
  • Home Improvement
  • HVAC

Why Is My AC Leaking Water?

  • Perla Irish
  • April 22, 2025
Rooftops in a modern city with solar panels and eco-friendly roofing repairs underway under a clear sky.
View Post
  • DIY
  • Home Exterior
  • Home Improvement

Why Roofing Repair Services Are Crucial for Sustainable Urban Infrastructure

  • Perla Irish
  • April 20, 2025

Leave a Reply Cancel reply

Your email address will not be published. Required fields are marked *

This site uses Akismet to reduce spam. Learn how your comment data is processed.

Join 13,000 folks!

Get instant access to our weekly newsletter where we share the best! 100% Privacy. No Spam.

  • Disclosure
  • Privacy Policy
  • Terms of Use
  • About
  • Sitemap
  • Contact Us

Input your search keywords and press Enter.