• DIY
    • Crafts
      • Outdoors & Garden Projects
    • Decorating
      • Exterior Painting & Decorating
      • Painting & Wallpaper
      • Room by Room
    • Furniture
      • Cabinets
      • Tables
    • Woodworking
  • Home Improvement
    • Real Estate
    • Living
    • Entertaining
    • Home Building & Design
      • Home Interior
      • Home Exterior
    • Home Management
      • Home Organization
    • Remodeling
    • Living Areas
    • Bathroom
    • Kitchen
  • Lawn & Garden
    • Lawn Care
    • Vegetable Gardening
    • Landscaping
      • Irrigating
    • Flowers
    • Trees & Shrubs
  • Categories
    • Home Improvement
    • Lawn & Garden
    • Landscaping
    • Real Estate
Housesumo.com
  • DIY
    • Crafts
      • Outdoors & Garden Projects
    • Decorating
      • Exterior Painting & Decorating
      • Painting & Wallpaper
      • Room by Room
    • Furniture
      • Cabinets
      • Tables
    • Woodworking
  • Home Improvement
    • Real Estate
    • Living
    • Entertaining
    • Home Building & Design
      • Home Interior
      • Home Exterior
    • Home Management
      • Home Organization
    • Remodeling
    • Living Areas
    • Bathroom
    • Kitchen
  • Lawn & Garden
    • Lawn Care
    • Vegetable Gardening
    • Landscaping
      • Irrigating
    • Flowers
    • Trees & Shrubs
  • Categories
    • Home Improvement
    • Lawn & Garden
    • Landscaping
    • Real Estate
Featured of Need to Know How to Repair Dry Rot? Here Are Some Easy Instructions
  • DIY
  • Home Improvement
  • Living Areas

Quick and Easy DIY Dry Rot Fixes Anyone Can Perform

  • Perla Irish
  • February 27, 2018
Total
16
Shares
16
0
0
0

Dry rot can destroy your house. Professional contractors are expensive. But if you follow these comprehensive instructions on how to repair dry rot, you can do it yourself.

Dry rot can eat your house from the inside out, weakening the structure more every day it is left untreated. These comprehensive instructions will teach you how to repair dry rot yourself, saving you a significant amount of money over hiring a contractor.

Need to Know How to Repair Dry Rot? Here Are Some Easy to Follow Instructions

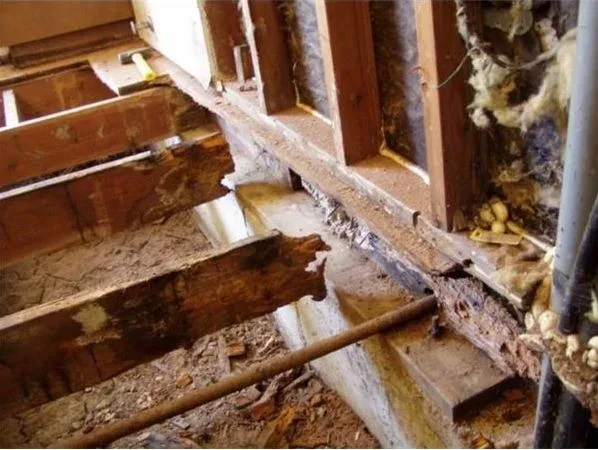
Merriam-Webster defines ‘dry rot’ as “a decay of seasoned timber caused by fungi that consume the cellulose of the wood leaving a soft skeleton which is readily reduced to powder”.

This means that it destroys the structural strength of the wood. If your house has dry rot, you should get it fixed as quickly as you can because the dry rot, as living fungi, will grow and consume more wood.

Dry rot example - How to Repair Dry Rot
Dry Rot Example (How to Repair Dry Rot)

Listed below are some easy-to-follow comprehensive instructions on how to repair dry rot anywhere in your house that it may appear.


Read Also:

    • Let the Light In with Clean Plantation Shutters: Tips to Clean Different Kinds of Plantation Shutters!
    • Wood Fences vs. Vinyl Fences: Which are Cheaper and Why
    • DIY Method: How to Clean Leather Furniture

Repair Dry Rot: Tools and Materials

  • Wood to replace the rotted sections
  • Drywall (If needed)
  • Circular saw
  • Tape measure
  • Pencil
  • Hammer
  • 2 nails
  • 2 ½ inch drywall screws
  • 3/16 wood drill bit
  • Drill
  • Phillips screw tip for drill
  • Reciprocating saw with remodeling blade
  • Safety glasses

Prepare Replacement Wood

Dry rot occurs because conditions are right for the growth of the fungus. Properly treating your wood before use, with a water sealer or wood preparation product will allow you to use the wood in environments that are conducive to dry rot and other types of damage, and yet the wood will stay in good condition.

If you don’t have a wood sealer product, such as Thompson’s, available, a good primer product, such as Kilz properly applied, will work in a pinch.

Clear the Repair Area

A clean and uncluttered work area is a safe work area, so if the repair is being done inside the house, everything in the area needs to be moved. This also means that if the work area is inside a wall, the drywall surrounding the damaged area will need to be removed and replaced.

Cut the Damaged Section Out

The first part of this repair is to cut the damaged section out. The reciprocating saw (known as a Sawz-All) with a remodeling, or demolition blade, attached, will make short work of this. You should cut at least three inches to either side of the end of the damage.

Floor joists may need to be released from the floors that may be nailed to them. The reciprocating saw with demolition blade shines in this job. The blade will fit easily between the floor joists and the subfloor or plywood above it.

Dry Rot - How to Repair Dry Rot
Dry Rot (How to Repair Dry Rot)

Measure the Damaged Gap

Building codes in some areas may specify more or less, but in a non-load-bearing wall, the replacement section of wood should overlap the existing wood by at least four to eight inches, on both sides. In a structural wall, that overlap should be increased to a minimum of twelve inches.

A twelve-inch overlap on both sides of the gap should be considered a minimum with a structural floor repair, also. Measure the desired distance beyond the gap and mark it with a pencil. Tap one nail into the board at this location and repeat this process on the other side of the gap.

Hook the tape measure to one nail and measure to the nail and line on the far side. Remembering the carpenter’s axiom of measure twice, cut once, and measure the gap in the opposite direction.

Cut and Drill the Replacement Section

Measure the replacement section and mark off the required distance to make it the same size as the measurement you made of the damaged section. Verify the measurement and cut the wood as squarely as possible using one of the saws. The circular saw is easier for this.

Lay the board flat and drill six holes in two rows at either end of the board. These holes should be one inch from either edge, two inches apart, and staggered. Attach the drill bit to the drill and secure it in the chuck. Remove the drill bit from the chuck and replace it with the screw tip.

Secure the Replacement Section in Place

Hold the replacement section in place with both ends near the marks you made while measuring. Hold the replacement piece securely against the existing piece and start all six of the screws on one side by hand, turning them clockwise as far as you can. Make sure the drill is set to turn clockwise and tighten all of the screws into both pieces of wood.

Repeat this process on the other side. Structural floor sections should have the floor in the area of the repair supported by a jack and blocks and a helper pushing up firmly against the underside of the floor as you attach the repair piece with the screws being drilled into the two boards with the drill and screw tip.

Finish the Repair

If the repair of dry rot was completed on a section of floor joists, you will need to go through the area of the repair and nail or screw the floor to the repaired section. Sections of wall studs or ceiling joists will need to have replacement drywall installed, taped, and painted.

There’s an article on HouseSumo.com dealing with drywall replacement and repair. One-inch drywall screws should be used to secure drywall to wall studs. Use extreme care while attaching drywall in areas where electrical wiring exists.

References for How to Repair Dry Rot

  • The author has over 15 years of experience as a handyman and has done this type of repair in several jurisdictions.
  • How to repair dry rot images provided by the author. All rights reserved.
  • Timberwise – Dry Rot Treatment: https://www.timberwise.co.uk/dry-rot/
0
0
16
0
Total
16
Shares
Pin it 16
Share 0
Tweet 0
Share 0
Share 0
Perla Irish

Perla Irish, who is more familiarly called Irish, is the Content Manager at Housesumo.com. She loves following trends around home and garden, interior design and digital marketing. Through this blog, Irish wants to share information and help readers solve the problems they are experiencing.

Related Topics
  • repairs
Previous Article
Featured of How to Applying Wood Stain with Sprayer, Airless and HVLP Sprayer
  • Home Improvement
  • Painting
  • Tips
  • Woodworking

How to Applying Wood Stain With Sprayer, Airless, and HVLP Sprayer

  • Perla Irish
  • February 26, 2018
View Post
Next Article
Featured of How to Install Lighted Crown Molding, Simple Steps Installation
  • DIY
  • Home Improvement
  • Lighting
  • Living Areas

Guide to Installing Lighted Crown Molding

  • Perla Irish
  • February 27, 2018
View Post

You May Also Like

Find out how to stop leaks and replace damaged drywall easily. Take quick action to protect your home and improve your ceiling.
View Post
  • DIY
  • Home Improvement
  • Home Renovation
  • Remodeling

How to Repair Drywall Ceiling Water Damage: A Simple Step-by-Step Guide

  • Perla Irish
  • June 3, 2025
Cozy home with open windows, a box fan blowing air out, gentle breeze flowing through, surrounded by lush green trees under a bright sunny sky.
View Post
  • DIY
  • Home Improvement
  • HVAC

Keeping the House Cool Without Air Conditioning

  • Perla Irish
  • May 31, 2025
Bright modern room with newly installed ceramic and porcelain tile flooring featuring varied patterns and grout colors.
View Post
  • DIY
  • Floor
  • Home Improvement

Everything You Need to Know Before Installing Tile Flooring

  • Perla Irish
  • May 27, 2025
A kitchen with white cabinets, stainless steel appliances, a black countertop, and three black bar stools in a house
View Post
  • DIY
  • Home Building & Design
  • Home Improvement
  • Kitchen
  • Remodeling

How to Open Up the Space Between a Kitchen and Living Room

  • Perla Irish
  • May 21, 2025
Working with a cement mixer in a construction site.
View Post
  • DIY
  • Home Building & Design
  • Home Improvement

How Do I Tell How Many Bags of Concrete I Need for a Project?

  • Perla Irish
  • May 20, 2025
Charming British home with diverse roof tiles—clay, slate, concrete, synthetic—under a cloudy UK sky, showcasing durable and stylish roofing options.
View Post
  • DIY
  • Home Exterior
  • Home Improvement

What Are the Best Roof Tiles for Your UK Home—and When Should You Replace Them?

  • Perla Irish
  • May 17, 2025
A cozy mobile home in a sunny neighborhood with palm trees, hills, and clear blue skies, highlighting affordable modern living.
View Post
  • DIY
  • Finances
  • Home Improvement

How to Qualify for a California Mobile Home Loan in 2025

  • Perla Irish
  • May 8, 2025
Modern interior door with a high-gloss red lacquer finish in a vibrant, eclectic living room during a summer afternoon, colorful artwork on the walls, patterned rug, natural light enhancing the door's bold color, showcasing elegance and durability.
View Post
  • Decorating
  • DIY
  • Home Improvement
  • Painting & Wallpaper

3 of the Best Finishes for Interior Doors

  • Perla Irish
  • April 29, 2025

Leave a Reply Cancel reply

Your email address will not be published. Required fields are marked *

This site uses Akismet to reduce spam. Learn how your comment data is processed.

Join 13,000 folks!

Get instant access to our weekly newsletter where we share the best! 100% Privacy. No Spam.

  • Disclosure
  • Privacy Policy
  • Terms of Use
  • About
  • Sitemap
  • Contact Us

Input your search keywords and press Enter.