Quick Answer: You can open up the space between a kitchen and living room – and even remove the wall between them – if you plan it correctly. First confirm whether the wall is load-bearing, then locate any hidden electrical, plumbing, gas, or HVAC lines. Non-load-bearing kitchen wall removal is often a manageable project. Opening a load-bearing wall between the kitchen and living room is major structural work that usually requires permits, temporary shoring, and licensed pros.
Safety & legal disclaimer: This guide is for general homeowner education only. Any work that affects structural walls, gas lines, electrical wiring, plumbing, or HVAC must follow local building codes. Always plan this work with a licensed professional, or have them review your plans before you start.
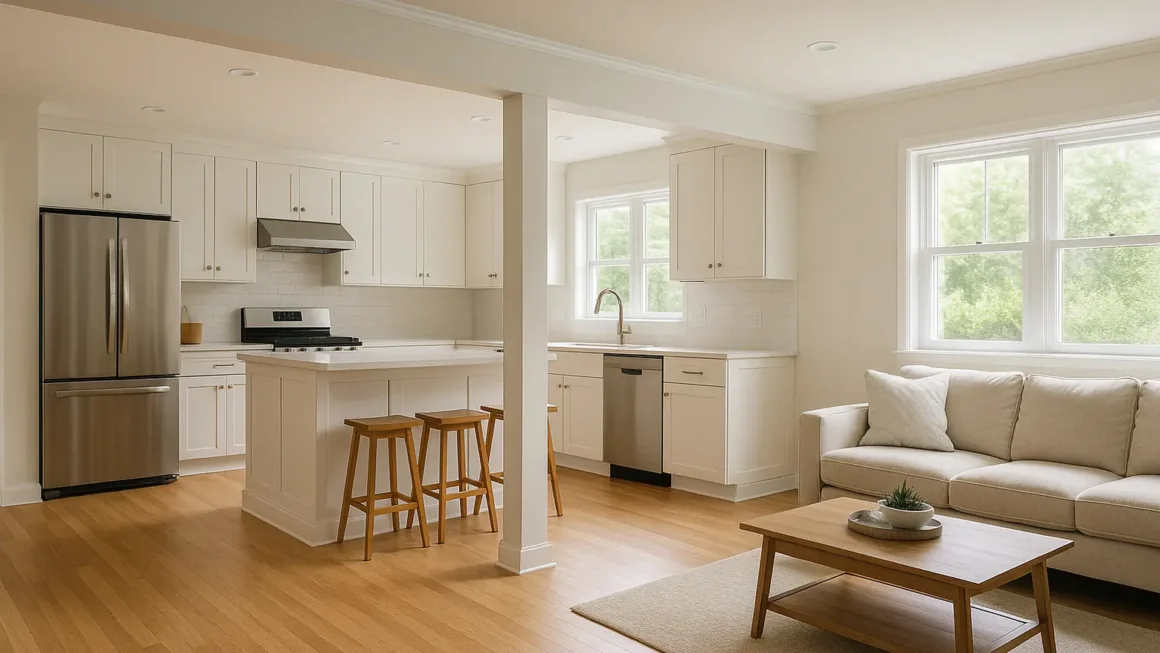
Opening up the wall between your kitchen and living room can turn two dark rooms into one bright social space. This guide shows you what to check before you start kitchen wall removal and how to avoid expensive mistakes. You’ll also learn how to plan a wall opening, from first inspection holes to the final coat of paint. These basics also apply if you open a wall between the kitchen and dining room or remove a half wall. You can even use them when you cut a pass-through between two rooms.

Living rooms, kitchens, and dining rooms are where most families spend their time. Removing a wall to connect these spaces – whether you open the wall between kitchen and living room or create an open kitchen–dining room – can modernize an older layout, improve sightlines, and make entertaining easier.
If this is part of a larger remodel, read this alongside 10 Things to Know Before Starting a Kitchen Remodel so your wall removal fits into your overall kitchen plan.
Overview: Should You Remove the Wall Between Kitchen and Living Room?
Fewer interior walls and larger, combined rooms are a clear trend in new homes. Opening a wall between the kitchen and living room (or between kitchen and dining room) can:
- Make a smaller home feel larger and brighter
- Improve traffic flow for families and guests
- Let you cook, supervise kids, and socialize in the same shared space
- Create better “before and after” value if you plan to sell later
Open-concept living isn’t perfect for everyone. Cooking noise, smells, and clutter are harder to hide, and you lose wall space for cabinets and storage. In some homes, instead of fully removing the wall between kitchen and living room, a wide cased opening, a kitchen wall cut-out to the living room, or a half wall may be a better compromise.
Before you commit to kitchen wall removal, ask four key questions:
- Is this a load-bearing wall or just a partition?
- What’s inside the wall? (electrical, plumbing, gas, HVAC ducts, data cables)
- What permits and inspections does your building department require for kitchen wall removal?
- Who will design and sign off on any new beam and columns (usually a structural engineer or qualified contractor)?
Once you have those answers, you can choose a path. Some homeowners fully remove the wall. Others open a load-bearing wall between the kitchen and living room with a beam. You can also create a partial opening, such as a pass-through or half wall.
Finding Supporting (Load-Bearing) Walls

In a typical wood-framed house, some interior walls carry the weight of floor joists or roof rafters above; others simply divide rooms. When you remove a load-bearing wall between the kitchen and living room, you must maintain that structural support during construction and replace it permanently – usually with a beam and posts – when the project is finished.
To begin assessing whether the wall between your kitchen and living room is load-bearing:
- Check the basement or crawlspace: Look for beams or joists resting on the wall line above.
- Inspect the attic: See whether joists or rafters change direction, lap, or end over the wall.
- Compare to plans: If you have original drawings, load-bearing walls are often marked or aligned with beams and girders.
A quick field check many contractors use: locate a stud at least one foot from any doorway with a stud finder, then carefully remove a small piece of drywall centered over that stud at the very top of the wall. If you see two horizontal 2x4s (double top plate) with joists bearing on them, the wall is likely load-bearing. A single top plate with joists running parallel often indicates a non-load-bearing partition.
However, these are only screening tools. Never assume a wall is non-structural based on a quick visual check. When you plan to open up a wall between kitchen and living room, do not guess. In multi-story or split-level homes, ask a structural engineer or qualified builder to confirm the load path first before you commit to demolition.
Example Remodel Plan: From Closed Rooms to an Open Kitchen–Living Space


In this example project, two interior walls are removed to dramatically change the kitchen and living room. A new column supports the existing beam, and a new beam is installed where the two walls previously met at a corner. The result is a single, larger room instead of three choppy spaces.
Removing the walls opens up space between the kitchen and living room and makes room for a peninsula or island. This gives you extra storage and counter space, better seating for casual meals, and a natural hub for entertaining – guests can sit at the peninsula while you prep food, with clear sightlines to the living room.
Case Study (Composite): Split-Level Kitchen Wall Removal
In a typical split-level home, the wall between the kitchen and living room often sits above a short run of stairs or over a central beam. In one composite example based on several reader projects, a family wanted a “before and after” transformation by removing that wall to create an open kitchen–living–dining level.
- Engineers confirmed the wall was load-bearing and designed a steel beam to carry the new opening.
- During demolition, the crew found an unexpected gas line and multiple electrical feeds in the wall – all rerouted by licensed pros.
- The project required temporary shoring, permits, inspections, and three days of on-site work.
- The final space combined the kitchen and living room in a small footprint. A new island stood where the wall once was. The “before and after split-level kitchen wall removal” photos also helped when they sold the home.
The lesson is simple. Even when your goal is just to knock down a wall between kitchen and living room, expect surprises inside the wall. Build extra room into your budget and timeline for those finds.
Case Study (Composite): Non-Load-Bearing Kitchen–Dining Wall Weekend Project
In another composite example based on several HouseSumo reader projects, a couple in a 1970s home wanted to connect a narrow kitchen and a formal dining room that nobody really used. Their goal was not a full open-concept main floor, but a brighter eat-in kitchen where they could host family dinners without feeling squeezed.
- The wall between the kitchen and dining room turned out to be a non-load-bearing partition with one electrical circuit and a thermostat wire inside.
- They hired an electrician to relocate the wiring and thermostat to an adjacent wall, then did the drywall demo and patching themselves over a long weekend.
- Instead of opening the entire wall, they left 18″ returns at each end and framed a wide cased opening that made both rooms feel connected but still gave them some wall space for furniture.
- Total project cost (excluding new cabinets/flooring) stayed under a modest budget because they combined DIY labor with targeted professional help where it mattered.
This kind of kitchen–dining wall change is a good example of a realistic DIY-plus-pro project: homeowners handle planning, demo, and finishes, while licensed trades manage the technical pieces like electrical work and thermostat relocation.
Electrical, Plumbing, Gas & HVAC: What DIYers Can and Can’t Do
Electrical changes in kitchen wall removal
Before you remove a wall between kitchen and dining room or living room, make a plan for the wiring. List every switch and outlet on that wall. Be extra careful if you start kitchen wall removal near appliances. Removing a kitchen wall usually means:
- Relocating light switches to a remaining wall or a new post
- Adding code-compliant receptacles along countertops and on islands/peninsulas
- Possibly rerouting range hood exhaust, low-voltage wiring, or smart-home cabling
In many areas, building codes require a licensed electrician to do or at least inspect kitchen electrical work. They’ll make sure the circuits are correctly loaded, GFCI/AFCI protection is in place, and new outlets around the island or peninsula meet code.
Plumbing, gas and HVAC inside kitchen walls
Plumbing works in a similar way. You can often move water supply and vent pipes if you plan the run carefully. Drain lines and gas lines are much more complicated. Drain changes affect slope, venting, and trap locations. Gas line changes carry obvious safety risks. Unless you have strong experience, hire a licensed plumber for this work.
For help choosing one, see Guidelines for Selecting a Plumber for Home Remodeling Projects.
HVAC ducts are another hidden wildcard. If your wall hides a main trunk or return duct, call an HVAC contractor. They can often reroute it through a soffit, column, or floor cavity. They will also check duct size and layout so you do not create noisy or under-performing rooms.
Temporary Support for a Load-Bearing Kitchen Wall
If the wall is load-bearing, you must support the structure before you remove any studs. Your engineer or builder will specify the shoring, but a common approach is to build a temporary support wall about a foot away from the wall being removed.
One common method uses a 2×4 bottom plate and a 4×4 top plate. Install 4×4 posts at each end and every three feet along the wall. On a nine-foot wall, that layout gives you a post at each end. You also get two posts in the middle at the three- and six-foot marks.
Never rely on a single jack post or makeshift props when you’re opening a load-bearing wall between kitchen and living room. Get the temporary support design from your engineer or contractor, and keep it in place until the new beam and posts are fully installed and inspected.
Demolition: Safely Removing the Wall
After you disconnect or reroute utilities and set up temporary supports, you can start demolition. Score the corners and ceiling joints with a utility knife to help prevent damage to adjoining walls and ceilings. Protect floors and set up dust barriers – kitchen wall removal projects create a surprising amount of debris.
Use a three-pound hammer to punch starter holes in the drywall along a horizontal line from one end of the wall to the other. Grasp the drywall with both hands and pull it off the studs, working in sections until most or all of the drywall is removed from both sides of the wall. Wear eye protection, a dust mask or respirator, gloves, and hearing protection throughout.
With the drywall removed, use a reciprocating saw to cut the studs at the top and bottom, taking care not to cut into floor or ceiling framing, wiring, or pipes behind. Remove the studs, then pry off the top and bottom plates. Keep the temporary support in place until the new beam and columns are fully installed.
Installing the New Beam and Supports

Next, install the support beam specified by your structural engineer or building department. In many small openings, multiple 2x10s or 2x12s fastened together can work; larger openings may need an LVL (laminated veneer lumber) or steel beam. Whatever you use, the beam must be tight against the joists or rafters it supports to avoid sagging floors or roof lines.
At each end of the beam, build solid supports down to a proper bearing point (such as a foundation, beam, or load-bearing wall below). A common solution is to nail three full-height 2x4s together at each end, but your building code and engineer may require more. Get helpers to lift and hold the beam in place while you install the supports. Arrange any required inspections with the building department before you cover the beam and supports with finish materials. Experienced queensland home builders always treat this step as a priority.
Costs, Permits & When to Call a Pro
Typical kitchen wall removal costs
How much does kitchen wall removal cost when you open the wall between kitchen and living room? Recent cost guides from HomeAdvisor, Angi, and Bob Vila report that:
- Removing a non-load-bearing wall often runs about $300–$1,000 for basic demolition and patching.
- Removing a load-bearing wall typically costs $1,200–$10,000+ once you include engineering, permits, temporary shoring, beam and column installation, and finish repairs.
- Complex projects (multi-story, long spans, rerouting major utilities) can climb toward the $10,000–$15,000 range.
Exact prices depend on wall length, beam material, access, and how much electrical, plumbing, gas, and HVAC must be rerouted. In many cases, the structural work of removing a supporting wall in the kitchen is less than half the total project; the rest is new flooring, cabinets, counters, and finishes.
Permits and when to hire a pro
Permits & inspections: Most building departments require a permit whenever you remove or alter a load-bearing wall, and many require one even for non-load-bearing walls in kitchens or living areas. You may also need:
- Stamped structural drawings from an engineer
- Electrical and plumbing permits
- Rough-in and final inspections before closing and after finishing
If you’re unsure, call your building department and ask specifically about “opening up an interior wall between the kitchen and living room.” Getting answers in writing (or at least in your permit file) protects you if you sell the home later.
As a rule of thumb: DIY can be reasonable for minor, non-load-bearing kitchen wall removal and finish work. For opening a load-bearing wall between kitchen and living room, or for walls hiding gas lines and complex wiring, involve licensed pros early. Their fees are much cheaper than repairing structural failures or safety hazards later.
Finish Work After the Wall Comes Down
After your inspector approves the beam and supports, you can focus on finishing. Wrap the beam and any columns with drywall or other finish materials, or leave some elements exposed for an intentional design feature. Patch gaps in the ceiling and walls, tape and mud the seams, and sand smooth.
For a deeper dive, see How to Finish Drywall: Step-by-Step DIY Guide + Pro Tips.
Finally, prime and paint the newly opened space so the kitchen, dining room, and living room feel like one cohesive area. At this stage, your “wall separating kitchen and living room” is gone – replaced by a beam line, island, or peninsula that ties the whole floor together.

Design Ideas & Before-and-After Inspiration
When you plan kitchen wall removal, you’re not just changing structure – you’re redesigning how the whole floor lives. A few popular kitchen wall removal ideas include:
- Remove a kitchen wall and add an island: Ideal when plumbing can be routed under the floor. This is one of the most common “remove kitchen wall, add island” projects.
- Open wall between kitchen and dining room: Turn two cramped rooms into a single eat-in kitchen with a larger table and better circulation.
- Kitchen wall cut-out to living room: A wide pass-through with a counter keeps some separation for noise and storage but visually joins the rooms.
- Partial removal or cased opening: Take down part of the wall between kitchen and living room, leave short returns at each end, and frame a wide, trimmed opening with a beam overhead.
- Half wall in kitchen: Remove the upper portion and add shelving, glass, or a breakfast bar while keeping base cabinets for storage.
Case Study (Composite): Pass-Through Cut-Out Instead of Full Wall Removal
In a small bungalow, another reader wanted to connect the kitchen to the living room. They could not justify the cost and disruption of a full structural opening. The ceiling framing above the wall was complex, and the project budget was tight.
- The wall carried some load and also contained a main plumbing vent, which made a long, column-free opening expensive to engineer.
- Instead of removing the entire wall, the contractor designed a large pass-through opening between the studs, leaving the plumbing vent and some of the structure in place.
- The new opening became a kitchen wall cut-out to the living room with a bar-height counter, pendant lights, and stools on the living-room side.
- From the kitchen, the homeowner could see the TV and talk with guests; from the living room, the pass-through framed the cooking area without exposing every bit of kitchen mess.
This type of project shows how a partial opening or wall cut-out can deliver most of the benefits of an open plan – more light, better sightlines, and easier conversation – with less structural complexity and lower cost than fully removing the wall.
Saving “before” photos (wall in place) and “after” shots (open kitchen and living room combined in a small space) not only helps you appreciate the transformation – it also makes your listing stand out if you decide to sell.
For more style inspiration once the structure is sorted, check out Top Kitchen Design Trends for Your Remodel for ideas on lighting, cabinetry, and finishes that work especially well in open-plan spaces.
Special Cases & Variations
- Removing a wall between kitchen and dining room: Structure and utilities work the same way as between kitchen and living room. The big design choice is whether to center the new opening on the table, the island, or a focal window.
- Split-level kitchen wall removal: Be especially careful here – walls near stairs often sit over main beams or carry more load than they appear. Never remove them without a structural engineer’s input.
- Removing wall between two closets: Even when two small closets back onto each other, don’t assume their shared wall is non-load-bearing. Treat it like any other wall until framing and an engineer confirm otherwise.
- Opening a load-bearing wall between kitchen and living room: Expect engineering, permits, temporary support walls, and a substantial beam. This isn’t a weekend “knock down a wall” DIY.
- Wall cut-out between kitchen and living room: If a full removal isn’t practical, a large opening (sometimes with a header and columns) can give you sightlines and light while keeping some wall for cabinets or a TV.
- Removing a half wall in the kitchen: Half walls often hide wiring or low ducts. Open them carefully and plan a new railing, pony wall cap, or built-in furniture so the space still feels grounded.
Micro Case: Half Wall & Closet Wall Surprises
One HouseSumo reader planned a quick weekend project. They wanted to open a short half wall next to the kitchen and combine two shallow closets into a single pantry. On paper it looked simple; in reality, the framing told a different story.
- When they opened the half wall in the kitchen, they discovered a bundle of electrical cables feeding nearby outlets and lighting. An electrician had to reroute and tidy the wiring before the new railing and pony-wall cap could be installed.
- The wall between the two closets wasn’t load-bearing, but it did hide a return-air duct and a low plumbing vent for an upstairs bath. Instead of a full tear-out, the contractor reframed a wider opening and built a deeper central section of shelving to work around the services.
The takeaway: even “small” interior walls can hide important wiring, ducts, or vents. Always open a few careful inspection holes and have a plan (and budget) for what you’ll do if the wall contains more than just studs and drywall.
References (official & expert sources)
- Photo By John Schilling
- On the Web: Live-in kitchen ideas from professional kitchen remodel designers
- HomeAdvisor – Cost to Remove a Wall (U.S. cost ranges)
- Angi – How Much Does It Cost to Remove a Wall?
- Bob Vila – How to Identify a Load-Bearing Wall
- Realtor.com – How to Tell if a Wall Is Load-Bearing
- Your local city or county building department – permit and inspection requirements for interior wall removal
- Author: Perla Irish — Home Improvement Editor at HouseSumo. Profile
- Reviewed by: Ricky McLain, P.E., SE — Structural Engineer & Mass Timber Specialist (structural review and load-bearing wall guidance). Reviewer’s public profile lists these credentials; review does not imply endorsement of specific products or suppliers.
Editorial note: This guide reflects general best practices at the time of writing. Building codes and costs change over time and vary by location; always confirm requirements locally.
How we researched this guide: We combined building-code fundamentals with cost data from national remodeling cost guides (HomeAdvisor, Angi, Bob Vila) and common scenarios shared by HouseSumo readers. Always confirm exact requirements and pricing with local professionals.
Last Updated: November, 2025
FAQs:
What is the first step in opening up the space between my kitchen and living room?
The first step is to determine if the wall you want to remove is load-bearing or not. Use a stud finder and inspection holes to understand the framing, check the basement or attic for how joists bear on the wall, and then confirm your findings with a structural engineer or qualified contractor before planning any demolition.
How can I ensure the structural integrity of my home during the wall removal process?
It is important to plan for support during and after demolition. If the wall is load-bearing, you will need a properly sized support beam and solid posts down to a suitable bearing point. Build temporary support walls before removing any studs, follow your engineer’s design, and arrange for building department inspections before closing up the beam and supports.
Will I need to hire professionals to move electrical or plumbing fixtures during the remodel?
In most areas, building codes strongly recommend – and sometimes require – that you hire licensed electricians and plumbers to move switches, outlets, water lines, drains, gas lines, or vents. While experienced DIYers can sometimes handle minor work, utilities inside a wall between the kitchen and living room are not a good place to learn. Pros make sure everything is safe and up to code.
What tools will I need to successfully remove a wall between my kitchen and living room?
You will need a stud finder, utility knife, pry bar, three-pound hammer, reciprocating saw, and standard framing tools (tape measure, level, drill/driver). For the new beam and supports, you may also need temporary support wall materials, ladders, and lifting help. For finish work, plan on drywall tools (mud pan, knives, sanding blocks) and painting supplies.
Once the wall is removed, how do I finish the project?
After you remove the wall and your contractor installs and passes inspection on the new beam and posts, the remaining work is mostly finish: wrap or cover the beam and supports, patch ceiling and wall drywall, tape and mud joints, sand smooth, and then prime and paint. From there, you can install any new trim, cabinets, or island/peninsula you’ve planned to complete your new open kitchen–living space.
 7")


 13")

 15")
