• DIY
    • Crafts
      • Outdoors & Garden Projects
    • Decorating
      • Exterior Painting & Decorating
      • Painting & Wallpaper
      • Room by Room
    • Furniture
      • Cabinets
      • Tables
    • Woodworking
  • Home Improvement
    • Real Estate
    • Living
    • Entertaining
    • Home Building & Design
      • Home Interior
      • Home Exterior
    • Home Management
      • Home Organization
    • Remodeling
    • Living Areas
    • Bathroom
    • Kitchen
  • Lawn & Garden
    • Lawn Care
    • Vegetable Gardening
    • Landscaping
      • Irrigating
    • Flowers
    • Trees & Shrubs
  • Categories
    • Home Improvement
    • Lawn & Garden
    • Landscaping
    • Real Estate
Housesumo.com
  • DIY
    • Crafts
      • Outdoors & Garden Projects
    • Decorating
      • Exterior Painting & Decorating
      • Painting & Wallpaper
      • Room by Room
    • Furniture
      • Cabinets
      • Tables
    • Woodworking
  • Home Improvement
    • Real Estate
    • Living
    • Entertaining
    • Home Building & Design
      • Home Interior
      • Home Exterior
    • Home Management
      • Home Organization
    • Remodeling
    • Living Areas
    • Bathroom
    • Kitchen
  • Lawn & Garden
    • Lawn Care
    • Vegetable Gardening
    • Landscaping
      • Irrigating
    • Flowers
    • Trees & Shrubs
  • Categories
    • Home Improvement
    • Lawn & Garden
    • Landscaping
    • Real Estate
Featured of DIY Table Saw Fence: Extended Fence for a Table Saw
  • DIY
  • Home Improvement
  • Remodeling
  • Woodworking

Build an Extended Fence for Your Table Saw’s Infeed and Outfeed Tables

  • Perla Irish
  • June 24, 2018
Total
6
Shares
6
0
0
0

How to build a long, straight, and sturdy fence for a table saw with a long table. This fence could be used for ripping long stock on a standard contractor saw or for cutting flats on logs on a saw with a large blade.

Do you need an extra-long fence that will stand up to heavy use? The DIY table saw fence described in this article is simple to build and we show you how to make it up to 24 feet long.

Most people don’t need a fence that long but we’ll show you how and you can customize the length to fit your needs.
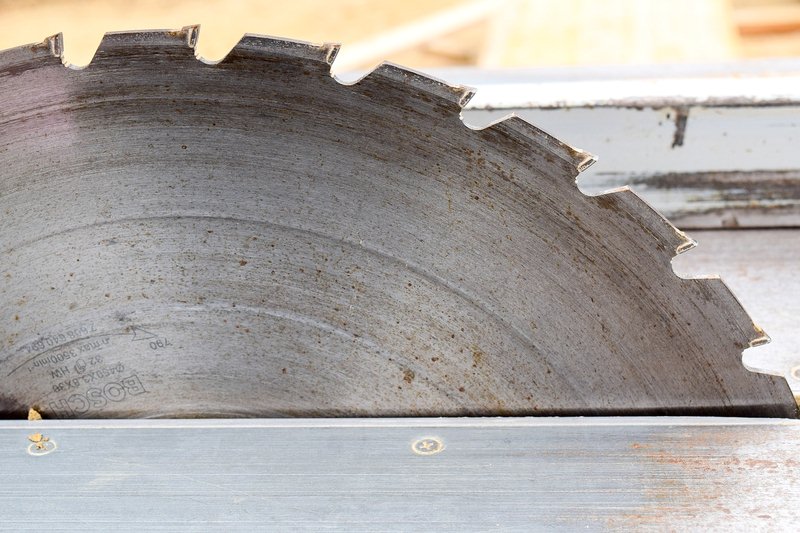
Build an Extended Fence for Your Table Saw's Infeed and Outfeed Tables
Build an Extended Fence for Your Table Saw’s Infeed and Outfeed Tables (DIY Table Saw Fence)

DIY Table Saw Fence, Extended Fence for a Table Saw

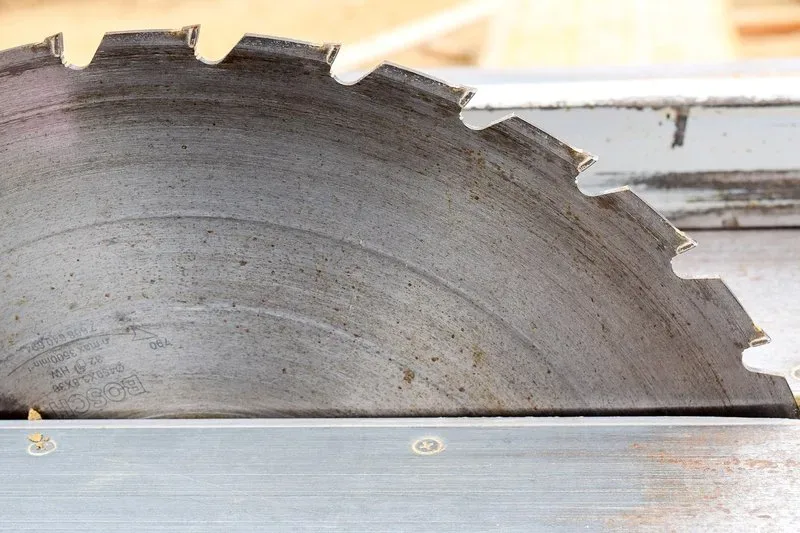
The fence on a table saw acts as a guide for the piece of wood being cut. If you have long stock to rip, extending the fence or using a longer fence is a good idea.

The more of the stock you can keep against the fence, the easier it is to make a straight cut. Let’s take a look at how to make a DIY extended fence for a table saw.


Read Also:

  • How I Made My Farm Table, Plus Free 39+ DIY Farm Table Plans to Build Yourself
  • Interesting Particulars to Learn about Woodworking and Carpentry
  • How to Go About Buying and Building a Vinyl Fence

Table Saw Fence Considerations

The fence in this article is 24 feet long, but you can make it longer or shorter as needed. The technique is the same and we’re using 24 feet to demonstrate that technique.
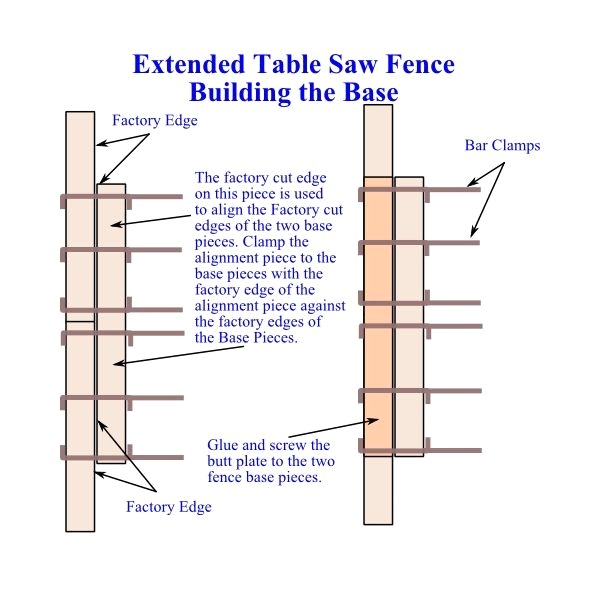
Extended DIY Table Saw Fence Base

Make a DIY table saw fence as straight as possible. Use the factory cut edge of a piece of plywood as a straightedge to align the pieces for the base of the fence.

Wherever you join two lengths of wood for the base of the fence, use a factory cut edge for the butt plate and another one to align it.

A 24 Foot-Long Fence

Purchase two sheets of a 4-by-8 foot, 3/4-inch thick birch plywood, and have the home center or lumberyard rip two, 12 1/2-inch wide pieces off the factory edges of both sheets. A 12-inch wide rip cut is the narrowest cut most home centers will do for safety reasons.

Having the home center or lumber yard make these four cuts will save you some trouble. Be sure to mark the factory edges before they make the cuts.
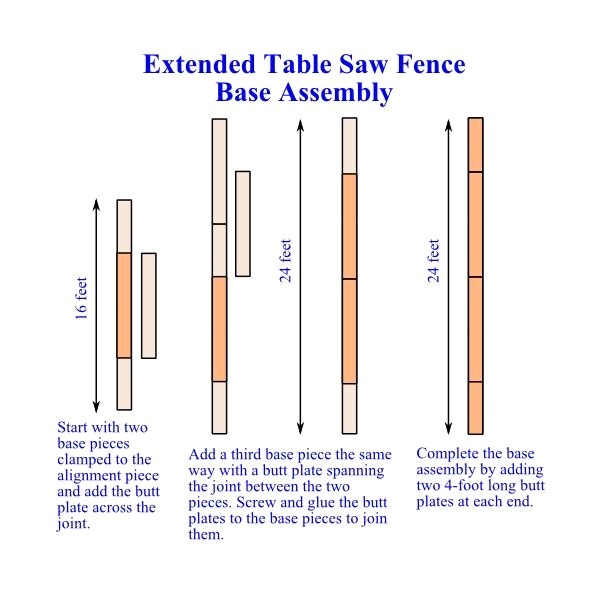
Extended Table Saw Fence Base Assembly

Set your table saw up for a 6-inch wide rip cut. Place the factory edge against the fence and rip eight, 6-inch wide pieces from the four with the factory edges.

Cut two additional 6-inch wide strips off of the leftover sheets. It is important that all the pieces are the same width rather than one piece at 6 inches and one at 5 15/16 inches.

Place two base pieces end-to-end with the factory cut edges on the same side. Place the alignment piece with the factory edge against the two base pieces and clamp it in place with bar clamps.
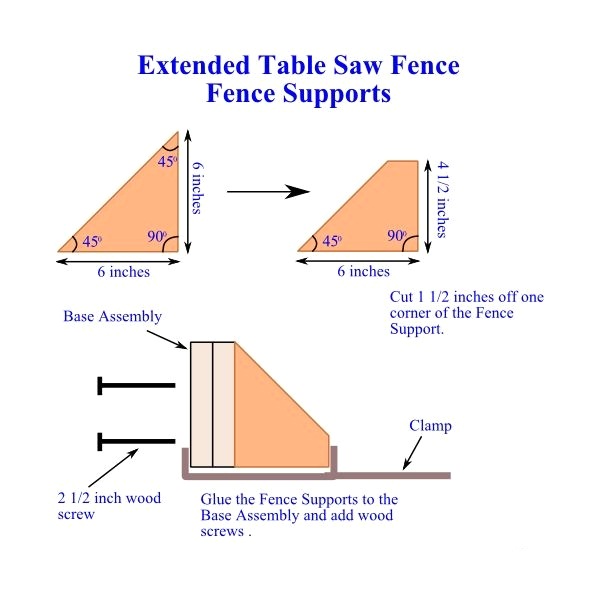
Extended DIY Table Saw Fence Supports

Spread yellow wood glue over the two base pieces for 4 feet on either side of the butt joint. Lay a butt plate over the two end-to-end pieces with half of the strip overlaying each piece.

Add a third base piece to the assembly, in the same way, using a butt plate to join it to the first two pieces. Give the glue an hour to set up.

While the glue dries, make 15 fence support brackets. The brackets are right triangles with two 45-degree angles and one 90-degree angle.

The two short sides are 6-inches long. Accurately cutting the angles is essential. Cut 1 1/2 inches off one of the 45-degree corners on each piece. (See Drawing.)

Stand the base assembly on the factory edge. Glue and screw the fence support brackets to the base assembly, spacing support brackets about 15-inches apart.

Where two face pieces will meet, use two brackets about 1-inch apart. Leave a 4-inch space at the end of the base assembly so you can clamp it to the saw table.

Use yellow wood glue and 1 1/2 inch long #8 wood screws to glue and screw the faceplates to the fence support brackets and the base assembly to complete your DIY extended fence for a table saw.

Safety Considerations
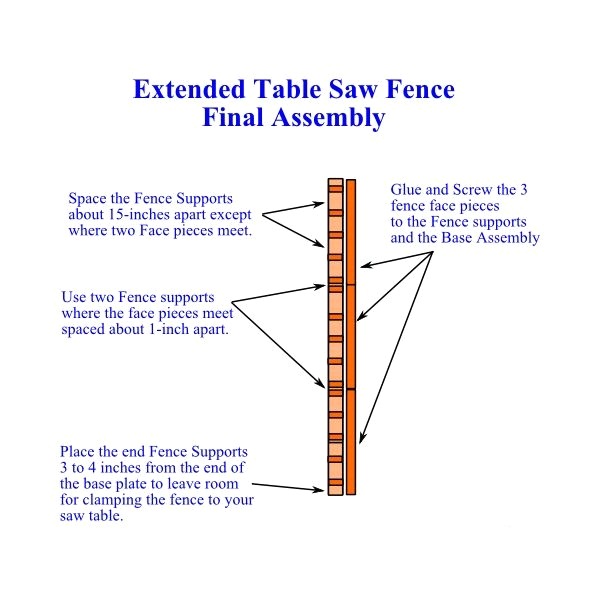
Extended DIY Table Saw Fence Final Assembly

Thin stock can become wedged underneath a fence if there is a gap. Ensure your extended table is flat and flush with the saw table and there are no gaps between the fence and the table.

A piece of stock that becomes wedged while cutting can turn a relatively safe operation into a deadly one.

Always firmly clamp the extended fence to the extended saw table so it can’t move.
0
0
6
0
Total
6
Shares
Pin it 6
Share 0
Tweet 0
Share 0
Share 0
Perla Irish

Perla Irish, who is more familiarly called Irish, is the Content Manager at Housesumo.com. She loves following trends around home and garden, interior design and digital marketing. Through this blog, Irish wants to share information and help readers solve the problems they are experiencing.

Related Topics
  • diy
  • extended
  • fence
  • table
  • woodworking tips
Previous Article
Featured of Alternative Home Cooling Methods, Reducing the Energy Cost of Home Air Conditioning
  • Home Improvement
  • Lawn & Garden
  • Living
  • Tips
  • Trees & Shrubs

Alternate Home Cooling Methods, Reducing the Energy Cost of Home Air Conditioning

  • Perla Irish
  • June 24, 2018
View Post
Next Article
Featured of Do It Yourself Wood Fence Installation for the Homeowner
  • DIY
  • Landscaping
  • Lawn & Garden

Install a Wood Fence in 7 Steps

  • Perla Irish
  • June 25, 2018
View Post

You May Also Like

A cozy mobile home in a sunny neighborhood with palm trees, hills, and clear blue skies, highlighting affordable modern living.
View Post
  • DIY
  • Finances
  • Home Improvement

How to Qualify for a California Mobile Home Loan in 2025

  • Perla Irish
  • May 8, 2025
Modern interior door with a high-gloss red lacquer finish in a vibrant, eclectic living room during a summer afternoon, colorful artwork on the walls, patterned rug, natural light enhancing the door's bold color, showcasing elegance and durability.
View Post
  • Decorating
  • DIY
  • Home Improvement
  • Painting & Wallpaper

3 of the Best Finishes for Interior Doors

  • Perla Irish
  • April 29, 2025
featured image - Different Types of Roofing and Its Advantages
View Post
  • DIY
  • Home Exterior
  • Home Improvement

Different Types of Roofing and Their Advantages

  • Perla Irish
  • April 25, 2025
Close-up shot of a leaking air conditioning unit indoors, showing water droplets forming on the metallic fins and dripping into a small, stagnant puddle on the dusty concrete floor, highlighting AC maintenance problems in a dimly lit basement.
View Post
  • DIY
  • Home Improvement
  • HVAC

Why Is My AC Leaking Water?

  • Perla Irish
  • April 22, 2025
Rooftops in a modern city with solar panels and eco-friendly roofing repairs underway under a clear sky.
View Post
  • DIY
  • Home Exterior
  • Home Improvement

Why Roofing Repair Services Are Crucial for Sustainable Urban Infrastructure

  • Perla Irish
  • April 20, 2025
Sunlit backyard with vibrant artificial grass, modern patio, and family-friendly outdoor space under clear blue skies.
View Post
  • DIY
  • Landscaping
  • Lawn & Garden

Why Homeowners in Burbank Prefer Artificial Grass for Their Lawns

  • Perla Irish
  • April 20, 2025
Using a paint sprayer gun to paint a wooden surface in a workshop.
View Post
  • Decorating
  • DIY
  • Furniture
  • Home Improvement
  • Painting & Wallpaper

How to Paint Furniture with a Paint Sprayer

  • Perla Irish
  • April 19, 2025
Stop pests before they invade!
View Post
  • DIY
  • Home Improvement

What Is the Best Way to Prevent Pest Infestation?

  • Perla Irish
  • April 11, 2025

Leave a Reply Cancel reply

Your email address will not be published. Required fields are marked *

This site uses Akismet to reduce spam. Learn how your comment data is processed.

Join 13,000 folks!

Get instant access to our weekly newsletter where we share the best! 100% Privacy. No Spam.

  • Disclosure
  • Privacy Policy
  • Terms of Use
  • About
  • Sitemap
  • Contact Us

Input your search keywords and press Enter.