Last Updated: August 2025
🕒 Estimated Time to Complete: 2–3 days for beginners (including drying times)
Finishing drywall requires patience and skill. Many steps are involved, and knowing what you’re doing before beginning is essential. This blog post will walk you through the basics of finishing drywall so that your project turns out perfect! Whether you’re taking on this DIY drywall project for the first time or just need a refresher, this guide will provide the expert tips and clear steps needed for a professional finish.

Drywall finishing is the process of preparing drywall for painting or wallpapering. It involves taping, filling holes with compounds, and sanding to create a smooth surface. The goal of any drywall finisher should be to cover up the seams in the drywall without making them too obvious. For those considering decorative options, you may want to explore how to get the perfect Venetian plaster walls as an alternative finish.
The cost to finish drywall depends on the current state of your walls, their height, and the type of finish you are after. Go here for more cost information from Home Garden Guides.
For official guidance on materials and techniques, refer to USG’s Drywall Finishing Resources, a trusted leader in gypsum construction.
Tools & Materials Checklist
| Tool/Material | Description |
|---|---|
| 🧵 Drywall Tape | Covers seams between drywall sheets |
| 🪣 Joint Compound | Smooths over joints and screw holes |
| 🥄 Mud Pan | Holds joint compound during application |
| 🔪 12-inch Drywall Knife | Prepares the surface before painting |
| 🧰 Trowel | Applies compound to larger areas |
| 🧽 Sanding Block / Hand Sander | Smooths dried compound |
| 📄 100-Grit Sandpaper | Medium texture for final sanding |
| 🧹 Shop Vacuum | Cleans dust and debris |
| 🎨 Primer | Prepares surface before painting |
| 🖌️ Paint or Wallpaper | Final surface finish material |
| 🌬️ Ceiling Fan | Helps manage dust during sanding |
| 🛡️ Drop Cloth / Plastic Sheeting | Protects surrounding surfaces |
| 😷 Safety Glasses & Dust Mask | Protection during sanding |

Step-by-Step Instructions

1. Cleaning
Step one is to clean up any dust or debris around the room using a shop vac. It’s also essential to clear away anything in the area surrounding the walls being worked on – furniture and other items should be moved as far away as possible.
2. Taping
Running tape and finishing compound should not have any bubbles or clumps, so it’s essential to mix the two ingredients thoroughly before applying them with a trowel.
Use either mud (for texturing) or joint compound (for smoothing) in small sections. The first coat of drywall compound should be about an eighth of an inch thick – this is called the “scratch” coat. For a breakdown of which drywall types are best for different environments, see our guide on the reasons why you might want to use drywall.
3. Applying Drywall Mud
After taping, start applying drywall mud. First, apply a generous amount of joint compound over the tape with your trowel at a 45-degree angle. Try not to put too much compound on the tape, or it will squeeze out when you smooth it.
If you are drywalling a basement or ceiling with moisture- and mold-resistant drywall, consider using a special mud that is also moisture-resistant. Refer to EnergyStar for moisture control recommendations in residential construction.
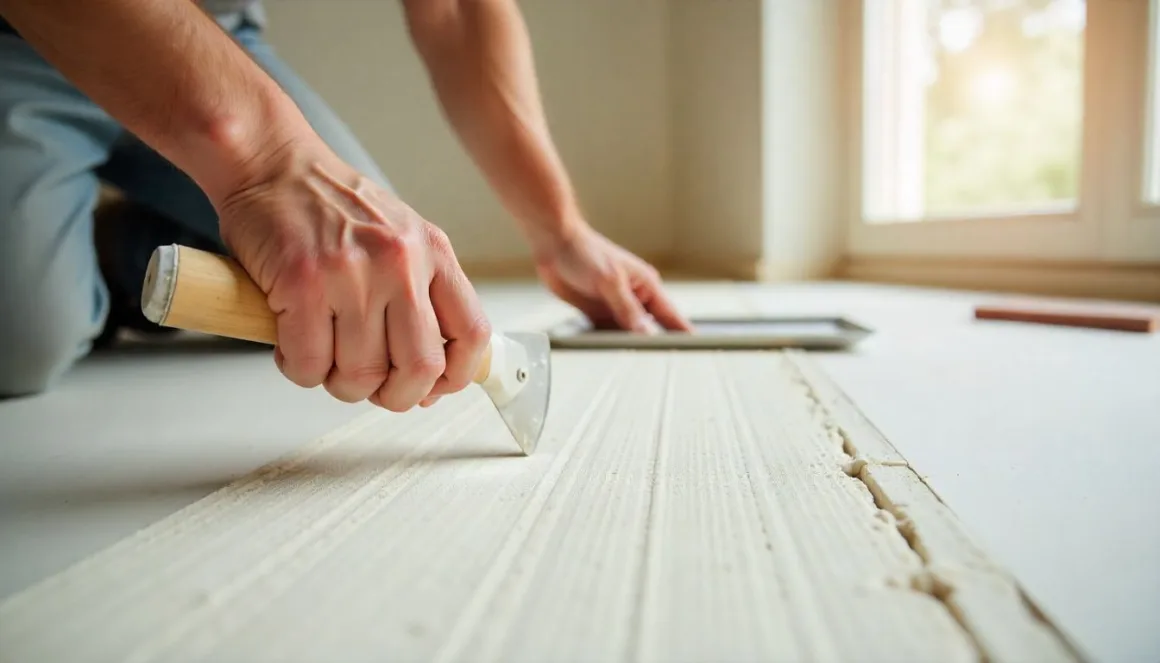
4. Using a Trowel to Apply Drywall Mud
Grab your 12-inch knife and gently go over the scratch coat until all the little peaks are gone. Make sure there is enough mud on top of the tape so that once you have removed all of the peaks, it is flat and even.
5. Using a 12-Inch Knife to Smooth Out Drywall Mud
Let this first coat sit for about 30 minutes until it becomes tacky. Then apply another thin layer over the top at a 45-degree angle with your trowel. Smooth as you go.
6. Applying the Second Coat
After letting the second scratch coat sit for 30 minutes, you’re ready to start sanding. Use your ceiling fan to help disperse the dust, and begin sanding from the top down using a back-and-forth motion with your sanding block. For best sanding results, refer to these drywall sanding tips.
7. Sanding to Prepare for Primer
Once again, let it sit for 30 minutes until tacky. Then apply another thin layer of mud using your trowel at a 45-degree angle. Try to keep it thin—about an eighth of an inch.
8. Final Coat of Drywall Compound
After the final layer sits for 30 minutes, use your 12-inch knife to gently go over the surface using a circular motion. Smooth out any areas missed by the trowel, and ensure no large clumps are left behind.
9. Using 100-Grit Sandpaper for Final Smoothing
As an added step, use a hand sander with 100-grit sandpaper to smooth out any of the scratches from your trowel. Take your time here—this step determines how flawless your wall will look under paint.
10. Priming the Surface
Let the final coat dry for about an hour before priming. Use either oil-based or water-based primer, applying it evenly over all surfaces using a brush or roller. Don’t forget the ceiling!
11. Applying Texture (Optional)
If you want a textured finish, use either sand-texture spray cans or drywall mud with mesh attached. Apply texture evenly. Avoid mixing more than two textures in the same room.
For advanced texture styles, the Cool Roof Rating Council provides insights on reflective finishes that improve energy efficiency.
Watch a Quick Tutorial
🎥 Need a visual walkthrough? Watch this helpful video on finishing drywall step-by-step:
🔗 Watch on YouTube
Common Mistakes to Avoid
- Using too much mud in early coats
- Skipping drying time between coats
- Failing to sand between layers
- Forgetting to prime before painting
Drywall Finishing FAQs
Looking for pro tips on how to finish drywall with fewer mistakes? This section breaks down the most asked questions.
How long does it take to finish drywall?
Typically, 2–3 days for a beginner, allowing drying time between coats.
Can I do it myself or hire a pro?
Many homeowners complete this DIY project with the help of guides like this. You can DIY if you follow the steps carefully. However, for large or high-traffic rooms, hiring pros ensures a flawless result.
Is sanding always required?
Yes. Sanding helps smooth transitions between layers.
What’s the best primer to use?
Use a stain-blocking, drywall-specific primer. Both oil- and water-based work, but water-based is more eco-friendly.
Are there safety concerns when sanding drywall?
Yes. Always wear a dust mask and safety goggles to protect yourself from airborne particles.
Pro Tips
- Always apply mud at a 45-degree angle.
- Alex’s Tip: “In my first drywall job, I rushed through the sanding step and ended up with uneven textures that showed through the paint. Ever since, I always do a touch test with my hand to feel for evenness before moving on to primer.”
- Alex’s Experience: “On one occasion, I used the wrong type of mud in a damp basement, and it began to crack within a week. Now, I always double-check the material compatibility when working in areas with high humidity.”
- Use a ceiling fan to keep dust from settling.
- Start with small walls to build confidence before tackling larger rooms.
- Use professional-grade tools for better control and cleaner results.
Final Steps
This DIY drywall project is nearly complete! The final step is applying paint or wallpaper over your beautifully finished drywall. If this seems like too much work (and it isn’t), many people choose to hire professionals for their drywall finishing projects.
Reviewed By
Reviewed by: Marcus Hale, Licensed General Contractor (License #GC248191).
Marcus has 20+ years of experience in residential construction and specializes in drywall, framing, and interior finish work. He reviews all technical content to ensure accuracy and adherence to current building practices and safety standards. View Marcus’s verified credentials on the State Contractor License Board.
Disclaimer: This guide is for informational purposes only and should not be considered a substitute for professional advice or consultation. Always follow local building codes and safety regulations.

Written by: Alex Reynolds
Certified Home Renovation Specialist | Member of the National Association of Home Builders
Alex is a trusted voice in the DIY community, known for clear and actionable renovation advice. With over a decade of hands-on experience in residential remodeling, drywall repair, and finish work, he brings expert insight to every guide. Alex has contributed to publications like Family Handyman and ToolCrave, and licensed contractors regularly review his how-to articles. He holds a Level 2 Certification in Drywall Finishing and is a guest speaker at regional builder expos. His work references national building standards and best practices from organizations such as USG, Energy Star, and the NAHB. Alex is a trusted voice in the DIY community, known for clear and actionable renovation advice. With contributions to major home improvement blogs and hands-on experience, he empowers readers to approach home repairs with confidence. His work references national building standards and best practices from organizations like USG and EnergyStar.
Citations & Sources
- Home Garden Guides – Drywall Finishing Costs
- USG – Drywall Finishing Resources
- EnergyStar – Moisture Control for Residential Construction
- Cool Roof Rating Council – Reflective Finishes & Energy Efficiency
- National Association of Home Builders – NAHB
- Family Handyman – Home Renovation Tips
Need more DIY inspiration? Check out our guides on house painters and house paint jobs.


 11")

 13")
