Walk into a room with well-done Venetian plaster and you notice it straight away. The walls don’t just look painted – they have depth, soft movement, and a stone-like sheen that makes the whole space feel more considered. If you’ve ever wondered how professionals get that look, this breakdown of the Venetian plaster technique will help you understand what’s involved and whether it’s realistic for your next project.
This guide is written for homeowners, design-minded DIYers, and anyone planning to hire a decorative plasterer. You’ll learn what Venetian plaster actually is, what the technique looks like in practice, and how to avoid the mistakes that leave walls looking patchy instead of polished.
Quick Overview of the Venetian Plaster Technique
- Start with the wall: clean, smooth, properly primed surfaces are non-negotiable.
- Apply thin coats: most systems use 2–3 very thin layers of lime or acrylic plaster.
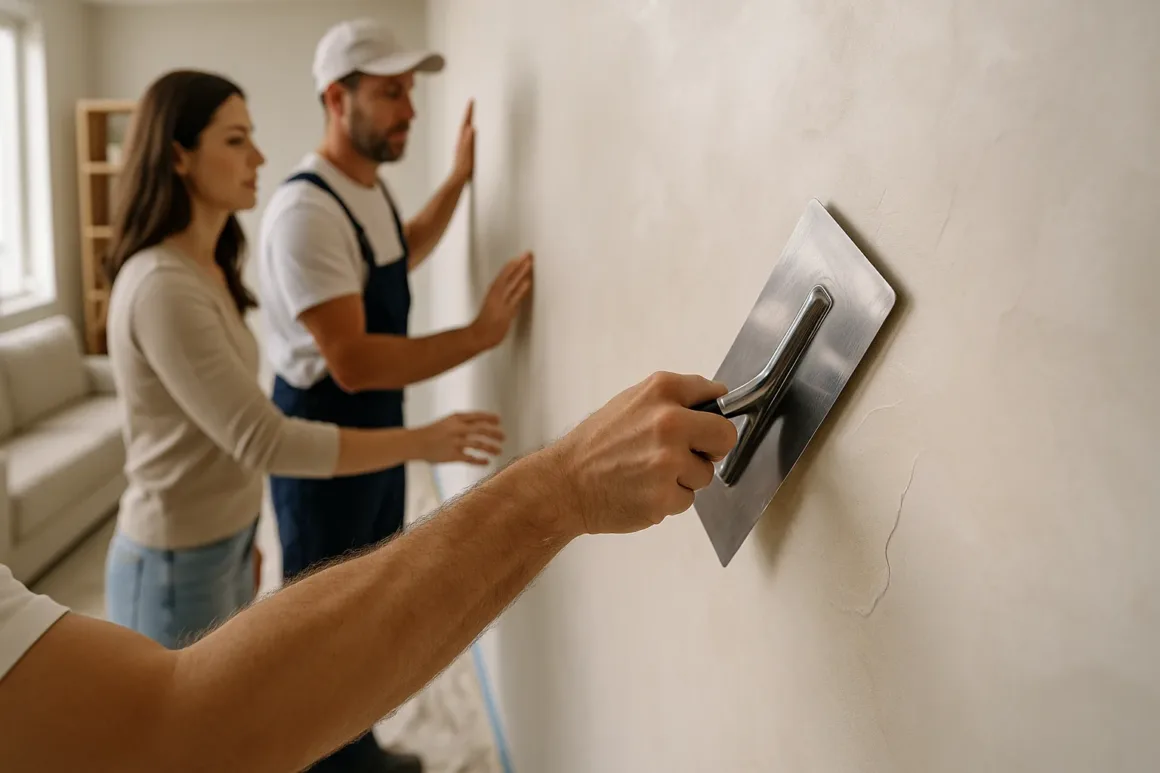
- Use a steel trowel: change your angle and pressure to build soft variation and movement.
- Burnish at the right time: compress the almost-dry final coat for a marble-like sheen.
- Seal when needed: wax or a compatible topcoat protects the finish, especially in busy rooms.
If there’s a single rule to keep in mind, it’s this: the Venetian plaster technique rewards patience and light, controlled passes. Rushing or loading on heavy coats usually leads to extra sanding later.
What Is Venetian Plaster, Really?
Traditional Venetian plaster is a mineral wall finish made from slaked lime and marble dust. It’s trowel-applied in very thin layers and then polished until it resembles stone. Compared with basic textured paint, it can be finished anywhere on the spectrum from soft, velvety matte to mirror-like gloss that reflects light and highlights architectural details.
You’ll often see a few related terms used alongside “Venetian plaster”:
- Polished plaster – an umbrella term for lime plasters that are compressed and burnished to a smooth, sometimes glossy finish.
- Marmorino – a family of lime plasters with marble aggregates that can read as stone, concrete, or classic marble, depending on the mix and technique.
- Acrylic “faux” Venetian plasters – modern, tintable products that imitate the look but behave more like specialty paints.
HouseSumo also has a practical walkthrough of an acrylic system in How to Apply Faux Venetian Plaster Finish, Decorative Paint Technique, which is a good option if you’d like a similar look with a slightly gentler learning curve.
Is Venetian Plaster Right for Your Room?
Before you commit, it helps to decide whether Venetian plaster actually fits your space, budget, and tolerance for maintenance. It’s beautiful, but it isn’t the default choice for every wall.
Why people choose it
- High-end look – subtle variation and depth that are hard to match with flat paint alone.
- Durability – when applied correctly and sealed, the finish holds up well to everyday life.
- Breathability – many lime-based plasters are vapor-permeable, which can be helpful on older walls and in some humid climates.
- Design flexibility – works on feature walls, stairwells, fireplaces, and ceilings, and pairs well with both traditional and modern interiors.
Trade-offs to consider
- Higher cost than paint – both materials and skilled labor cost more than a typical repaint.
- Skill-based finish – it takes practice to control the trowel, timing, and thickness of each coat.
- Harder to reverse – changing your mind later usually means sanding, priming, and rebuilding the finish.
Your wall construction matters too. If you’re working with new boards or renovating down to the studs, it’s worth reading The Advantages and Disadvantages of Plasterboard so you know what you’re finishing and how it will behave over time.
Tools and Materials for a Clean Venetian Plaster Finish
You don’t need an industrial setup, but the right tools will save you a lot of frustration and make the Venetian plaster technique far easier to control.
Core tools
- Flexible steel Venetian plaster trowel (rounded corners help prevent scratch marks).
- 4–6″ drywall knife or small trowel for corners, edges, and awkward areas.
- Hawk or mud pan to hold plaster and keep your trowel loaded.
- Drill with mixing paddle for smooth, consistent texture and color.
- Fine sandpaper (220–400 grit for prep; very fine for light corrections).
- Painter’s tape and drop cloths to protect trim and floors.
- Lint-free cloths or felt pads for buffing wax or sealer.
Pro tip: For your first project, invest in one good mid-sized trowel instead of a handful of cheaper, very small ones. A flexible, well-made trowel is easier on your wrists and makes it much simpler to keep coat thickness under control.
Materials
- Your chosen Venetian plaster product (lime or acrylic, depending on look and project needs).
- Compatible primer, often a sanded or “quartz” primer that adds tooth.
- Colorant or pre-tinted plaster in your chosen shade.
- Wax or topcoat sealer recommended by the manufacturer for your application.
If your walls are still at the drywall stage, take the time to get them flat and smooth first. HouseSumo’s How to Finish Drywall: Step-by-Step DIY Guide + Pro Tips is a helpful companion before you move into decorative finishes.
Step-by-Step Venetian Plaster Technique
Every brand has its own instructions and working times, so always read the technical sheet on the product you’re using. The steps below describe the general sequence most Venetian plaster systems follow. Expect the whole process to take at least a couple of days with drying time, not a single afternoon.
1. Prepare and Prime the Surface
- Repair nail pops, cracks, and dents, then sand the patches flush with the surrounding wall.
- Degrease and dust the surface, especially in kitchens and high-touch areas.
- Prime with the primer recommended for your plaster system, which often dries to a slightly gritty surface to help the plaster grip.
Most problems that show up later – peeling, uneven sheen, ghosted repairs – can be traced back to this stage. The more consistent and clean the substrate, the better your final result.
2. Practice on a Sample Board
Before you touch the main wall, practice the Venetian plaster technique on primed scrap drywall or sample boards. Try a few small mockups with different trowel angles, stroke lengths, and pressures. You’ll quickly get a feel for how little material you actually need and how the plaster responds when you change your angle or pressure.
Pro tip: Keep one practice board untouched after it dries. It’s useful later when you want to see how a wax or sealer will change the color and sheen before you commit to the whole room.
3. Apply the First Coat (Base Layer)
The first coat is about even coverage and creating a solid base. Don’t worry if it doesn’t look “finished” yet.
- Load a modest amount of plaster onto the trowel.
- Hold the trowel at around 15–30° to the wall.
- Work in sections of roughly 1 × 1 m (3 × 3 ft), using a mix of short and slightly longer strokes.
- Keep the coat very thin – just enough to hide the primer and level minor texture.
A few chatter marks and slight color shifts are normal at this stage. Allow the coat to dry fully according to the product’s instructions before moving on.
4. Apply the Second Coat (Build Movement and Depth)
The second coat is where the wall starts to look intentional instead of patchy.
- Increase the trowel angle to about 45–60°.
- Use overlapping, crisscross strokes to build soft movement and variation.
- Vary your pressure slightly so some areas catch more plaster and others stay lighter.
- Feather your edges and avoid stopping in the middle of a large, open area whenever possible.
Step back now and then and look along the wall in natural light. If one area feels heavier or lighter than the rest, you can subtly correct it with your next passes.
5. Optional Third Coat and Burnishing
If you want a deeper, more luxurious look, a third, very thin coat can help pull everything together and prepare the surface for burnishing.
- Skim on a whisper-thin layer, concentrating on areas where you want more movement or depth.
- After a short set time (often 15–30 minutes, depending on product and climate), check the surface with a fingertip. It should feel firm and only slightly cool, not soft or tacky.
- When it’s ready, burnish by running the trowel over the surface at a high angle (80–90°) with firm, smooth passes.
As you compress the plaster, you’ll see the surface tighten and a soft sheen develop. Rounded trowel corners and relaxed wrists make it easier to glide without leaving drag marks.
6. Wax and Seal for Protection
Once the plaster has fully dried, a compatible wax or sealer can deepen the color, add subtle sheen, and make day-to-day cleaning easier.
- Apply a thin, even coat of wax or sealer with a trowel, cloth, or pad, following the product instructions.
- Allow it to haze lightly if recommended.
- Buff until you reach the level of sheen you prefer, from soft satin to a higher gloss.
In busy hallways, kitchens, and baths, this extra step offers good value. If you love the depth of plaster but want something closer to a traditional paint process on a different project, HouseSumo’s How to Paint Faux Italian Plaster, Mottled Wall Technique shows how to create movement with standard latex paint.
Common Venetian Plaster Mistakes (and How to Avoid Them)
- Rushing prep – glossy spots, old repairs, and grease patches can show through or cause adhesion issues. Sand, clean, and prime carefully.
- Coats too thick – heavy coats take longer to dry, are harder to control, and are more likely to crack or show trowel marks.
- Visible stop lines – starting and stopping in the middle of a big wall without feathering edges can leave bands you’ll see every time the light changes.
- Burnishing too early – burnishing while the plaster is still soft tears the surface instead of polishing it. Wait until it’s firm to the touch.
- Using the wrong product for the room – some mixes are fine for living areas but not for constantly wet shower zones. Match the product to the conditions.
Pro tip: If you’re unsure about an area, stop and let a small patch dry completely. It’s much easier to adjust your technique on the next coat than to fight a wall that’s setting up too quickly.
Maintenance, Touch-Ups, and When to Re-Plaster
Day to day, Venetian plaster is usually easier to live with than it looks from the photos.
- Routine cleaning: dust with a soft cloth; use a damp cloth and mild, non-abrasive soap for fingerprints and smudges.
- Light scuffs: may buff out with a soft cloth; if needed, a gentle pass with very fine sandpaper followed by a little wax can blend the mark.
- Deeper damage: larger scratches or chips typically require patching with fresh plaster and careful blending, especially on high-gloss finishes.
Where there’s more serious wall movement or moisture damage, you’ll usually get better results by calling in a plaster specialist rather than fighting the problem yourself. For bigger repairs and re-do projects, Tips for Choosing a Good Plastering Company explains what to look for in quotes, references, and portfolios before you decide.
DIY vs Hiring a Professional Venetian Plasterer
When DIY makes sense
- You’re finishing a single feature wall or small room.
- You’re comfortable with basic drywall repair and painting.
- You can spread the project over a few days, allowing full drying between coats.
Start with sample boards, then choose a simple, well-lit wall without complicated corners or angles. Save stairwells, curved ceilings, and large open-plan spaces until you’ve had at least one smaller project under your belt.
When it’s better to call a pro
- You want double-height spaces, curved ceilings, or several rooms finished consistently.
- You’re working in wet areas like shower enclosures that need careful waterproofing behind the decorative layer.
- Your walls show structural cracks or ongoing moisture problems that need diagnosis, not just cosmetic cover-ups.
If you’re collecting quotes, HouseSumo’s Easy to Follow Steps to Finding a Good Plasterer walks through practical checks – from insurance and references to before-and-after photos – so you can compare contractors on more than just price.
FAQs About the Venetian Plaster Technique
Can I use Venetian plaster in bathrooms or kitchens?
Often, yes. Many modern systems are designed for humid environments, as long as you use the correct primer, follow the manufacturer’s instructions, and seal the surface properly. Direct shower walls and constantly wet areas generally require more specialized products and waterproofing behind the decorative finish.
How much does Venetian plaster cost?
Costs depend on your country, the brand you choose, wall condition, and design complexity. As a rule of thumb, Venetian plaster is a premium option compared with standard paint. Many homeowners use it on a few key surfaces – like a fireplace wall or entry hall – instead of every room, which keeps budgets realistic while still delivering impact.
Can I apply Venetian plaster over existing paint?
In many situations, yes. Clean the walls well, dull any glossy paint with sanding or a deglosser, repair defects, and apply the primer recommended by your plaster manufacturer. Once that’s dry, you can follow the usual sequence of thin coats and burnishing.
What if I want to repaint later?
If you decide to go back to ordinary paint, you’ll need to remove or de-gloss any wax or sealer, sand the surface to knock down high spots, and prime thoroughly. It’s more work than repainting over standard latex, but a methodical approach makes it manageable.
Further Reading and Trusted Sources
If you’d like to dig into the history, chemistry, and design options behind Venetian plaster, these resources are a useful starting point:
- Topciment – Venetian plaster: all about this wall decoration technique
- Vasari – Exploring the aesthetic of Venetian plaster finishes
- House Beautiful – Designer guide to Venetian plaster and textured paint
Perla Irish is a home improvement and remodeling writer who focuses on practical how-tos for real households. She specialises in step-by-step guides on topics like wall finishes, HVAC, and energy-smart upgrades, with an emphasis on clear, realistic instructions that homeowners can follow without a trade background.
You can see more of her work and professional background on her MuckRack profile: https://muckrack.com/perlairish
Reviewed by — Lori Blomstrom, Venetian Plaster Artisan & Trainer
Lori Blomstrom is a manufacturer-certified Venetian plaster artisan and trainer. She runs Veneshe Master Venetian Plastering and teaches workshops on Italian lime plasters and Venetian plaster finishes for both homeowners and professionals.
Professional profile: https://www.linkedin.com/in/loriblomstrom
For more on how HouseSumo handles product mentions, affiliate links, and reader trust, see the site’s Disclosure & Affiliate Policy and About pages.
