If you are looking for tools needed to repair doors, you have come to the right place.

There are different ways to fix up a door; maybe you want to put some wooden frames on it or mend the chiseled parts of the door, and to do any repair work, you will need a few things handy.
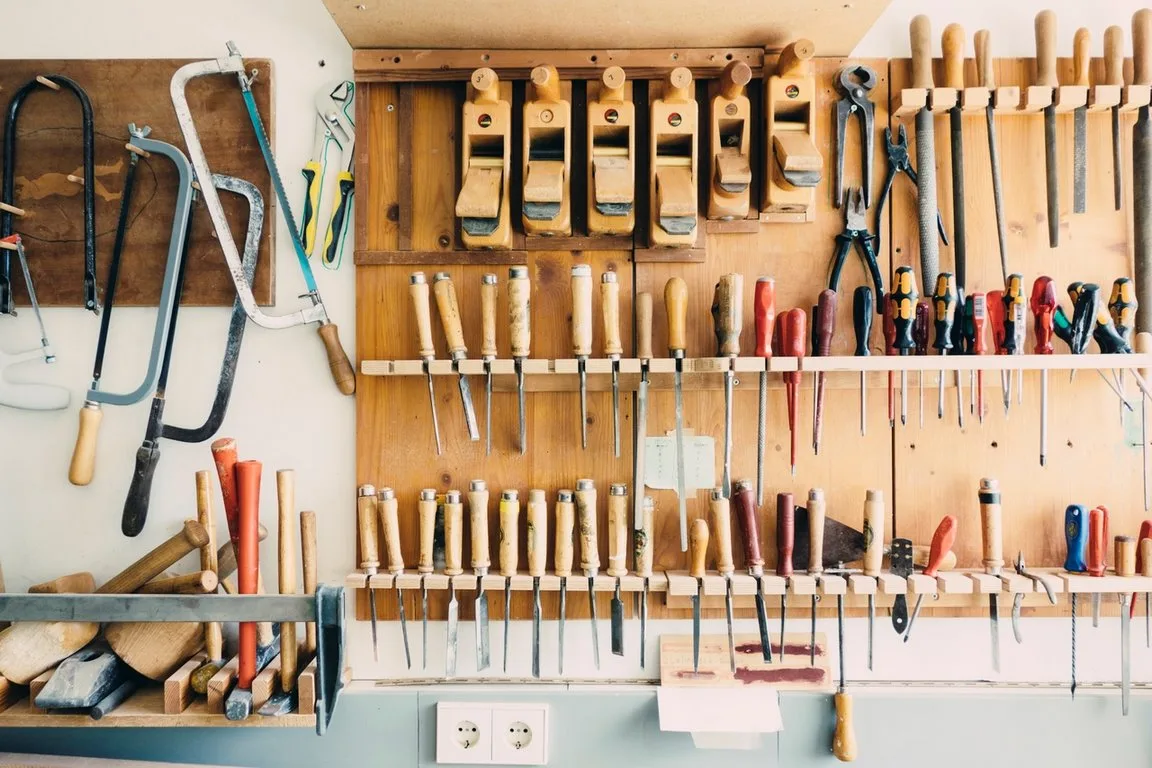
Here is the list of Door maintenance tools:
- Chisels
- Screwdriver
- Cordless Drill
- Screws
- Hammer
- Door Hinge Jig
- Tape Measure
- Pry Bar
Some of these items are everyday tools; you need to repair anything and everything around the home. However, you might also prefer getting some tools specifically designed to improve doors.
You can get most of these tools in your local hardware shop, and they are not very hard to use as well. These tools come in handy for repairing other furniture around the house, too, and once bought, they will set you up nicely for a couple of years. However, make sure to buy the right tool in the correct size.
Door Maintenance Tools
Maintaining your door is an important part of ensuring that it functions properly and lasts for a long time. In order to do so, you will need some specific tools.
Fixing doors is not as hard as it might look. Fixing doors can be easy and also be done in a day. However, you will need to have the essential tools for the repair and an idea of how to do it.
It is best not to start fixing your door abruptly and instead plan out how you want to repair the door. If you are repairing sliding doors, it is best to be extra careful. Sliding doors, the ones fixed with glass and not fiberglass, can be a bit vulnerable and can hurt or injure.
There are various doors you might be repairing or changing for another kind. Foldable indoor doors are a great way to create a partition inside the room, and glass doors are great for patios. However, in any case, wooden doors are the best anywhere.
1. Chisel
A Chisel is a tool with one sharpened end, and the driving force of a hammer is best used if it.
A Chisel is very useful in taking the door hinges out. Also, if the hinges are misaligned, using the chisel to fix it is the best option without taking the whole thing off the door.
2. Screwdriver
A screwdriver is the most helpful tool. Almost for all door repairs, you will need a screwdriver. It is useful in installing and uninstalling the door hinge screws and lock system screws or chain screws.
Also, if the corners and chiseling off, you can use a screwdriver and fix them with a push. A screwdriver comes in handy most times and is even helpful for other repairs.
3. Cordless Drill
You will need to drill the door, where you want to put the hinges, the wall, but the opposite side of the hinge in, and put indoor locks.
Use the Drill and mark the point with a pencil before you start drilling. The Drill is most beneficial to make the correct sized holes for the screw.
Most of the time, the holes do not match up and are not level. Therefore, check to see the area and the level beforehand.
Read Also:
4. Screws
You will need screws to screw in the hinges, locks, or chains. Screws come in all sizes, from miniature to extra big ones.
Make sure to get the ones that will hold your door stably. If you are putting screws in the wall, make sure to push a piece of wood inside to hold the screw more stably.
5. Hammer
Everybody knows the use of a hammer. It is the best tool for all repair jobs and can be used to replace door jabs.
Hammers are also great to put the pieces of wood in drilled holes and the screws. If you are thinking of putting up a coat rack on the backside of the door, a hammer will come in handy to push those screws in place. You can find great Estwing Hammers with Stonex Australia
6. Door Hinge Jig
You know what door hinges are; they are the points of connection and help retain accessibility when opening or closing a door.
A door hinge jig helps you securely put the jig in place and ensure the hinge does not move while you install it. It is very helpful, and you need not worry about measuring the level.
7. Tape Measurer
A Tape measurer is needed for various things, from measuring where you want the hinges and the locks to installing wooden designs in the door. If you have measured it using a measuring tape, you will never go wrong.
8. Pry Bar
A pry bar is used to chisel out a piece of wood sticking out and is even helpful to take out the screws which might be jammed into place.
Use a bit of strength, and you can take out any piece of stuff stuck in a second. However, some pry bar edges can be pretty sharp, so make sure to use them safely.
There are some other tools or accessories you will need to do the fixing or maintenance of the wooden doors:
- Door Hinges: It is important to have a few door hinges on hand in order to ensure that your door can open and close properly. You will need to lubricate the door hinges regularly in order to keep them from rusting or becoming damaged.
- Door Locks: In order to keep your door secure, you will need to have a good quality door lock. You should check the door locks regularly to make sure that they are working properly.
- Doorknobs: Doorknobs are another important part of maintaining your door. You will need to make sure that the doorknob is tight and secure in order to prevent it from coming loose.
- Door Frames: The frame of your door is what holds the door in place. You will need to make sure that the frame is made of a sturdy material in order to prevent it from warping or breaking.
- Door Weatherstripping: In order to keep your door sealed tight, you will need to install door weatherstripping. This will help to prevent drafts and leaks around the door.
- Door Sweep: A door sweep is a strip of material that is installed at the bottom of the door in order to seal off any gaps. This will help to keep out dirt, dust, and pests.
- Doorstop: A doorstop is a device that is used to prevent the door from closing all the way. This can be helpful if you have kids or pets that might accidentally close the door.
- Door Closer: A door closer is a device that is used to automatically close the door once it has been opened. This can be helpful if you want to make sure that the door is always closed when not in use.
- Keyless Entry: If you have a keyless entry system, you will not need to worry about keys getting lost or stolen. This can be a great way to increase the security of your home.
- Deadbolt Lock: A deadbolt lock is a type of lock that cannot be picked or bumped open. This is one of the most secure types of locks available and is often used in conjunction with other security features.
By following these tips, you can ensure that your door is properly maintained and will last for many years to come.
Be sure to check all of the hardware on your door regularly and replace any parts that are worn or damaged. If you have any questions about door maintenance, be sure to ask a professional.
DIY Project Ideas
If you want to use your old doors and reuse them to make other stuff, you are lucky. There are many easy DIY things you can create using old doors, and most of them will be pretty helpful.
So, what are different things you can make? However, sand and polish the items to give them a newly finished look after you make them.
Chair
You can use your old door and transform it to make a chair. If your door comes with decorations, it is all the better. They will go nicely on the back of the chair and give the chair a nice vintage look.
These chairs, if made beautifully, are best for keeping in walk-in closets, powder rooms, and more. Refurbish your door and give it a nice look.
Bedframe
You can also make a bed frame using your old door. This is the easiest to make. Make sure to cut the door symmetrically, and you can put it to the wall using screws or attach it to the bed frame.
Bed frames look very nice and can exponentially increase any room’s attractivity. Therefore, using your old wooden doors to build a makeshift bed frame is the best idea.
Cabinet
You can also choose to make a cabinet using an old door. However, if you are interested in creating a wardrobe, plan it out ahead of starting the work, like the number of drawers, the designs, and more.
This, however, might require a bit more skill to make sense; making a cabinet from regular pieces of wood can be a bit tricky. Most of the time, the cabinets do not turn up to be level. Keep a few things in mind and DIY a cabinet from an old door.
New Door
Instead of throwing the door away, you can sand and polish the door to use it again. Painting an old door will also make sure to hide most of its imperfections, and you can also add some designs to it.
If you feel too lazy to paint, another thing to do is use wallpaper. Using a nice, printed wallpaper and fitting it as the door to your powder room will look beautiful.
You can also put in fun wallpapers and attach them to the children’s room. To make something this big from an old wooden door also requires a table saw, but there are so many out there.
Right now, I’ll recommend you go with the Dewalt DWE7485 Table Saw, it is compact, powerful, trusted by many, and a reliable one. If you want to know more about it, you can read this detailed review from here.
How to Properly Clean Wooden Doors?
Wooden doors are a must-have for any home, but they can get dirty over time. If you’re looking for ways to clean your wooden door, look no further!
We’ve compiled a list of easy and effective methods that will have your door looking brand new again. The first thing you’ll want to do is remove all the grime from the surface of the door with a dry cloth or sponge dipped in warm water and detergent.
Next, wash it with soap and water using a damp brush or sponge. Dry it off immediately after washing so as not to allow dirt to build upon its surface and start ruining everything else around it too!
Finally, if there’s an excess amount of dirt on top of the wood (this usually happens with kids or pets running around), you can sand it down using fine-grit sandpaper. Once you’re done cleaning, be sure to give the door a good coat of varnish or paint to protect it from future damage.
Importance of Lubricating Door Hinges
Door hinges are a vital part of any door. They help keep the door in place and allow it to open and close smoothly. But like anything else, they need to be lubricated on a regular basis in order to function properly.
Lubricating your door hinges are not only important for the health of the hinges, but it’s also important for the overall stability of the door. A well-lubricated hinge will move more freely and will require less force to open and close the door. This can help prolong the life of both the hinge and the door itself.
If you neglect to lubricate your door hinges, you may end up with a broken hinge or a warped door. So, make sure to give your door hinges a little TLC every now and then to keep them in tip-top shape.
There are a few different ways that you can lubricate your door hinges. The most popular method is to use WD-40. WD-40 is a multi-purpose lubricant that can be used on a variety of different things, including door hinges.
To use WD-40 on your door hinges, simply spray a small amount onto the hinge and then wipe away any excess with a rag. You don’t need to use a lot of WD-40, just enough to coat the hinge and provide a smooth surface for movement.
If you don’t have WD-40, you can also use a silicone-based lubricant or a household oil, such as olive oil or vegetable oil. Simply apply a small amount to the hinge and wipe away any excess.
Once you’ve applied the lubricant of your choice, open and close the door a few times to work it into the hinge. And that’s it! You’ve now successfully lubricated your door hinges.
It’s important to note that you should only lubricate your door hinges when they are dry. If you try to lubricate a wet hinge, the lubricant will simply wash away. So, make sure to wipe away any water or moisture before applying the lubricant.
Lubricating your door hinges is a quick and easy way to keep them functioning properly. So don’t neglect this important task! A little bit of lubricant can go a long way in prolonging the life of your door hinges.
How to Fix a Jammer Door?
Jammer Doors can be a huge pain to fix. It is usually the result of some type of structural issue or malfunction.
If you have tried unsuccessfully for hours to repair your jammed door, then it might be time to call in a professional and get them on the job ASAP.
A jammed door can cause major problems with an entire facility including food spoilage, security breaches, and health code violations.
The cost of repairing this problem could range anywhere from $5,000-$10,000 depending on factors such as local labor rates, availability of parts, etc.; but don’t let that scare you away!
There are many different ways you can attempt to fix your own jammer door before having professionals come out and do all the work for you!
- First, check to see if the problem is with the frame or the door itself. If the frame is damaged, it will need to be replaced. If the door is damaged, it can often be repaired.
- Next, take a look at the hinges. If they are loose or broken, they will need to be replaced or repaired.
- If the problem seems to be with the rollers, then you will need to replace them. You can either purchase new rollers or repair the existing ones.
- Finally, if all else fails, you can always call in a professional to help you fix your jammed door! They will have the tools and knowledge necessary to get the job done right.
Conclusion
It is, however, vital that you remember protective gear while using any repair tool. Do not play around with the tools and use them with a firm grip.
It is also essential to make sure children do not come to play with the devices since it can be pretty dangerous.
Make sure to ask for help if you are unsure which tool would be the best fit for your door or hire someone else for the door maintenance work if you are not comfortable using the tools or do not have the idea of using them. However, it is always better to try using them yourself than someone else.