• DIY
    • Crafts
      • Outdoors & Garden Projects
    • Decorating
      • Exterior Painting & Decorating
      • Painting & Wallpaper
      • Room by Room
    • Furniture
      • Cabinets
      • Tables
    • Woodworking
  • Home Improvement
    • Real Estate
    • Living
    • Entertaining
    • Home Building & Design
      • Home Interior
      • Home Exterior
    • Home Management
      • Home Organization
    • Remodeling
    • Living Areas
    • Bathroom
    • Kitchen
  • Lawn & Garden
    • Lawn Care
    • Vegetable Gardening
    • Landscaping
      • Irrigating
    • Flowers
    • Trees & Shrubs
  • Categories
    • Home Improvement
    • Lawn & Garden
    • Landscaping
    • Real Estate
Housesumo.com
  • DIY
    • Crafts
      • Outdoors & Garden Projects
    • Decorating
      • Exterior Painting & Decorating
      • Painting & Wallpaper
      • Room by Room
    • Furniture
      • Cabinets
      • Tables
    • Woodworking
  • Home Improvement
    • Real Estate
    • Living
    • Entertaining
    • Home Building & Design
      • Home Interior
      • Home Exterior
    • Home Management
      • Home Organization
    • Remodeling
    • Living Areas
    • Bathroom
    • Kitchen
  • Lawn & Garden
    • Lawn Care
    • Vegetable Gardening
    • Landscaping
      • Irrigating
    • Flowers
    • Trees & Shrubs
  • Categories
    • Home Improvement
    • Lawn & Garden
    • Landscaping
    • Real Estate
Featured of How to Replace a Thermocouple in a Water Heater
  • Home Exterior
  • DIY
  • Home Improvement

Steps in Replacing a Thermocouple in a Gas Water Heater

  • Perla Irish
  • February 5, 2018
Total
8
Shares
8
0
0
0

A pilot light that won’t stay lit is a symptom of a failing thermocouple. Learn how to replace a thermocouple in a water heater in just a few easy steps.

Turn off the gas and remove the old thermocouple. Install a new one and test for gas leaks. Replace the doors and you’re all done.

A Gas Water Heater (How to Replace a Thermocouple in a Water Heater)

How to Replace a Thermocouple in a Water Heater

A failing water heater thermocouple prevents the pilot light from remaining lit. The thermocouple is a safety device that detects whether or not the pilot light is lit.

If it is not lit, the gas supplying the pilot is turned off and the gas valve will not switch the main burner on.

When a thermocouple begins to wear out, it cannot correctly detect if the pilot is lit or not. Follow these easy steps on how to replace a thermocouple in a water heater.


Read Also:

  • When There’s No Time to Lose: Learn to Install a Water Heater in 10 Steps
  • What’s That Smell? Signs that Help Detect a Propane Leak in your Home
  • How to Winterize and De-winterize Your House’s Plumbing System

Turn Off the Gas

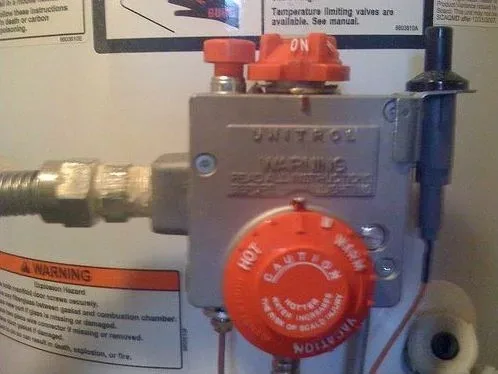
Turn off the gas valve that supplies the water heater. Usually, it is located on a pipe just before it enters the water heater gas control valve. Most manufacturers also recommend turning off the gas control valve.

Push it in, and hold it in while turning it to the off position. Don’t leave this step out; gas water heaters can be dangerous if you do – gas could escape while you changing the water heater and it only takes a spark to cause a fire or explosion.

Remove the Old Thermocouple

Remove the outer and inner doors to the gas burner. The thin copper tube leading from the gas control valve is the thermocouple. Follow this to where it is attached to the pilot light assembly by a bracket.

Some brackets are held in place by a screw, others clip into place. Remove the thermocouple bracket from the pilot light bracket assembly.

Remove the thermocouple from the gas valve with a small adjustable wrench. Most can be turned using a 7/16-inch wrench as well. Thermocouples are reversely threaded; turn it clockwise to loosen the nut.

Be careful not to bend any part of the thin copper tube that leads from the gas control valve to the thermocouple – you can use it as a sort of template to bend the new one if it comes coiled up.

Install the New Thermocouple

Bend the new thermocouple tube to the same shape as the old one. Install the new thermocouple into the gas control valve and tighten it firmly, but do not over-tighten it, or it will be damaged.

Remember the threads are reversed; turn it counterclockwise to tighten. Place the thermocouple on the pilot light bracket assembly, and install the screw or clip, that holds it in place.

A Water Heater Gas Control Valve - How to Replace a Thermocouple in a Water Heater
A Water Heater Gas Control Valve (How to Replace a Thermocouple in a Water Heater)

Finishing Up: Replace the Thermocouple Water Heater

Turn on the gas valve that supplies the water heater. Test the thermocouple connection to the gas control valve with soapy water. No bubbles mean no gas leak.

Follow the manufacturers’ instructions to light the pilot. Check the pilot light to make sure the flame heats the last 1/2-inch of the thermocouple.

Turn the water heater control valve to ON and the main burner should light. Replace the inner and outer doors and you’re all done with how to replace a thermocouple in a water heater.

0
0
8
0
Total
8
Shares
Pin it 8
Share 0
Tweet 0
Share 0
Share 0
Previous Article
Featured of How to Replace Basement Windows Easily
  • Home Exterior
  • DIY
  • Home Improvement

Simple How to Steps for Replacing Basement Windows

  • Perla Irish
  • February 2, 2018
View Post
Next Article
Featured of Euro Hinge Installation: How to Install Euro Hinges on Your Cabinets
  • Cabinets
  • DIY
  • Furniture
  • Home Improvement

Installing Hidden Hinges Euro Style

  • Perla Irish
  • February 9, 2018
View Post

You May Also Like

Bathroom remodel in progress showing tile installation and renovation tools during construction.
View Post
  • Bathroom

How Long Does a Bathroom Remodel Really Take?

  • Perla Irish
  • March 11, 2026
Temporary ground protection panels installed over lawn beside a residential patio to prevent surface damage during an outdoor event
View Post
  • Lawn & Garden
  • Lawn Care

How to Protect Your Lawn and Outdoor Surfaces During Events (Before Damage Sets In)

  • Perla Irish
  • February 23, 2026
Side-by-side comparison of casement and double hung windows in a modern home interior
View Post
  • Remodeling

Replace Casement Window with Double Hung? Structural & Code Impacts

  • Perla Irish
  • February 20, 2026
New residential asphalt driveway with smooth surface and landscaped edges
View Post
  • Home Improvement

Asphalt Driveway Advantages vs Concrete: Cost, Lifespan & Structural Value

  • Perla Irish
  • February 20, 2026
Modest kitchen with wood-look faux butcher block countertop
View Post
  • Kitchen

DIY Faux Butcher Block Countertops: Cost, Durability & Long-Term Reality

  • Perla Irish
  • February 14, 2026
Modular furniture components arranged as an adaptive interior system rather than fixed standalone pieces.
View Post
  • Furniture

Modular Furniture Beyond Sofas: Designing Interiors That Adapt Over Time

  • Perla Irish
  • January 27, 2026
Flexible living room interior layout illustrated as a system, showing modular seating, storage, and furniture arranged for long-term adaptability rather than fixed styling.
View Post
  • Home Interior

Flexible Living Room Layouts: Designing Spaces That Adapt Over Time

  • Perla Irish
  • January 26, 2026
Neutral living space illustrating eco-friendly interior design through flexible layout and long-term adaptability.
View Post
  • Home Interior

Transforming Your Home With Eco-Friendly Interior Design

  • Perla Irish
  • January 26, 2026

Leave a Reply Cancel reply

Your email address will not be published. Required fields are marked *

Join 13,000 folks!

Get instant access to our weekly newsletter where we share the best! 100% Privacy. No Spam.

  • Disclosure & Affiliate Policy
  • Privacy Policy
  • Terms of Use
  • About
  • Sitemap
  • Contact Us

Input your search keywords and press Enter.