Simple and easy steps using a template for Euro Hinge installation. Choose the correct style for your cabinet.
There are three styles of hinges for frameless cabinets and three styles for cabinets with face frames.
Buy the correct style. Use the template to mark hole locations and then drill the holes. Install the hinges on the cabinet first, then mount the doors to the hinges. Adjust the hinges in three planes for a perfect fit.

Euro Hinge Installation: How to Install Euro Hinges on Your Cabinets
Learn about Euro hinge installation, how to choose the correct style of hinge for your cabinets.
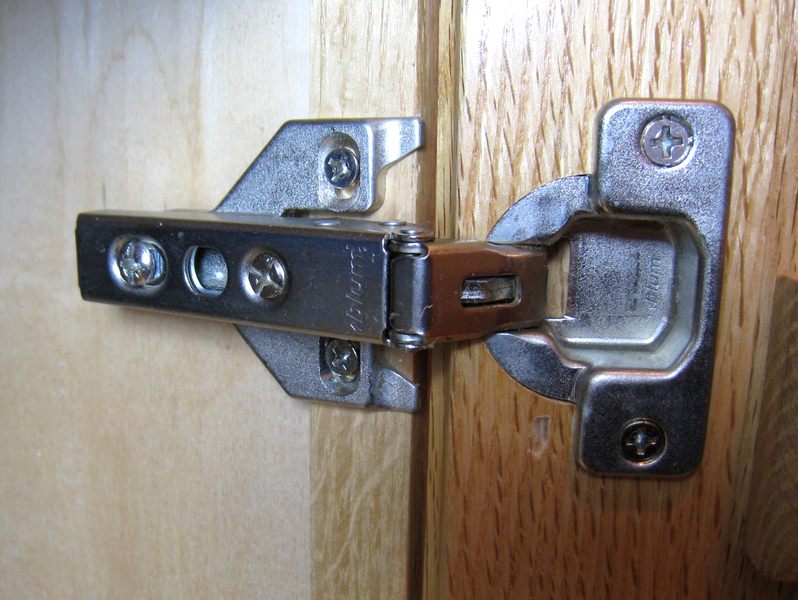
Euro hinges attach to the inside of the cabinet and the back of your cabinet doors, making them conveniently out of sight until you open the cabinet. They also adjust much easier than standard hinges.
Euro hinges are hidden, making them one less piece of hardware that has to match when it’s time to select knobs, handles, and pulls. They also adjust in three planes, making it a snap to line up cabinet doors.
Cabinets with a face frame require hinges for a face frame. Use overlay hinges for doors that rest completely against the front of the cabinet. Doors with a groove cut into the back so it fits into the opening require 3/8 inset hinges.
Doors without a groove that fit completely inside the cabinet door opening require a full inset hinge. In a similar fashion, cabinets without a face frame require full overlay, half overlay, or inset hinges for frameless cabinets.
Here’s how to install Euro hinges using a template.
Read Also:
Using The Template
Check the documentation that comes with the hinges to determine if the cup hole will be centered 22.5mm or 20.5mm from the edge of the door.
Mark the door exactly 3 inches from the top and bottom and place the template centerline at that mark. Mark the position of the cup hole and the two installation screws.
Subtract the door opening height from the door height and divide it by two. For full inset doors, this will be a negative number.
Subtract the result from 3 inches to determine the distance from the top or bottom of the opening the hinges will be on the cabinet. Measure the cabinet door opening from the top and bottom for this distance and mark it.
Check the documentation supplied with the hinges for the exact placement on the face frame or cabinet side to place the hinges. The style of the hinge will make a difference as to placement.
Measure the distance and mark the holes, using the previously made marks as a guide to center the hinges and the hinge screw holes as a template. Now you’re ready to install your euro hinges.
Drilling And Mounting
Clamp the cabinet door to a solid work surface. Using a 35 mm or 1/3/8-inch Forstner bit, drill holes at the cup locations 1/2-inch deep. Change the bit for an 8 mm drill bit and drill the 1/2-inch deep pilot holes for the mounting screws.
Use a screwdriver rather than a drill to drive the screws. Place the hinges in the open position and align the screw holes with the pilot holes in the cabinet sides. Attach the hinges to the cabinet with the screws.
Hold the door in place on the cabinet and press the hinge cups into the cup holes. Fasten the door to the hinges with the screws.
Adjustment And Alignment

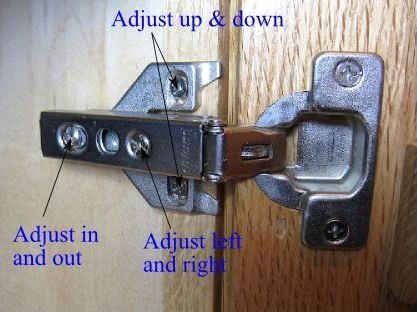
Adjust the door up and down with the two screws that hold the hinge to the cabinet. Loosen all four hinge screws slightly to move the door up or down, then re-tighten the screws when the correct position is reached.
To move the top or bottom of the door in or out, turn the screw on the far inside of the hinge in or out. Finally, adjust the door left or right with the center screw. That’s how to install Euro hinges.
Credits and Resources
- Photo courtesy of Wikimedia Commons
- Understanding Hinges: Rockler Woodworking
- European Hinges FAQ: HingeDummy.info


