• DIY
    • Crafts
      • Outdoors & Garden Projects
    • Decorating
      • Exterior Painting & Decorating
      • Painting & Wallpaper
      • Room by Room
    • Furniture
      • Cabinets
      • Tables
    • Woodworking
  • Home Improvement
    • Real Estate
    • Living
    • Entertaining
    • Home Building & Design
      • Home Interior
      • Home Exterior
    • Home Management
      • Home Organization
    • Remodeling
    • Living Areas
    • Bathroom
    • Kitchen
  • Lawn & Garden
    • Lawn Care
    • Vegetable Gardening
    • Landscaping
      • Irrigating
    • Flowers
    • Trees & Shrubs
  • Categories
    • Home Improvement
    • Lawn & Garden
    • Landscaping
    • Real Estate
Housesumo.com
  • DIY
    • Crafts
      • Outdoors & Garden Projects
    • Decorating
      • Exterior Painting & Decorating
      • Painting & Wallpaper
      • Room by Room
    • Furniture
      • Cabinets
      • Tables
    • Woodworking
  • Home Improvement
    • Real Estate
    • Living
    • Entertaining
    • Home Building & Design
      • Home Interior
      • Home Exterior
    • Home Management
      • Home Organization
    • Remodeling
    • Living Areas
    • Bathroom
    • Kitchen
  • Lawn & Garden
    • Lawn Care
    • Vegetable Gardening
    • Landscaping
      • Irrigating
    • Flowers
    • Trees & Shrubs
  • Categories
    • Home Improvement
    • Lawn & Garden
    • Landscaping
    • Real Estate
Featured of How to Install Lighted Crown Molding, Simple Steps Installation
  • DIY
  • Home Improvement
  • Lighting
  • Living Areas

Guide to Installing Lighted Crown Molding

  • Perla Irish
  • February 27, 2018
Total
249
Shares
249
0
0
0

Applying lighted crown molding may seem like a daunting task. This article will provide you with the simple steps of installation to improve your lighted features quickly.

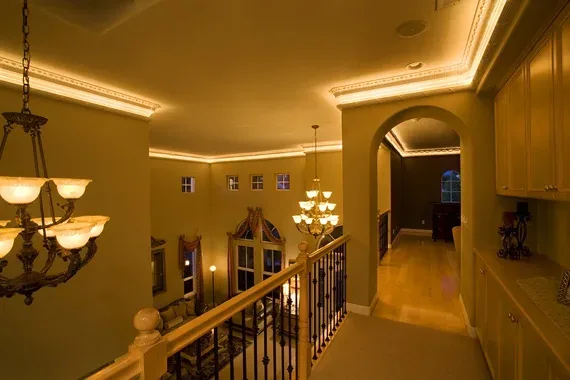
Lighted crown molding can improve the look of your ceiling to create a whole new effect. It will add a finishing touch to your light fixture and improve the whole look of your room. Your easy crown Molding will not take long to complete and will prove to be a worthwhile task.

How to Install Lighted Crown Molding

How to Install Lighted Crown Molding

Follow the simple steps below to install your lighted crown molding.


Read Also:

    • How to Use, Maintain, And Repair EDC Torchlight?
    • Lighting: the Mainstay of Any Remodelling Project

1. Gathering Your Ideas

Planning is the key to any successful project and the same goes for this project. You must first gather some crown molding ideas before starting your project. To find crown molding ideas you should search the Internet or visit a local hardware store.

You can add baseboard molding, casing, chair rail, panel molding, or a ceiling trim. Once you decide the kind of molding you want to install, you will need to decide where you want to add the molding, as this is the molding where lighting would later be added once you make the channels.

2. Nailing Strip

You must create a strip to attach your crown molding. To do this simply remove a strip of lumber using your saw or another sharp cutting item. You should ensure that this is the same size and shape as your crown molding. You should attach the nailing strip and crown molding and try them against the wall of your ceiling to ensure they are the correct size and fit. And you can change anything that requires changing now.

3. Marking the Layout

Marking the Layout - How to Install Lighted Crown Molding

Marking the Layout (How to Install Lighted Crown Molding)You should use a pencil or pen to create an outline of where the lighted crown Molding will be placed. This will provide you with a guideline of where the molding will be applied. Pay special attention here as the wrong markings can lead you to restrain the whole installation process again.

4. Nailing to the Studs

You must now place the nailing strip onto the wall, meeting the lines that you have marked onto the ceiling. Find the studs in the ceiling and nail your nailing strips to them.

5. Attaching the Molding

To attach the molding to the wall you need to nail it to the nailing strip. Ensure that the nails are securely connected to the nailing strip so that your molding remains secure. This will also disguise the nails for a better effect.

6. Applying the Lighting

Applying the Lighting - How to Install Lighted Crown Molding
Applying the Lighting (How to Install Lighted Crown Molding)

The final step is to apply some form of rope lighting along the molding. This should be run down and attached to an electrical outlet. You have now completed your easy crown molding.

Guide to Installing Lighted Crown Molding

Lighted crown molding can be used for various forms of lighting, such as cove lighting, up lights, and indirect lighting features. Ensure that you check the processes for your specific lighting needs before commencing the installation of your molding. To do this search for your specific type of lighting using the Internet or ask in your local hardware store.

You are now ready to start the improvements on your home and the installation of your molding.

0
0
249
0
Total
249
Shares
Pin it 249
Share 0
Tweet 0
Share 0
Share 0
Perla Irish

Perla Irish, who is more familiarly called Irish, is the Content Manager at Housesumo.com. She loves following trends around home and garden, interior design and digital marketing. Through this blog, Irish wants to share information and help readers solve the problems they are experiencing.

Related Topics
  • ceiling
  • ideas
  • install
  • installing
  • lighting
  • molding
Previous Article
Featured of Need to Know How to Repair Dry Rot? Here Are Some Easy Instructions
  • DIY
  • Home Improvement
  • Living Areas

Quick and Easy DIY Dry Rot Fixes Anyone Can Perform

  • Perla Irish
  • February 27, 2018
View Post
Next Article
Featured of Shellac: It's Role in Wood Finishing
  • Home Improvement
  • Painting
  • Tips

Shellac, It’s Role in Wood Finishing

  • Perla Irish
  • February 28, 2018
View Post

You May Also Like

A cozy mobile home in a sunny neighborhood with palm trees, hills, and clear blue skies, highlighting affordable modern living.
View Post
  • DIY
  • Finances
  • Home Improvement

How to Qualify for a California Mobile Home Loan in 2025

  • Perla Irish
  • May 8, 2025
Modern interior door with a high-gloss red lacquer finish in a vibrant, eclectic living room during a summer afternoon, colorful artwork on the walls, patterned rug, natural light enhancing the door's bold color, showcasing elegance and durability.
View Post
  • Decorating
  • DIY
  • Home Improvement
  • Painting & Wallpaper

3 of the Best Finishes for Interior Doors

  • Perla Irish
  • April 29, 2025
featured image - Different Types of Roofing and Its Advantages
View Post
  • DIY
  • Home Exterior
  • Home Improvement

Different Types of Roofing and Their Advantages

  • Perla Irish
  • April 25, 2025
Close-up shot of a leaking air conditioning unit indoors, showing water droplets forming on the metallic fins and dripping into a small, stagnant puddle on the dusty concrete floor, highlighting AC maintenance problems in a dimly lit basement.
View Post
  • DIY
  • Home Improvement
  • HVAC

Why Is My AC Leaking Water?

  • Perla Irish
  • April 22, 2025
Rooftops in a modern city with solar panels and eco-friendly roofing repairs underway under a clear sky.
View Post
  • DIY
  • Home Exterior
  • Home Improvement

Why Roofing Repair Services Are Crucial for Sustainable Urban Infrastructure

  • Perla Irish
  • April 20, 2025
Sunlit backyard with vibrant artificial grass, modern patio, and family-friendly outdoor space under clear blue skies.
View Post
  • DIY
  • Landscaping
  • Lawn & Garden

Why Homeowners in Burbank Prefer Artificial Grass for Their Lawns

  • Perla Irish
  • April 20, 2025
Using a paint sprayer gun to paint a wooden surface in a workshop.
View Post
  • Decorating
  • DIY
  • Furniture
  • Home Improvement
  • Painting & Wallpaper

How to Paint Furniture with a Paint Sprayer

  • Perla Irish
  • April 19, 2025
Stop pests before they invade!
View Post
  • DIY
  • Home Improvement

What Is the Best Way to Prevent Pest Infestation?

  • Perla Irish
  • April 11, 2025

2 comments

  1. Stephen Lankford says:
    December 6, 2020 at 10:52 am

    I have the standard, fluorescent, two tube lighting fixture in my apartment kitchen. It is most hideous and is not even flush with the eight foot high ceiling. What do you suggest I replace that ugly old fixture with? Thank you!

    Reply

Leave a Reply Cancel reply

Your email address will not be published. Required fields are marked *

This site uses Akismet to reduce spam. Learn how your comment data is processed.

Join 13,000 folks!

Get instant access to our weekly newsletter where we share the best! 100% Privacy. No Spam.

  • Disclosure
  • Privacy Policy
  • Terms of Use
  • About
  • Sitemap
  • Contact Us

Input your search keywords and press Enter.