Drywall installation is a fundamental aspect of home improvement projects, whether you are renovating a room or building a new structure. Often referred to as plasterboard or wallboard in the UK, drywall is a versatile and cost-effective option for creating smooth, durable walls and ceilings.

While hiring a professional is always an option, many homeowners prefer the satisfaction and cost savings of tackling drywall installation themselves. This guide will cover everything you need to know about DIY installing drywall in your home to help you decide whether you are up to the task.
Understanding Drywall
Drywall is composed of gypsum plaster sandwiched between two layers of paper. It comes in various thicknesses, typically ranging from 9mm to 15mm, with the latter being more common for walls. Understanding the different types of drylining available can help you choose the most suitable option for your project, and some of the options available are listed below:
- Standard Drywall: Suitable for most interior walls and ceilings.
- Moisture-Resistant Drywall: Ideal for moisture-prone areas, such as bathrooms and kitchens.
- Fire-Resistant Drywall: Provides enhanced fire protection and is required in specific building regulations for certain areas.
- Soundproof Drywall: Offers improved sound insulation and is beneficial for reducing noise transmission between rooms.
Tools & Materials
Before you begin, you must gather the necessary tools and materials first, and the things you will need are as follows:
- Drywall Sheets
- Drywall Screws
- Joint Tape
- Joint Compound (also known as mud)
- Corner Beads
- Drywall Saw or Utility Knife
- Drywall Screw Gun or Drill
- T-Square
- Joint Knife
- Sanding Block or Sandpaper
- Dust Mask
- Safety Goggles
Shopping around for the necessary tools, equipment, and materials before installing your drywall can help you save money. You might also be lucky and know somebody who can lend you some of what you need, providing you with further savings.
Preparing the Space
Start by clearing the area where you will be installing the drywall. Remove any existing wall coverings, nails, or screws, and ensure the framing is in good condition. Inspect any electrical or plumbing fixtures that need to be relocated or adjusted.
Measuring & Cutting
Measure the dimensions of the walls and ceiling precisely, accounting for any openings such as doors and windows. Transfer these measurements to the drywall sheets and use a drywall saw or utility knife to cut them to size. Remember to mark the location of electrical outlets and switches on the drywall for cutting out later.
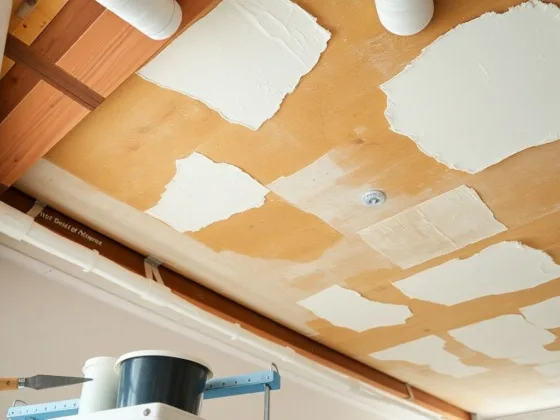
Installation
With the drywall sheets cut to size, it’s time to install them. Begin with the ceiling if applicable, as it’s typically the most challenging part of the process. Use a T-square to ensure the sheets are aligned correctly and use a drywall screw gun or drill to attach them to the studs, placing screws every 6 to 8 inches along the edges and every 12 inches in the field.
Once the ceiling is in place, move on to the walls, starting from one corner and working your way across. Remember to leave a small gap, approximately 5mm, between the sheets and the floor to allow for expansion. Use a drywall rasp or sandpaper to smooth any rough edges for a seamless finish.
Taping & Mudding
Once all the drywall sheets are installed, it’s time to tape and mud the joints to create a smooth surface. Apply joint tape to the seams, pressing it firmly into the compound using a joint knife. Cover the joint tape with a thin layer of joint compound, feathering the edges to blend it seamlessly with the drywall surface. Allow the compound to dry completely before sanding it smooth.
Adding Corner Beads
Corner beads are metal or plastic strips that reinforce the corners of the drywall, preventing them from denting or chipping. Install corner beads on all outside corners using drywall screws or nails, ensuring they are straight and securely attached.
Sanding & Finishing
Once the joint compound is dry, smooth the surface using a sanding block or sandpaper. Wear a dust mask and safety goggles to protect yourself from airborne particles. After sanding, clean the walls and ceiling of dust using a damp cloth or sponge, and use a vacuum cleaner to help with the rest of the room.
Priming & Painting
Before painting, you must prime the drywall to seal the surface and ensure the paint adheres correctly. Choose a primer suitable for drywall and apply it evenly using a paint roller or brush. Once the primer is dry, you can paint the walls and ceiling in your desired color.
DIY installing drywall in your home can be a rewarding and cost-effective way to improve your living space. Remember to work safely and patiently, and do not hesitate to seek advice or assistance if you encounter any challenges. With the right tools, materials, and know-how, you can successfully tackle drywall installation and enjoy the satisfaction of a job well done.