Early Spring Gardening Tips — A brief guide on how to start seedlings indoors for an early start on growing your garden.
You can get a jumpstart on your vegetable garden this spring by starting your favorite vegetable seeds now. The earlier you get your seeds started the earlier you will be able to enjoy the produce. The trick, of course, is to start the seeds in a greenhouse or in a sunny kitchen window now while it is still frosty outside.

Early Spring Gardening Tips, Get a Head Start on the Season
In a few weeks, the garden centers of stores across the nation will be crowded with little seedlings yearning to be put into the warm soil. The problem is that the soil will not be warm enough yet for other several weeks. Seedlings in garden centers will not get the care that you can give your own home started bedding plants.
Starting Your Own Seeds Gives You Several Advantages Over Store-bought Seedlings
- The first advantage is your choices are individualized to take advantage of your family’s favorite foods when you choose your own seed varieties.
- Secondly, your carefully tended plants may be healthier than plants from the store. (There are stores that have wonderfully healthy plants and that take excellent care of them, so if you have a brown thumb instead of a green one just wait until the bedding plants arrive and make your choices from the offerings.)
- A third advantage is the plants that are started and sheltered indoors may give earlier yields than plants started weeks later in the garden.
Early Spring Gardening Tips: What You Will Need?
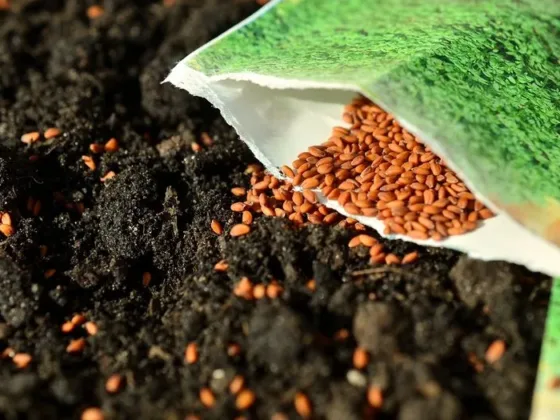
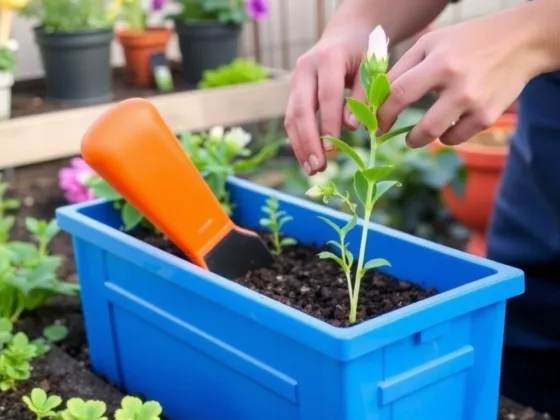
All you need to get started is a bit of space, (this can be as small as your kitchen windowsill or as large as a greenhouse) seedling flats, seed starting soil mix, seeds and sterilized water. You can get seed starter kits that have the trays, individual cells, and greenhouse type covers that you only have to put the seeds in and water to achieve success.
Some gardeners tell you that any shallow container will work as long as it holds the planting mix and has some drainage holes in it. I think the risk of plant viruses and other contagious pest problems is better avoided by purchasing the kits. If you choose to assemble your own materials be sure they are well cleaned and the soil is sterilized by baking in the oven in foil trays to kill weed seeds and bacteria.
Fill your little pots with the starting mix up to about a quarter inch from the top. Make a little dent in the top of the soil and drop the seed in it then cover with more planting mix. Put a little water gently into the container and cover the pots or containers with clear plastic covers to keep the moisture in until your little sprouts peek through the soil.
Damp but Not Wet
The best way to put water into your containers may be with a fine mist sprayer that will not disturb the soil over the seeds. You want to be cautious with water as too much will simply rot the seeds. The key phrase here is damp but not wet.
Your baby plants need to have about twelve to sixteen hours of light each day. The experts advise you to place the seedlings about three inches or so below the lights. Try to take advantage of natural light from a window or to replicate natural light by using a grow light. Keep a gentle air circulation by adjusting a fan on a low setting that is not blowing directly on the plants.
Water occasionally as the seedlings grow so the soil stays a bit moist and use diluted fish emulsion fertilizer sparingly to help them get a healthy start. If you use too much fertilizer the plants will get leggy and will be hard to transplant into the garden.
Must Read:
Pick two or three of your favorite vegetables or flowers and plant a few seeds of each into carefully labeled containers. Reseal the seed packets tightly with tape and wait until the first batch is up before planting the second batch. Doing a few at a time allows you to spend time being extra careful to details and gives you a second chance with the remaining seeds if something does not work out right the first time.
Plants that get a good start in the warmth and protection of indoor conditions need to be “hardened off” before they go into the garden. The proper way to harden off your seedlings is to take them outside for a couple of hours in the warmest part of the day for a few days and then gradually increase the time spent outside each day.
Be sure to keep the plants sheltered from wind and keep them in on chilly days. Take care to have them inside before dusk and do not leave them out at night until all danger of frost is past.
Once the ground in your garden warms up you can transplant your seedlings into their permanent homes.
External Links
- Earliest Spring Blooming Bulbs (Early Spring Gardening Tips) – How-To & Growing Tips Articles at Burpee.com
- Early Spring Gardening Tips: Garden Projects for Early Spring | Eartheasy Guides & Articles
- Early Spring in the Garden | Natural Learning Initiative
- A Gardener’s Checklist for Early Spring – Fine Gardening Magazine
- Tackle Early Spring Gardening Chores | HGTV
- Getting Started, Early Spring Gardening Tips: 14 Early Spring Garden Chores – Ilona’s Garden
- Early Spring Garden Planning – The Homestead Garden
- Image Credit: Early Spring Gardening Tips Image by Wonderlane @Flickr