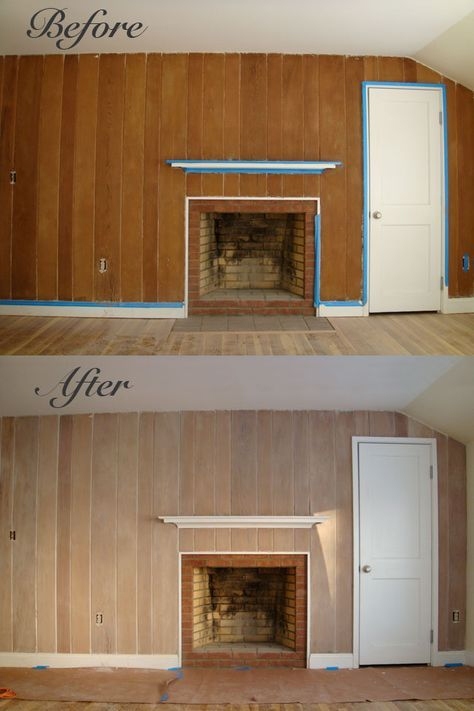
If your house was built in the 1950s -1970s you probably have some wood-paneled walls in a room or two. Now, – you’d like to “get rid of those dark walls” and update. Painting paneling is not hard to paint.
There are a few critical steps that (while not hard) must be done right. After that, the painting part is easy. Removing the paneling off the walls for painting is a bigger job by far, and hard work. I usually vote for painting it.

Often you will get a response to your question about “how to paint paneling?” with “Why don’t you just pull it off?” I know the one who answers the question that way is either:
You will have drywall patching and skim coating to do once the paneling comes off most likely. The paneling is sometimes glued on. you will not be able to remove it without tearing up the drywall paper facing under it. You will also have glue ridging to deal with.
Even if the paneling was not glued, the drywall underneath may not be finished for paint. It may be just taped and skimmed (called “fire taping” – you will see this kind of finish in a garage oftentimes).
It is possible that the drywall underneath was completely taped, mudded, sanded, and primed but, by the time you are finished pulling off the paneling there will be at least some drywall damage and there will be trim work to do. The most often overlooked point with the pull-the-paneling-off answer is the trim carpentry.
Baseboard will have to come off (without breaking) and be reinstalled, as will door casings, and window casings. Sometimes you will have to totally rework the trim because of the gap left behind where the paneling was. You will have some trim carpentry to do too.
This is a common question. Depends on whether the paneling is smooth or rustic. Admittedly, if there is a case for removing the paneling, it is a better option with rough-sawn, rustic paneling. You can paint the rustic paneling, it will have an exterior T-1-11 siding-like look to it.
Smooth paneling looks nice, it even has a kind of formal look to it. Not unlike a wainscot or an office with paneled walls (painted with enamel), the look can be very formal, especially if it is only in one room of the house.
If all the rooms are painted paneling, then it might look a little more like a pre-fab house or something. If you are doing one room or two, it will be a nice change from the same smooth drywall in every room.
It doesn’t matter if the paneling is fake or real wood, the procedure will be the same. Even if you are going to paint the rough-sawn, rustic paneling, it still is the same procedure.
You must clean the paneling. This step and the next step (priming) will make or break the job. Do a good job on the cleaning or you will have problems with paint chipping and gouging off down the road.
You really don’t need to solvent clean anymore. In the old days, solvent cleaning was required to do a good cleaning job. There are good water-based cleaners now that will do a good job. Krud Kutter (Original) is one I have used on paneling that works well. Krud Kutter comes in a convenient spray bottle making application easier. S
pray the product on, let it “dwell” on the surface for a minute, scour it with a scouring pad, then wipe it off. Use this procedure for every square inch of the paneling. Then repeat it.
Yes, cleaning is so important that you should clean it twice. That is my method. Whatever you missed the first time, or didn’t come clean, you will get the next round. Clean the paneling well, the success of the job depends on this step.
Lead Paint Note: Use a wipe or a rag instead of scouring with a scouring pad if your house was built before 1978. Do not disturb lead-based paint.
Read Also:
This step is also crucial to the job. You must prime and you must use the right primer. The best primers are solvent primers, either oil-based or pigmented shellac primers. The two I recommend are Zinsser’s Coverstain (oil), or BIN (shellac) primers.
The solvent-based primers are better stain blockers and are a little more forgiving on a surface that is not perfectly clean (oil in particular is more forgiving).
The solvent primers will both cure faster and develop adhesion quicker than a latex bonding primer. Always provide good ventilation when using either oil or shellac primers during and after priming, as they are very strong. See Eliminating Paint Odor
As stated, either oil or shellac is the best way to prime paneling. I know I have to address the latex primer issue. First, most latex primers will have poor adhesion to glossy surfaces.
There are a few water-based primers that do a good job on glossy surfaces: XIM’s UMA (urethane-modified acrylic) is one. It will stick to glossy, varnished paneling, but the paneling better be absolutely squeaky clean. If not, it will be repelled and not adhere.
Another generic problem with latex primers (and pants) is that while they dry quickly, they cure slowly, and they develop adhesion as they cure. What this means in practical terms, is that the primer will be soft and subject to scratching off and gouging until the primer finally cures. Curing can take a month. So you will need to treat the walls like “eggs” until final curing.
Finally, latex primers are not good stain blockers. The extractives in the wood grooves in particular because the flat facing is varnished and sealed, will often bleed into the finish paint through a latex primer.
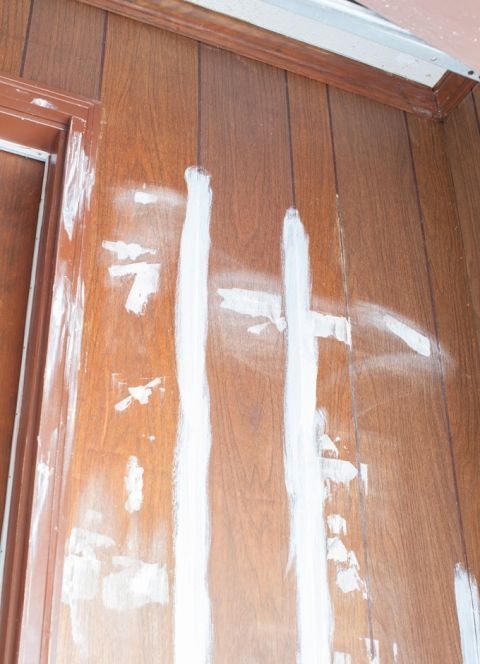
Maybe this paragraph is out of sequence, but I need to touch on the point of spot testing. Because you will have a colossal mess if your adhesion is poor. I want to address the issue of testing -before you prime, to be sure your surface preparation and priming are adequate before doing the whole room.
Once the room is primed – it’s primed. You can’t put the genie back in the bottle, and you can’t get poorly adhering primer to stick once it is down – you’re stuck (or “un-stuck” – pun intended).
I like to do a few adhesion spot tests on the wall with my primer prior to priming the room in total, to be sure I have done my cleaning preparation well, and to be sure the primer is going to stick.
Prime a few 4″ x 4″ spots on all four walls at different locations, this will give you a more accurate test result than just doing one spot. Let the primer dry for a day or two and then test the spots using the cross-cut method. See Cross Cut Adhesion Testing.
If the spots all pass, you are ready to move on to priming the walls in total. If you failed on any spots, you will need to clean the paneling better. Re-clean and re-test before proceeding.
Use a standard ½” roller nap, unless you have the rustic, rough-sawn paneling. Flat, satin, or semi-gloss is all good, depending on your preference and the use of the room. I do satin paint most of the time. You won’t need a heavy nap to get into the grooves a ½” should do the job.
You can paint the paneling light or dark. Many want to lighten the room from a dark wood stained paneling so they opt to paint with a light color. If you are going to use a deep tone, your primer should be tinted gray to help with the paint coverage. See Painting with Deep Tone Paints.
Half the walls of paneling (wainscot) look good in deep colors or in the trim enamel. You can do a faux finish on the paneling too if you’d like.
Before painting, you will need to caulk gaps in the paneling which after priming, are suddenly revealed. Gaps between the door and window casings and the paneling, gaps between the baseboard and the paneling, gaps in the inside corners, and gaps where the 4’ x 8’ paneling sheets butt up to each other.
Don’t caulk the grooves in the paneling. See below.
Leave them. That is my advice. Painted paneling has a finished look that is a change from all smooth drywall – walls. I have never filled the grooves on a painted paneling job. It is a lot of extra work, with some risk of re-cracking, or the Spackle coming out of the groove, so why bother with them? They add to “the look”.
Though I’ve not had to fill the grooves on any job, the way I would go about it is to fill them after the total prime coat, using Spackle. I would use an interior/exterior Spackle intended for wood (as well as drywall). The lightweight Spackles are better for this than the old Spackles.
Two thin coats should fill the grooves. Sand smooth, and vacuum the dust off the walls. Then you must re-prime the entire paneling. I would use the oil-based primer – again.
Note: You probably should tape (with fiberglass mesh tape) the butt joints where the pieces of paneling sheets meet together, these joints will have a higher chance of re-cracking if you don’t tape them.