Stain Matching — Getting a good stain match is not quite the same as matching with paint.
Paint is opaque and hides the surface underneath, the stain is transparent and the surface underneath adds to the finished appearance. Adding to the equation is the variableness of the underlying wood to be stained.
Some pieces of trim will want to stain with a red cast perhaps, and other pieces will take on a grayer cast. This is the beauty of stained work and the frustration of it.
The goal in staining is to control this randomness of color that naturally occurs and still keep the overall look uniform in color.
Read Also:
The way stains are matched for consumers or paint contractors usually follows this course:
A piece of trim that is already stained and finished is brought in to the local paint store and with that, a piece of unfinished wood (sometimes the same wood species and sometimes not) and the request is made for a stain that will match the finished sample.
The paint store people will then start with a stain base (or a stain color) and add universal colorants to tweak the stain match – for that particular piece of bare stock that you brought in so that it matches the already finished sample.
Let me say that for most people this type of match is going to be acceptable. Painters need to advise their customers of the variableness of woods and that it is hard to control the exact color and “some rogue pieces are going to just come out different”…… That is the simple way of staining and for the painter, it is aggravation free and easy to do.
Some customers expect perfect uniformity of color even though they have pine trim, oak doors and poplar hand railings (with a greenish cast).
In such cases, you will need a different approach to staining than the usual “I put on the same stain that you approved” approach. I will explain how I match stain for wood finishing jobs, but first some introductory considerations.
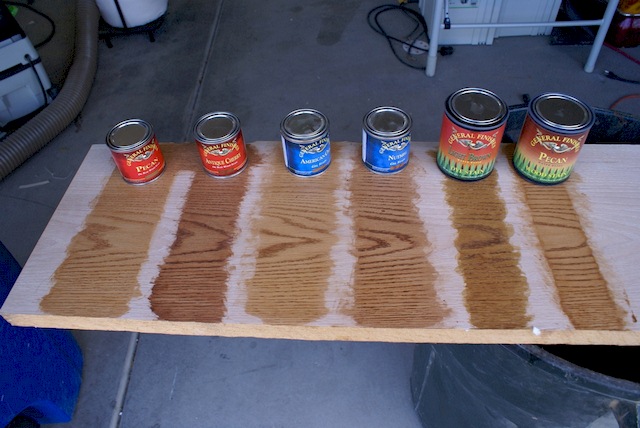
When you examine stain charts or stained woods in your home and study the actual colors that comprise 90% of all stain work, you can quickly narrow down the colorants that are used to arrive at just about any stain color.
You usually don’t see blue, or green stained trim do you? And while white used to be a popular color a few years ago (and we called it “pickling“) it is not used much anymore. You can narrow most stain colorants down to brown, orange and red.
The different stain colors come from managing the amounts of each of these colorants in your mix. In terms of universal colors (the color standard that house painters use), it would be brown (burnt umber), orange (raw sienna – is gold actually, but mixed with burnt sienna I can make orange) and red (burnt sienna) and maybe a bit of gray (raw umber).
Most stain colors (and wood graining colors) can be mixed from these tints into a clear stain base, or glaze as is the case with wood graining.
Armed with this knowledge I know how to bring a mismatch back to the desired color. If while applying my pre-matched stain, a piece of trim strays off-color – it will be either too brown, too orange or too red, too gray (also too light or too dark), these comprise almost all the variables that you will face.
You might also look at the color as being “not brown enough” or “not orange enough” etc……
I use Minwax stains because:
I mix all my stain matches myself, I don’t rely on the store people for this. I match all my stain matches by intermixing Minwax standard colors (this is why the quart and pint sizes are important).
The real key to matching your stain this way is to try to get your match by mixing only two or three standard colors to arrive at your color match.
You need to remember proportions of each (you don’t need to be as overly exact with this as you would need to if you were using universal colorants) in case you need to duplicate your mix if you run short.
Simply make note that your mix is “two parts Provincial, one part Maple and a half part Mahogany” or whatever, that is about as close as I measure.
Once I have my stain matched to my color sample piece on a piece of wood that is the same species of wood as what I will be using the stain on, then I am ready to proceed with the staining of the actual project.
But now I am smart and I know that I should bring with me some extra orange (Maple), red (Mahogany) and brown (in this case Provincial), in case I need to modify my the stain color to match better.
So I will come to the job brimming with confidence knowing that I can match anything that comes my way and satisfies the most demanding customer armed with:
Note: It is advisable to use protective gloves if you will be stained with a rag which will serve two purposes:
I stain almost all stain jobs “in place”, that is, the trim work is installed and attached to the wall, the door casings are up and nailed in place on the wall, etc…
In the normal course of events, while staining the trim you will wipe the stain over a piece that just won’t come out as orange or red or brown as the majority of the other trim.
When this happens I simply re-wipe the orange (Maple), red (Mahogany) or brown (Provincial in this case) directly over the piece that I just stained with the right color stain (red, orange or brown) needed to blend it in with the rest.
So, if my odd piece is not orange enough, I will backtrack immediately and wipe Maple stain directly onto the odd piece to add extra orange to it and shade it back to a match with the rest of the trim. Do this with the red and brown as needed to shade the rogue pieces back toward a good blended match with the rest.
If you have just a few pieces of wood to stain that are a different species from the rest (for example an Oak hand railing when the rest of the trim package is pine) you can use this same procedure. If the Oak is staining a bit too orange – follow up your initial staining by re-wiping over the top with your brown to tone the orange down.
If you have a lot of wood that is of a different species then I would make a small batch of modified stain by pouring some of the premixed stain into another container and then adding the color lacking or needing to be strengthened.
You want to stain your trim and blend as needed – as you go by directly adding red, orange, or brown over top of you premixed stain to get the rogue pieces to blend in with the rest.
One final note: if you can’t blend the piece over by staining “wet on wet”, you will need to wait for the stain to dry completely (usually 24 hours) and then re-wipe the remaining rogue pieces again with the right toning color to finish the blending process.
If you run into a piece of trim that is more porous than the rest, it will take stain much darker and probably more gray or brown than the rest.
If this happens you can wipe a lot of the stain out by scrubbing the surface with a scouring pad dampened with mineral spirits then wiping the stain off (use caution with rags etc… soiled with wood stain, and thinner for that matter, as they can be spontaneously combustible.
Hang these rags up on a “clothesline” apart from each other to dry out. Do not clump these rags together as they can give off enough heat to start themselves on fire).
View Comments
This article is very helpful in understanding the ‘base’ tones in wood stains. That information goes a long way toward matching stains or creating a custom color.