How to Install Pergo Flooring — Need to learn about how to install a Pergo floor? This guide covers the basic essentials on how to install Pergo laminate flooring. You’ll learn about some essential “need to know” concepts, planning your installation, making good joints, and installing the laminate planks.

We’ll guide you through how to install pergo flooring including what you need to know to get the job done yourself. We’ll address planning, essential considerations, laying out the floor, making joints, and getting the installation started and continuing from the beginning to the end —everything you need to know.
Pergo corporation was the first company to introduce a floating floor system that looks like wood. The floor is called a floating floor because it is not attached to the floor in anyway. Instead, the planks click together using a tongue and groove system and the completed floor is free to expand and contract with the seasons. There are some essential facts to consider about how to install a Pergo floor.
Essentials on how to install pergo laminate flooring.
Lay the plastic vapor barrier if is required, then lay the foam underlayment on top of that. Lay plastic and underlayment as you lay rows of planks to prevent creases and seams. Overlap the vapor barrier seams by 8 inches and seal them with plastic packing tape.
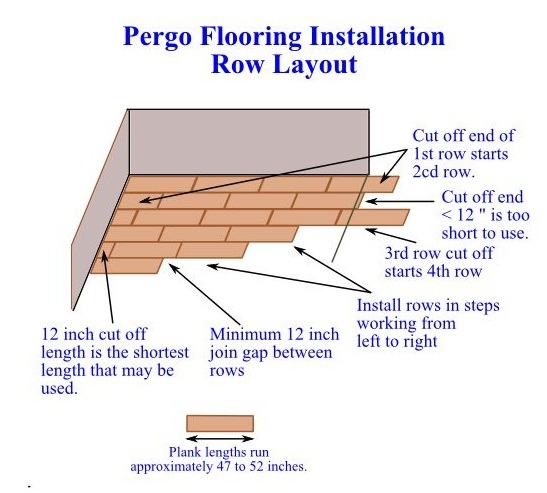
Install the plank rows in pairs or in a step fashion. Lay the planks out on the floor for several rows at once. Use the waste cut-off end of the last plank in the first row for the first plank of the second row. Always try to use the waste piece of the last plank of each row for the first plank of the second row, but try not to use pieces shorter than 12 inches. Maintain a 12 inch separation of joints from one row to the next.
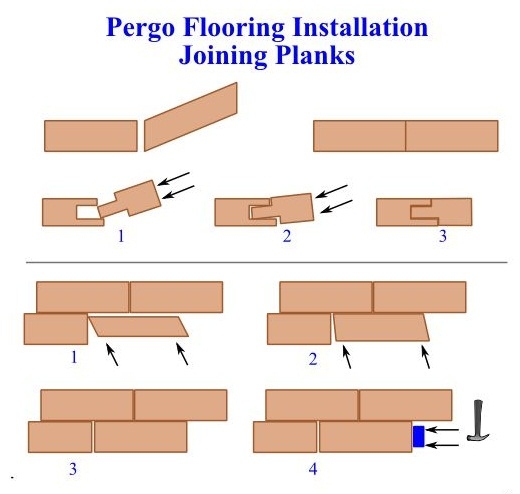
Join planks by holding a plank at a 45 degree angle and insert the tongue into the groove of the plank on the floor. Lower the plank to the floor and it should then click into place. Use the tapping block on the groove end of the plank to tap the tongue end into the groove of the previous plank. A few light taps brings the joint together. Don’t overdo it or the plank ends will mushroom slightly and make the joints obvious.
Must Read:
Place the first plank on the floor in a corner and use installation spacers to maintain the gap between the plank and walls. Next, place the spacers against the walls, and the planks against the spacer.
Place a spacer against the end wall and fit the tongue of the first plank in row two, into the groove of the first plank for row one.
Place the second plank’s tongue into the groove at the end of the first plank. Lift the opposite end of the second plank and push the tongue into the groove on the end of the first plank. Lower the second plank and, if necessary, tap the end of the plank using a tapping block to tighten the joint. At walls, it will be necessary to use the pull-bar to pull the joints into place, rather than the tapping block.
Feel free to leave comments or questions on How to Install a Pergo Flooring.