Great Tips and Insight to Easily Installing Laminate Wood Flooring — One great option for giving your floors a great fresh look is by installing new laminate wood flooring.

As discussed in my previous article Jazz Up Your Floors with Laminate Flooring, laminate wood floors are a durable, low-cost, no maintenance, and beautiful option for giving a room new life.
So I imagine that you are here because you have already decided to go with laminated wood flooring and want to see how easy it is installing laminate wood flooring yourself. The answer is Pretty Easy.
I first installed wood laminate flooring in my house in 1996. I had never done flooring of any kind before then but decided to give installing laminate wood flooring a try. The tips I learned then and since then, along with better tools since then, make the process easier and quicker than before.
We will look at the tools you will need to complete the job, the materials for installation, and tips to make the installation go easier.
I have acquired many tools along the way of completing different projects because the adage “the right tool for the right job” could not be more true.
Even if you only plan to do one laminate flooring installation project, make sure you get all the right tools. Laying laminate flooring with inadequate tools will delay your project, increase your frustration, and may damage your materials, thereby increasing your costs.
There are laminate flooring installation kits you can buy for laminate floor tile projects. Most include a plastic tapping block to tap the planks/tiles in place, a pull bar to pull pieces in place when there is not enough room for a hammer and tapping block, and spacers to go around the outside (more on that in a bit).
I highly recommend getting one of these kits. The tapping block is made to fit into the tongue and groove of the planks. You do not want to hit the pieces with a hammer, it will break your project.
You will need a razor knife to cut the underlayment, a pencil and square to mark pieces that need cutting, and a hammer for tapping.
If you have a question on how to cut laminate flooring, you have a couple of choices. You can use a saw or laminate floor cutter. If you use a table saw to cut the laminate, you will need to have it away from the project because of the sawdust going everywhere.
There are a number of laminate flooring cutters available now for reasonable prices. When doing another laminate project, I would not hesitate to get one of these. They are basically like a paper cutter with a larger knife or others come with a chopping blade that shears the laminate in one chop.
The laminate flooring cutter is manually driven and slices easily through the laminate without creating sawdust. Cutting laminate flooring is also much easier this way because the cutter is small enough to have right there at the project, which means no more running the board out to the deck or garage to cut. It leaves a little bit of a rough cut but that will never be seen once the baseboards, molding, and transitions are installed.
Try to get a good count of how much laminate you will need by measuring the area to get the square footage. Many people claim to allow 10% more for waste. Not a bad idea but always prepare for more.
Purchase the same square footage for laminate flooring underlayment. Underlay for laminate flooring is a roll of thin (usually 1/8 inch) foam or cork that is rolled out before the laminate goes on. The laminate flooring underlay provides not only a vapor barrier for over cement installations, but also makes your floor softer, quieter, and provides a good bed for your laminate to float on.
Before purchasing laminate floor underlay, make sure that the laminate you are buying doesn’t already have it adhered to the bottom. Laminate flooring with attached underlayment has become popular to save the extra step of laying down the underlayment.
If you are using laminate that requires you to glue each piece, purchase glue made for this project. Although it takes longer, I always prefer to glue the seams.
Once you have purchased the laminate and have it at your home, store it in the same temperature area as the place it will be installed for at least 24 hours before installation.
Laminate will slightly expand and contract with temperature and humidity. This gives the laminate a chance to adapt to the area.
Make sure the existing floor that you are installing a laminate floor over is fairly level, with no dips or bumps. Sand down any bumps and fill any dips with leveling compound like Fix-All. This allows the floor to float without squeaking or breaking.
Remember, you can install a laminate floor right over the top of a linoleum floor as long as the existing floor is not coming up or curling. You can always cut those parts out and fill them in with leveling compound.
Remove baseboards and molding from the surrounding walls. Vacuum all loose particles from the existing floor.
Roll out and put down your underlayment from wall to wall. The underlayment doesn’t need to be taped at each seam or stapled to the existing floor.
When laying the floor, you need to make sure that you leave a 1/4 inch gap between the laminate and the wall all the way around. This allows for expansion. Too tight and the floor may buckle. Your baseboards, molding, and transitions will cover the gap.
You will need to make sure your first row is square. The whole floor will flow from this first row so it has to be square. Use a chalk line to get a straight square line then screw a 1X2 on the line or a series of nails for the first row to butt against if you are very close to the wall.
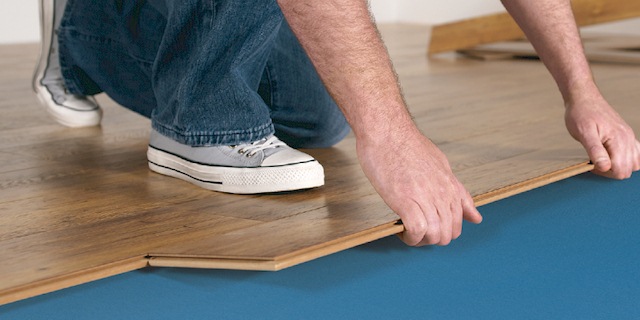
Use a hammer and tapping block to tap each piece into each other. If you are using glue, be sure to put glue into each seam that will be joined.
After your first row is complete, you want to make sure you stagger your seams beginning with the second row. If you used a full piece to start your first row, cut a full piece in half to start the second row. This will give you a staggering seam.
All of your cuts will always be on the outside perimeter of the floor. Cut ends cannot be joined with another piece.
Once you have completed laying the floor, put down your baseboards, molding, and transitions.
Installing laminate wood flooring is a fairly easy project as long as you take your time and do each step right. It definitely is a good DIY laminate flooring project.
Below I have attached a laminate flooring installation video / installing laminate wood flooring and a video showing a laminate floor cutter.
If you decide to do it, take your time and enjoy it. Good luck.