DIY Mosaic Flower Pot: How to Make a Mosaic Flower Pot — A free craft using discarded or discontinued tiles and broken dishes to dress up an ordinary flower pot.
These instructions are for an outdoor flower pot which involves different types of adhesives, grout, and sealant than an indoor project requires.
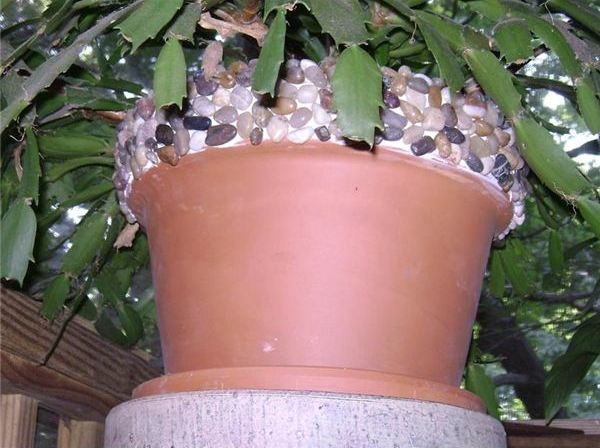
Finished DIY Mosaic Flower Pot (How to Make a Mosaic Flower Pot)
How to Make a Mosaic Flower Pot
Sometimes just transforming your existing flower pots can add a dramatic change to your gardening scheme. Like most people, you’ve probably had your share of broken dishes (sometimes the irreplaceable kind) and leftover tiles from home improvement projects.
Things to Consider Before Starting DIY Mosaic Flower Pot
Some things you may want to consider before embarking on your flower pot transformation are essential. One being, where are you placing this newly adorned project; indoors or outdoors? Next, is using the correct adhesives and sealants for the appropriate location.
As so many projects seen on the internet, some aren’t as descriptive or informative as they should be. Always take into consideration when doing any project for the outdoors that you will almost always need different adhesives, sealants, paints or substrates than you would for an indoor project.
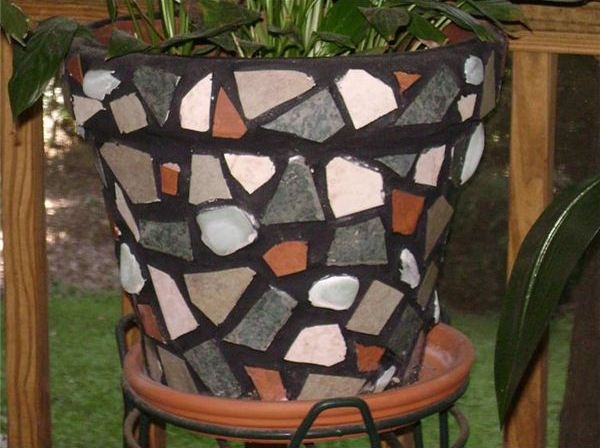
Finished Flower Pot Mosaics (DIY Mosaic Flower Pot)
Materials Needed for an Outdoor Flower Pot
Terracotta pot with a drainage hole
Newspaper to cover workspace
List of embellishments that would work nicely:
Tile, whole or broken
China, whole or broken
Polished pebbles (attainable at the craft store)
Mirrored tiles (also at craft stores)
Glass Tiles
Sea glass, half marbles (floral dept.), etc.
Thinset bonding mortar (found at hardware stores) Purchase the already mixed variety as the dry powder type requires too many specifics to get the recipe correct.
The proper outdoor sealant that provides complete protection rather than stating that it’s water-proof (ask at the hardware store)
Water-resistant grout for outdoor use.
Rubber gloves.
Sponge.
Water.
Tile Nippers.
Applicator for the thin-set mortar (popsicle stick works fine).
*Float for the grout (or use your gloved fingers).
Protective eyewear.
Paper bag for tile nipping.
Tips: As always, follow the instructions for application on the products’ label.
How to Make a Mosaic Flower Pot, How to Proceed
Step 1: Using a clean, terracotta pot, envision a special theme or color scheme you would like to achieve.
Step 2: Marking off a design or pattern to follow on the actual flower pot is a good idea. Finishing a complete pot, especially a large one may take some substantial time, consider just applying your embellishments to the rim of the pot (see the first image).
Step 3: Nipping larger tiles or unbroken china requires a tile nipper or some people like the randomness a hammer can create with unpredictable sized pieces. Whatever you choose, wear your protective eyewear and nip at the tile once you have into position in a paper bag to create a protective barrier from flying shards.
Step 4: Apply to your substrate but don’t space your pieces farther apart than a 1/4 inch or your grout will crack. You can avoid the cracking if you use sanded grout but spacing too widely doesn’t seem to look as attractive. Then you can “butter” your pieces or add a bit of thinset to the surface of the pot using a uniform consistency. You will get a feel for how much to apply. Remember to wipe off any thinset you may get on the surface of the tiles because it will be difficult to remove later.
Step 5: After achieving your completed design, remember that there’s a curing time period for the thinset before grouting (read the label on the thinset container).
Step 6: You may apply the grout with your gloved hands, working in the grout between cracks or use a float they sell at the hardware store that does the job equally well. Wipe off any grout on the surface of the tiles with a damp sponge. Grouting the tile can be a fun process but take special care in following the directions for drying time as it can take as long as 4 days.
Step 7: After curing the grout, use the correct sealant made specifically for outdoors. You may need to apply it several times. Hardware stores and tile stores sell this specifically, so don’t hesitate to ask.
Step 8: After the sealant has completely dried, you may want to test the waterproof quality of your sealant by applying a drop of water to the grout and seeing if it beads up or soaks in. If it beads up, you’re good but if it is the latter, you may want to invest in another coat or a better sealer.
DIY Mosaic Flower Pot Special Considerations
Please use caution as tile, mirrors and other cut materials have sharp edges. Also, use that protective eye gear! Grouts do come in different shades such as the second above image but make sure it is for outdoor use. As always for outdoor DIY mosaic flower pot projects, store your flower pot away indoors before the first frost. Enjoy your new creation on How to make a mosaic flower pot!