DIY Raised Bed Garden — There are many DIY instructions on how to make a raised bed garden, but before construction starts you must decide if it is sitting on the ground, its raised sides containing the soil, or if it to be fitted to legs for easier access.
Once this has been decided, the material to make a DIY raised bed garden should be chosen and purchased, only then can construction commence. Learn about materials, dimensions, cost and how to make a raised bed for the garden.
Raised gardens can be constructed within your main garden from various types of wood, plastic, PVC, and bricks. They can also be supplied as self-assembly units, all components coming in a complete package that slot together very easily, resulting in a professional raised bed garden.
Raised garden beds have been around for many years, forming part of the main garden. Raised beds can be used to grow not only special plants but all the normal flowers, herbs, and vegetables.
The plants can be easily cultivated without all the usual deep digging, kneeling or stooping over a vegetable patch.
The raised bed can be built from many different materials in a variety of sizes and shapes to suit the rest of the garden layout. They can also be purchased in a self-build modular form that is simple and straightforward to assemble.
Here you will learn how to make a raised bed in a garden. We begin with how to select materials required to construct a wooden one and then steps to make one.
This can be in the form of finished wooden boards, rough wood or logs. All wooden beds will require an internal plastic liner to protect the wood from damp soil.
These are boards which have been planed to a smooth finish.
These can be purchased quite cheaply from a local sawmill, or a builders merchant.
I have chosen finished wood as the material of construction as it comes in convenient packs and sizes being easily formed into the required box-shape.
I have always found it cheaper to source and purchase building materials, rather than having the builder supply and construct a component. However, ask the builder for prices for both options, then go for the cheapest, remember to include his cost of painting or staining the wood.
A carpenter/builder would charge around $150 for labor giving a total of materials and labor of $323
However the average DIY person could easily construct a raised bed from wood and I have supplied a few assembly instructions on this in the next section, along with a drawing.
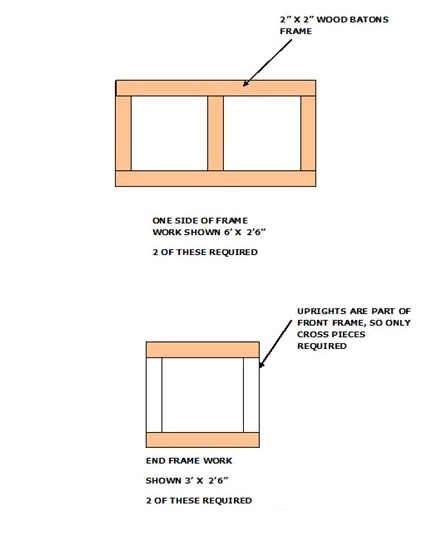
Please refer to the diagrams below for a visual idea about how to make a raised bed garden.
The only wood that needs to be cut is the 2”x 2” battens and 4”x 4” square wood to the following lengths:
Once these are cut, the 2” battens can be formed into a box-frame by nailing together using 3” steel spiraled wood nails which won’t split the wood. Leave the 4” of wood on the side for later use.
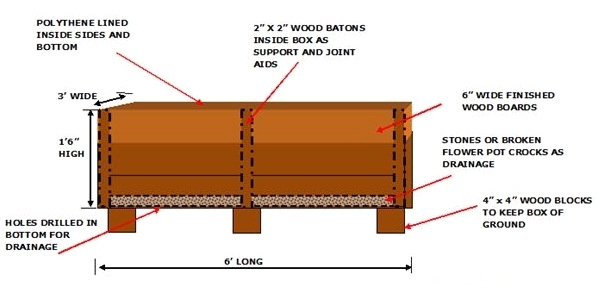
I have used steel panel pins to attach the side boards to the frame, but found brass screws did a much better and longer lasting job. So, affix the wood boards around the 2” x 2” framework, using the wood screws -don’t forget the bottom!
Now, drill holes into the bottom boards to allow water to drain off, eight ½” holes spaced along the length will be sufficient. The 4” x 4” wood lengths can now be fixed to the frame using wood screws driven from the inside through the bottom of the box.
The next job is to stain the wood, inside and out and leave it for a few days to dry thoroughly; I have been using a green stain for a change from the normal brown shades.
The liner can then be placed on the inside of the box and stapled to the sides and the bottom; don’t forget to perforate the polythene over the drain holes in the wood.
Must Read:
For drainage, use old broken bits of crockery flower pots or stones. These are laid along the bottom polythene liner.
Fill with soil. A good general purpose fibrous compost mixed with a little sand is a good base, topped up with well-rotted manure or your own compost, adding bulk and water retention properties to the soil. remembering to water plants well in the beginning.
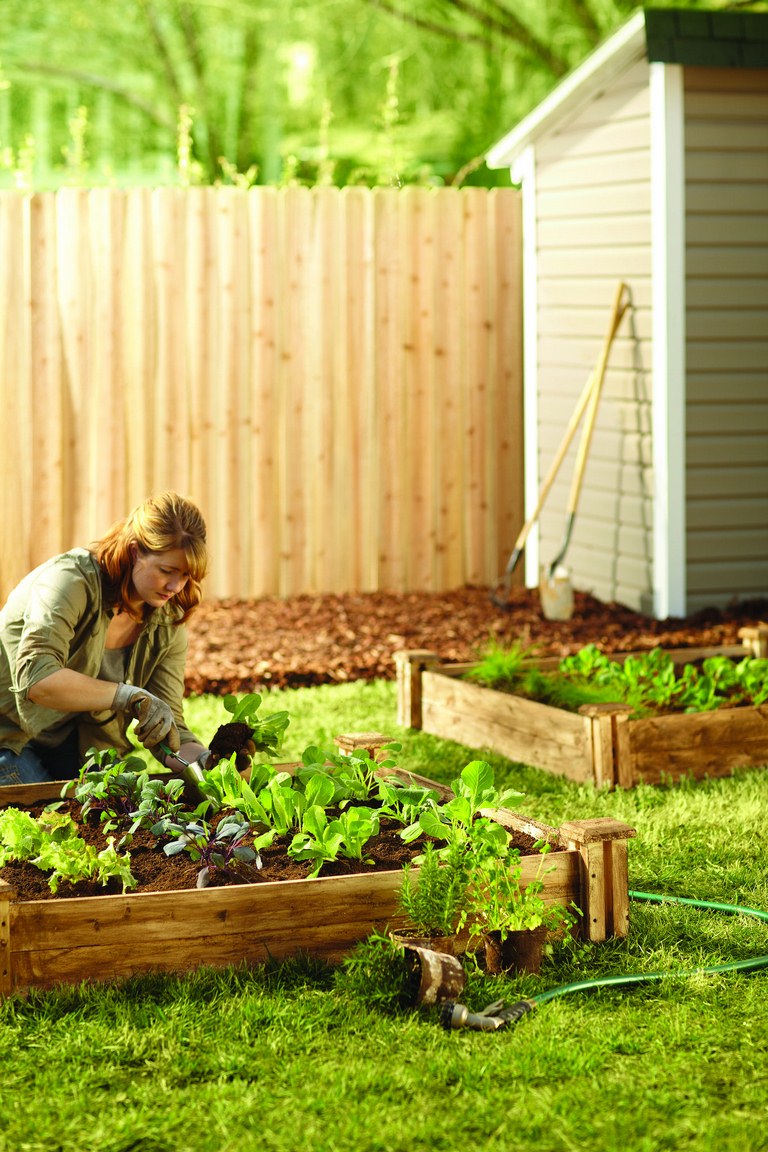
Now start planting! Remember to water plants regularly as the soil in a raised bed garden tends to heat up and, dry out faster than the soil in a conventional garden.
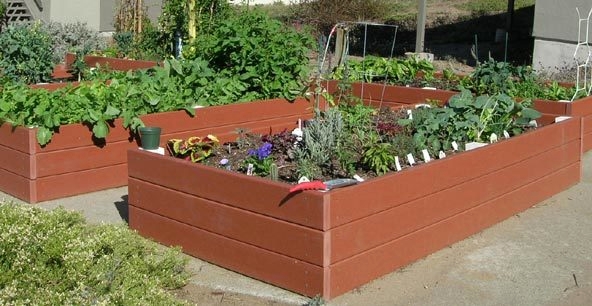
Well, that’s about it, if I am disabled, I like the raised garden beds to sit on the patio or a concreted area, for easy access. However, if you look at some of the pictures in the image section; they show raised beds sitting on top of the garden soil. This is a much easier and cheaper method, but for the disabled, it still requires a fair bit of bending and kneeling to cultivate the plants or using long-handled tools.
The method of making the frame and boards is the same for both types of raised beds except there is no bottom section, drainage stones or 4” wood required for the one sitting on the main garden the soil – good luck and good gardening!
Please feel free to contact me through the comments column for any queries on this type of raised garden bed or garden beds suitable for disabled people.
Here we learned about selecting materials such as wood, PVC or bricks for a raised bed garden. These are selected on factors such their suitability, maintenance requirements, and aesthetic qualities along with their durability properties. The materials can be cut to various lengths.
Once built a raised bed garden can be filled with soil and used to grow all the usual plants that are normally cultivated in the main garden, but without the associated kneeling or stooping, which is ideal for a person with limited physical ability.
Raised Bed Gardening
In this article, we address the need for raised bed gardening as well as how to create one.
- A Raised Bed Garden for a Disabled Person
- How to Make a Raised Bed Garden: DIY Raised Bed Garden