You can create much-needed storage space in your garage. Just follow these directions on how to build garage shelves. Then organize the clutter and who knows, you might even have room for your car.
You’ll soon know how to build shelves to make room in a garage for all the things you need. You can custom build the shelves the right size for all your needs.

De-clutter your garage in one weekend. You can do this by learning how to build garage shelves and store all that “stuff” that just seems to appear magically.
A messy garage is not only irritating, it can be a safety hazard. Are you getting sick and tired of tripping over sports equipment, tools, and assorted other stuff in your garage? If so, check out these easy instructions on how to build garage shelves. Then get busy and start organizing your garage.
Before you rush out and buy lumber, take the time to check out your garage. How much room do you have in it for shelves? You have the garage doors which take up most of the front wall and there’s the door into the house or to the outside. Some garages even have windows in them. That cuts down on your wall space tremendously.
Now bring your car or cars into the garage. Walk around them. How much clearance is there? You don’t want to build shelves that will interfere with getting in and out of the car. Not as much room as you thought? Don’t despair, you can still find space.
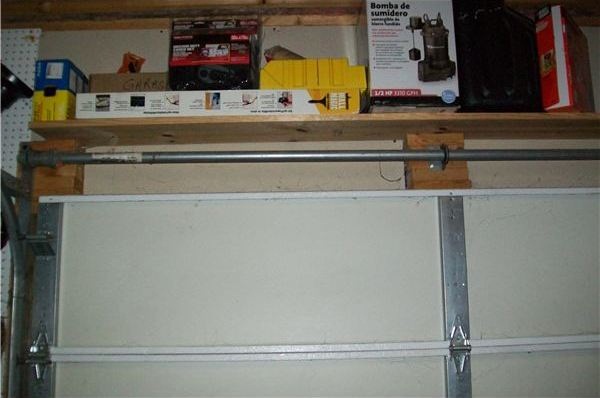
Look at areas toward the back of the garage or even up high. Shelves above the garage door levels are great for storing those seldom-used articles.
Now that you have an idea of where to locate the shelves, you’re ready to start the building process.
Shelves should be strong enough not to give when heavy items are stored on them. The thickness of the lumber you use and the length of the shelf will determine how many support braces you need.
The longer the shelf, the more likely it is to sag, therefore you will need more braces or supports for longer shelves. A common size for shelving is 1″ by 12″ sheeting. You can also buy the 1″ boards in varying widths such as 6″, 8″, and 10″. Even a 6″ wide shelf is very useful in a garage.
You can store quarts of oil, spray paint, and countless other things on these shelves. By purchasing the widths you need, you will have less cutting.
If you plan on building very many shelves, you might want to go with 3/4″ plywood or MDF (medium-density fiberboard). You can buy these in standard 4′ by 8′ sheets and cut them to the sizes you need.
This will be cheaper than using the 1″ by 12″ sheeting; however, it will require more cutting. If you do decide to go with the 4′ by 8′ sheets of plywood or MDF and plan on painting the shelves, paint the entire sheet before cutting. Afterward, you will only have to touch up the edges and any smudges. It will save you a lot of time.
Once you’ve decided on which type of lumber to use, you’re on your way to knowing how to build shelves to make room in a garage for all that stuff. You just need a few other items, such as screws and nails.
Drywall screws are excellent for attaching braces to the studs in the walls. The length of the screws will depend on the thickness of your brace and whether or not there is drywall on the wall. You can also use the screws to attach the shelves to the braces or use #8 finishing nails.
If you are only building one shelf, for example, over a garage door, simply cut braces from the same lumber. To make two braces, cut a square an inch less than the width of the board. Then cut the square into two triangles.
Using the same wood, cut a strip the same length as the short legs of the triangle. It should be one and a half inches wide. This will be the back of the brace. Using the drywall screws, attach the short leg of the triangle to the center of the back brace.
Then attach the brace to the wall at the desired height using at three drywall screws, long enough to go through the back of the brace, the drywall, and into the stud at least a half inch. This will ensure that your brace is strong. You need a brace at least every three feet. Attach the shelf to each brace with at least one screw. This will keep the shelf from moving.
Must Read:
If you want to save time by buying braces or brackets, you can purchase metal L shaped brackets for approximately two dollars each. These simply attach to the studs in the wall with nails or screws. Lay the shelf on top and screw in short screws through the bracket up into the shelf. They come in brown, gray or white, and you can spray paint them.
To build a free-standing shelving unit, build a frame from 2×4’s the length and width and height you want, like a skinny rectangle. Add braces on the back and sides at the level you want your shelves. Frame the top and sides with plywood or MDF.
Cut shelves to fit inside the frame. Attach shelves with at least one screw to keep them from moving. Paint or stain the shelves to finish.
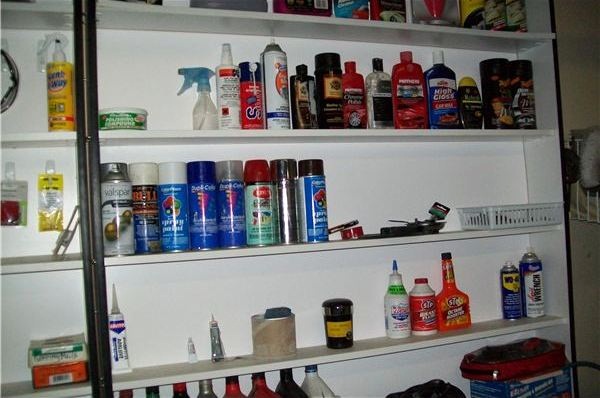
Now get really efficient and start getting rid of stuff you don’t need. Keep items together, such as sports equipment on one shelf and camping equipment on another. Write on the wall behind the shelf what goes there. That makes it easy for everyone to put things away. You’re now qualified on how to build garage shelves to make room and reduce that ever-growing mess.
Following are a few examples of storage shelves that others have built. After you take a look at them, go over to our page on building, and psych up to do it yourself!