Your driveway is not just a functional part of your property; it’s also one of the first things people notice when they arrive at your home.
Over time, driveways can accumulate dirt, oil stains, mold, and mildew, which not only detract from their appearance but can also cause damage if left untreated. Pressure washing is a highly effective method for restoring the cleanliness and curb appeal of your driveway.
In this blog post, we will guide you through the steps of pressure washing your driveway to achieve the best results.
Before you begin pressure washing your driveway, gather all the necessary equipment. You will need a pressure washer, a driveway cleaner or detergent, a nozzle suitable for concrete or hard surfaces, safety goggles, gloves, and protective clothing.
Make sure your pressure washer is in good working condition and that you have a sufficient length of hose to reach the entire driveway.
Clear the driveway of any obstacles such as vehicles, furniture, or debris. Sweep the surface thoroughly to remove loose dirt and debris. Cover any nearby plants or delicate surfaces with plastic sheeting to protect them from the cleaning solution and high-pressure water.
Read Also:
Most driveways benefit from pre-treatment with a specialized driveway cleaner or detergent. These cleaners are formulated to break down tough stains, oil, and grime, making it easier for the pressure washer to remove them.
Follow the manufacturer’s instructions for mixing and applying the cleaner. Use a garden sprayer or a pump sprayer to evenly distribute the solution over the entire surface of the driveway.
Allow the driveway cleaner to sit on the surface for the recommended amount of time. This dwell time allows the cleaner to penetrate and loosen the dirt and stains. Be mindful of any time restrictions specified by the manufacturer, as leaving the cleaner on for too long can cause damage to the driveway.
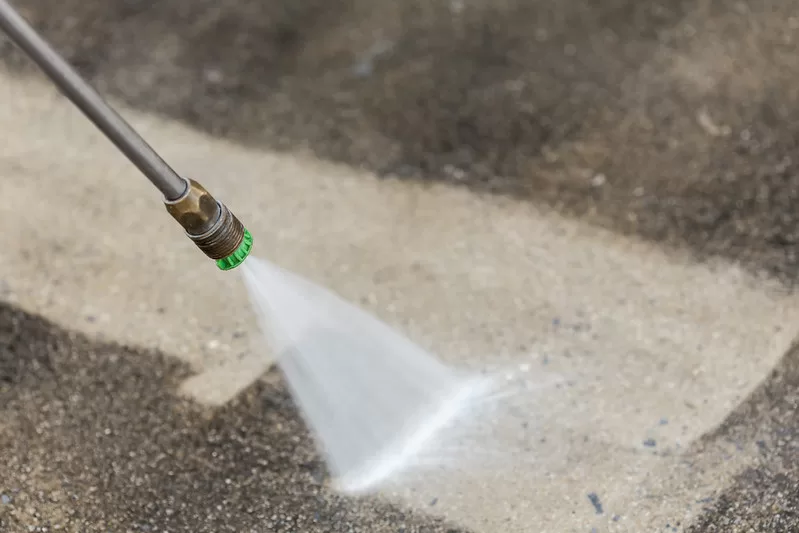
When pressure washing your driveway, you’ll want to use a nozzle specifically designed for concrete or hard surfaces. These nozzles typically have a narrow spray pattern or a rotating turbo nozzle, which provides the necessary power to remove stubborn stains.
Follow the manufacturer’s instructions for attaching the nozzle securely to the pressure washer wand.
Before you begin pressure washing the entire driveway, it’s crucial to adjust the pressure settings and test the water stream. Start with a low-pressure setting and gradually increase until you find the right balance between effectiveness and avoiding damage.
Test the pressure washer on a small inconspicuous area of the driveway to ensure the pressure is not too high, which can cause etching or pitting.
Begin pressure washing your driveway by starting at one end and working your way to the other. Hold the wand at a slight angle and maintain a consistent distance of around 1-2 feet from the surface.
Move the wand in a sweeping motion, overlapping each stroke to ensure even coverage. Avoid focusing the water stream on one spot for too long, as it can damage the concrete.
For stubborn stains, spend additional time and effort to remove them. Adjust the pressure and nozzle distance accordingly to apply more concentrated force to the stained area.
You may need to make multiple passes or use a rotating turbo nozzle for particularly stubborn stains. Be patient and persistent, as some stains may require repeated treatment.
After pressure washing the entire driveway, rinse it thoroughly with clean water. Start at one end and work your way to the other, ensuring all the cleaning solution and debris are washed away.
Pay close attention to any corners, joints, or cracks where dirt and debris tend to accumulate. Proper rinsing is crucial to prevent any residue from drying and leaving streaks on the surface.
Once you have rinsed the driveway, allow it to dry completely before using or walking on it. Drying times can vary depending on weather conditions, but it’s generally recommended to wait at least 24-48 hours. Avoid parking vehicles or placing heavy objects on the driveway until it’s fully dry to prevent any imprints or damage.
To keep your driveway looking its best and maintain its longevity, consider applying a concrete sealer after pressure washing. A concrete sealer helps protect the surface from future stains, oil spills, and UV damage. Follow the manufacturer’s instructions for the application process, ensuring the driveway is clean and dry before applying the sealer.
In conclusion, pressure washing your driveway is an effective way to restore its cleanliness and enhance its curb appeal. By following these steps and using the proper techniques, you can achieve excellent results and prolong the lifespan of your driveway.
Remember to prioritize safety by wearing protective gear and following the manufacturer’s instructions for your pressure washer. Regular maintenance, including periodic pressure washing, will help keep your driveway looking its best for years to come. Enjoy How to Pressure Wash Your Driveway