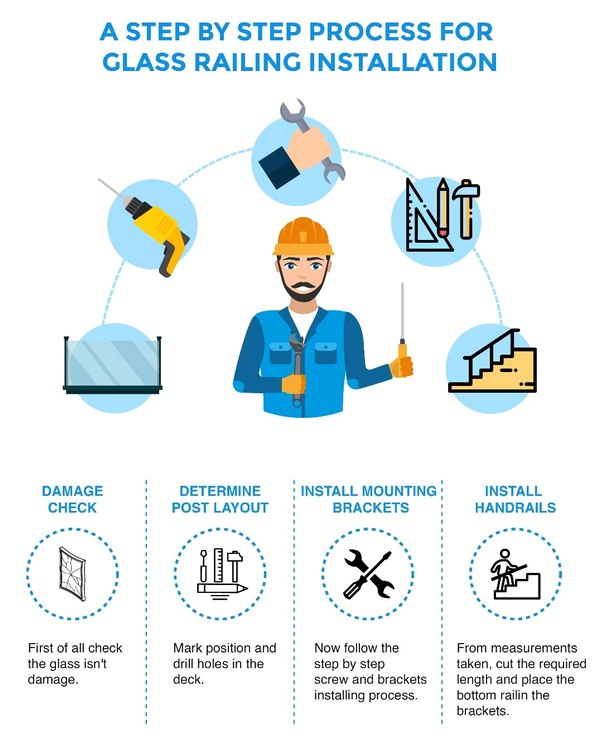
A Step By Step Process of Glass Railing Installation for Your Home
Keeping an eye on your kids while you enjoy a book or listen to your favorite playlist on your deck can be a tough task.
Traditional railing, while being bulky, are also unattractive and obstructive. That aside. I know you’re looking to transform your deck – add some color and style.
The way to go is glass railing as they help enhance your view, transform our surroundings, and gives you peace of mind.
A Step By Step Process of Glass Railing Installation for Your Home
Perhaps you’ve been thinking of changing your wooden and traditional railing to glass for a while. But each time, you are put off by the amount of work required. Whenever you think deck, you’re consumed with thoughts of complicated engineering and carpentry works.
Not true. While changing your railings might require some necessary handyman skills like the use of a hammer, tape rule, lead pencil, and level, you do not need advanced skills.
Although installing your glass deck railing yourself will save you a lot of money and time. If you have no prior knowledge of railing and find handy works hard and complicated, your best bet is to contact a decking professional. But if you’re experienced, your glass railing installation will only take you a few hours.
However, before we get to the installation of your glass railing, it is essential that you clean your deck. Power wash your deck and remove all traces of old stains and sealers. Or you could apply new stain and sealer evenly with a bristled push broom.
So if you’re done putting your deck in order, then let’s get started without further delay on how to install your glass railing. This simple and straightforward guide will walk you through the installation of your glass railing in no time.
You can’t go about installing broken glass on your deck. You will be inviting danger and injuries if you do so. Ensure all the glass components arrive undamaged.
Step 2 – Determine the Post Layout
Mark and draw a line 1 ½” from the edge of all sides of the deck where you want your glass railing to be.
How far do you want your posts to be from one another? Determine that and mark positions on the deck.
For better results, begin installing from one end of the deck. Drill holes in the deck for the post bracket and screw them in.
Fix in the posts without tightening the screws. Tighten lightly to leave some room for flexibility when installing the handrail and bottom rail.
Step 3 – Install the Mounting Brackets
Now, you have to determine how high you want your railing to be. However, the height of the brackets is usually dependent on the track system. Vertically mark the locations for mounting brackets for the handrail and bottom rail on the wall.
Next, you measure 3 5/8″ on the edge of the deck and draw a vertical line at 37″ or 43″. You must take note of using a level to ensure a perfect job.
From the line above, mark 2 7/8″ from the floor to meet the lower bracket and 42 1/8″ to locate the upper bracket.
Carefully align the bottom railing with the drawn line and screw it to the wall.
The locations for the vertical mounting brackets for the handrail and bottom rail should be marked at the point.
Remove the post caps you fixed earlier and mark a 1 1/8″ from the top of the post. Depending on the height of the handrail, mark 32 ½” or 38 ½” from the top of the post.
Using a level to ensure everything is straight; connect the top of the brackets with the marks you’ve made and screw.
Step 4 – Install Handrails and Bottom Rails
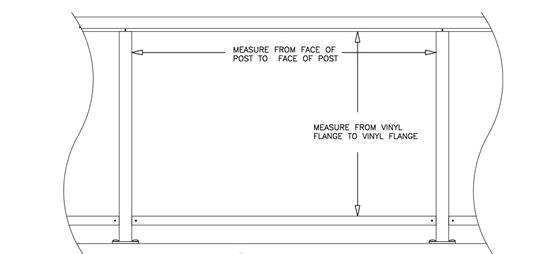
From the insides of the mounting brackets, measure the distance from post to post for the bottom rail. And ensure you use the same sectional length for the handrail and bottom rail for uniformity.
From the measurements taken, cut the required length and place the bottom rail in the brackets.
To prevent water from accumulating in the rails, drill holes in it every 4″. Next, at 36″ apart, install support brackets under the rail.
In the brackets installed, insert the handrails. Ensure you level the posts, then proceed to screw it in.
After screwing in the handrails and bottom rails, do the same for all other sections of the deck.
Step 5 – Glass Dimensions
If you have purchased the glass panels, then fantastic. And if you’re yet to plan to buy them yourself, then pay close attention here.
Vertically take dimensions and add 3/4″ to ensure a proper balance of the glass. Take horizontal dimensions and subtract 3″ thereby giving a gap of 1 1/2″ on each side of the glass panel.
Finally, inform the glass manufacturer to polish the two sides of each glass as they will be exposed to avoid damaging and scratching.
Step 6 – Insert the Glass Panels
Your glass railing installation will require some lubrication to prevent the glass from damaging. Likely lubricants that you can use are soapy water and glass cleaner. Apply the lubricant to both sides of the glass.
To insert the glass panels, remove the U-channels from the handrails and bottom rails.
Next, you insert the plastic moldings in the rails and center them between the posts. And place rubber blocks at every 12″ and also, at each end of the bottom rail.
It is now time for the glass. Carefully center the glass panel while sliding it in the handrail and resting on the bottom rail.
Proceed the same way for all other sections.
Step 7 – Secure All Posts
After placing our glass panels, handrails, and bottom rails ensure they are all level. A haphazard job where all the sections are at different levels is not pretty.
When you’re checked, and sure everything is level, tighten the screws.