Easy to Build DIY Deck Storage Bench with Plans — Need some storage and sitting space on your deck? Try this very easy to build DIY deck storage bench. You can put this together in less than four hours and be adding stain and sealer for a deck storage bench that will store your chair cushions and other deck accessories.
Having a place to store your chair cushions and other deck accessories you don’t want to blow around or getting wet is convenient and practical. Who wants one of those ugly plastic boxes that pretend to look natural, but just look like plastic?
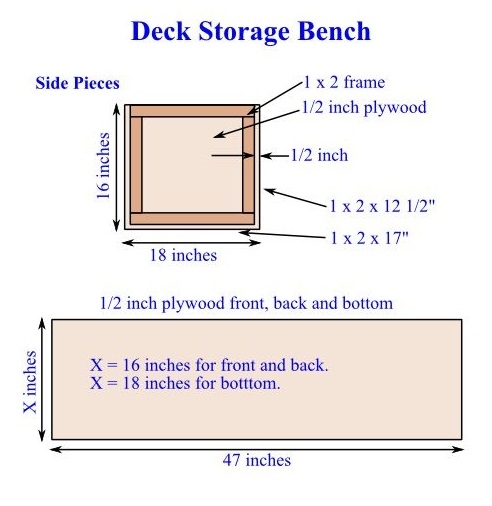
This DIY deck storage bench provides a dry place for your cushions and makes up for its footprint by adding a comfortable bench to sit on. The interior is made from 1/2-inch plywood while the exterior is T1-11 sheet siding. The top is made from a single piece of 3/4-inch plywood. This attractive deck accessory will look good on any deck.
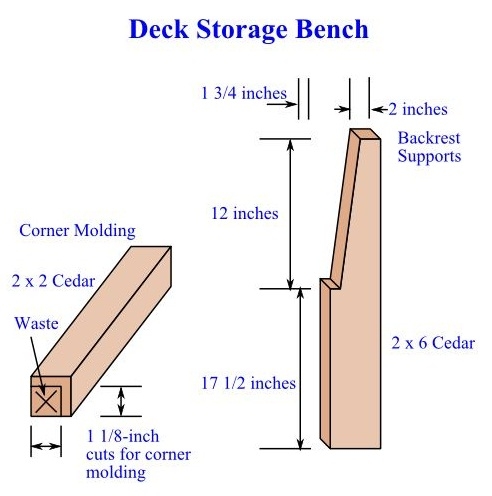
Cut the plywood sides, front, back, and bottom from a single 4-by-8 foot piece of 1/2-inch exterior grade plywood. The frame is made from 1-by-2 clear pine or popular and fastens to the sides, front and back with 1-inch galvanized wood screws. The 3/4-inch exterior grade plywood top fastens to the bench in the back with three galvanized steel hinges. Cut the three backrest supports according to the drawing with a jigsaw or band saw. Cut the corner trim on a table saw from 2-by-2 cedar.
Drill countersunk pilot holes for all screws. Mark the sides for placing frame rails and stiles. The top rail sits flush with the top edge of the side, but the two vertical stiles and bottom rail are 1/2 inch from the edges. Screw the side frame pieces into place.
It is easier to screw the front and back to the sides first, then add the frame pieces after they are attached. Space the feet evenly across the bottom piece and screw them together. Place a 1/4-inch bead of exterior latex caulk around the perimeter of the bottom piece and screw it to the bottom of the bench.
Measure and cut T1-11 grooved cedar sheet siding for the front, back and sides. Place a bead of latex caulk around the perimeter of the pieces and screw them to the outside of the bench with 1-inch screws for cedar lumber. The T1-11 pieces should go slightly lower than the bottom edges of the plywood.
Measure and cut the plywood top to fit exactly over the top of the bench. Trim the edges of the top with 1-by-2 cedar strips nailed to the 3/4-inch edge of the plywood so they overhang the bench sides. Fasten another strip of 1-by-2 cedar to the back of the box for the hinges. With the cover in place, apply a bead of caulk to the corners and trim them outside corner molding.
Attach each backrest support to the stiles on the back with 3-inch deck screws. Be sure to drill pilot holes with countersinks. Attach two 1-by-4 boards with screws to the backrest supports.
Finish your DIY deck storage bench plans with quality clear water sealer and don’t forget to apply several coats to the bottom edges of the T1-11. Place cushions on the top and against the backrest, pour yourself a cool drink and enjoy.