When we moved into our home, we knew we were going to be doing renovations; however, our budget didn’t match our dreams. We decided to do as much work ourselves.
We could not afford to pay a contractor for a full remodel, so we decided to do all of the demos ourselves. This would immediately knock about $1,000 off the cost of our bathroom remodel. Could we do it?
Demoing a bathroom is a great DIY job that’s accessible to most homeowners. You don’t need any specialized skills to do it. All it takes is some good old hard work.
Your first step in bathroom demolition is to line up a roll-off dumpster rental. The debris from a bathroom demo will potentially contain broken tile, mirror glass, cabinet debris, and tub/shower enclosure pieces.
This is difficult to dispose of in your regular trash collection.
Roll-off dumpsters come in a range of sizes, but most bathrooms only need a small 10 or 20-yard dumpster to handle the debris from a bathroom remodel.
The convenience of having a rental dumpster at your home for easy tossing can’t be beaten.
Read Also:
On to your bathroom demo! Take off the bathroom door to give yourself more room to work. Remove all vent covers and tape some plastic sheeting over the openings.
You will then need to clear out the cabinets and drawers. Takedown anything on the walls including the toilet paper holder, towel racks, pictures, and wall storage.
If your mirror is simply part of a wall medicine cabinet, then it can be unscrewed and easily removed. A large wall mirror may need some extra work to remove. If it is glued to the wall, you’ll want to carefully remove it. Separate the mirror from the wall by running a thin scraper along and under the top edge.
Once it begins to separate from the wall, you can use a thin pry bar to gently pull it away from the wall. Use very gentle pressure and a lot of patience to continue to loosen and remove it.
If the mirror does break, take care when disposing of the pieces. Place them in a heavy contractor bag and then immediately throw them into your dumpster.
At this point in the demo process, you should turn off the power and water to the bathroom. Remove lighting fixtures and cap the wires with wire nuts. This will reduce any chance of getting shocked.
Your bathroom is now prepped for demolition. And keep in mind that you need to work safely. Make sure that you put on safety glasses and a dust mask when demoing your bathroom.
Work gloves will help protect your hands from potential cuts and bruises. If you are removing tile, knee pads make the task more comfortable.
Remove the baseboards and door trim along the wall. Cut through any caulk or paint on the edges of the baseboard. Insert a flat chisel into the gap between the wall and the baseboard to pry it away from the wall. If you want to reuse them, take care when pulling them away from the wall and store them in a safe place.
Turn the water valves to the off position and disconnect the water supply lines. Loosen the nut on the p-trap and disconnect the drain pipes.
Pull down any backsplash material. Unscrew the vanity from the back wall. You can then easily pull the vanity-free from the wall.
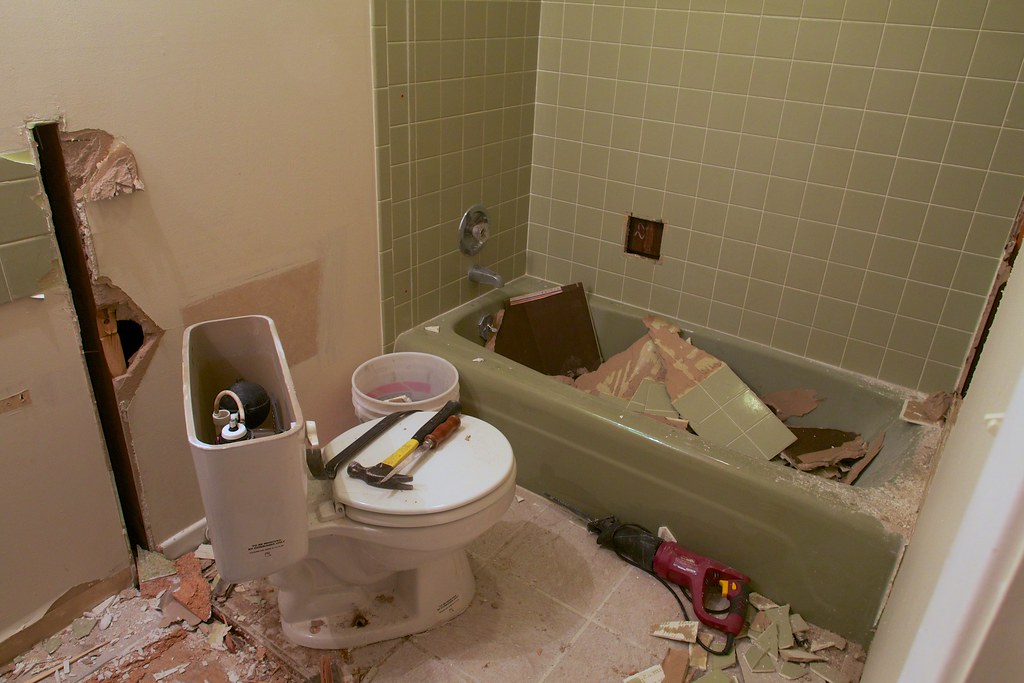
Turn off the water supply valve on the toilet and disconnect the water supply line. Drain the water from the faucets and toilet by flushing several times to remove as much water as possible.
Then, remove the toilet tank. Unscrew the bolts on the bottom and lift the toilet up and out. Scrape off any remnants of the sealing ring from the floor. Plug the hole with a rag or cover with cardboard to keep gases from escaping into the room.
Use a chisel to chip grout out from between floor tiles. Once some of the grout is cleared away, insert a crowbar in the gap and use a mallet to begin breaking the tile up. As the tile comes up, break up the cement or underlayment board and pull it away.
Keep a bucket handy to put the debris into. When a bucket gets full, transfer the tile debris to a heavy-duty contractor bag for easy removal from your home. Use a shop vac to get up any remaining dust and small debris.
Remove the tub or shower fixtures including the faucet, showerhead, overflow valve, and drain. Cap off the water lines.
If your tub or shower is tiled, you will remove it in the same manner as floor tile. You can cut through a fiberglass or acrylic all-in-one shower/tub enclosure using a reciprocating saw.
Use a shop vac to collect dust as you go. If you have a helper, have them vacuum the dirt and small debris as you work. Cut the tub enclosure into manageable pieces for easy removal.
Keep your cuts shallow and pull away the material to be able to see behind the enclosure. Check to make sure you are not at risk of cutting into any electrical or water lines in the wall.
Once your demo is complete, you can turn the electricity and water to the bathroom back on. You are now ready for a final clean-up. Shop-vac up any remaining dust and small debris. Toss everything into your rental dumpster to go to the landfill.
Your bathroom is now ready for the installation of new fixtures. And you’ll get to enjoy the satisfaction of a job well done and the extra money in your budget for your new and improved bathroom.